Tomato Bed Wisdom from a Master Gardener

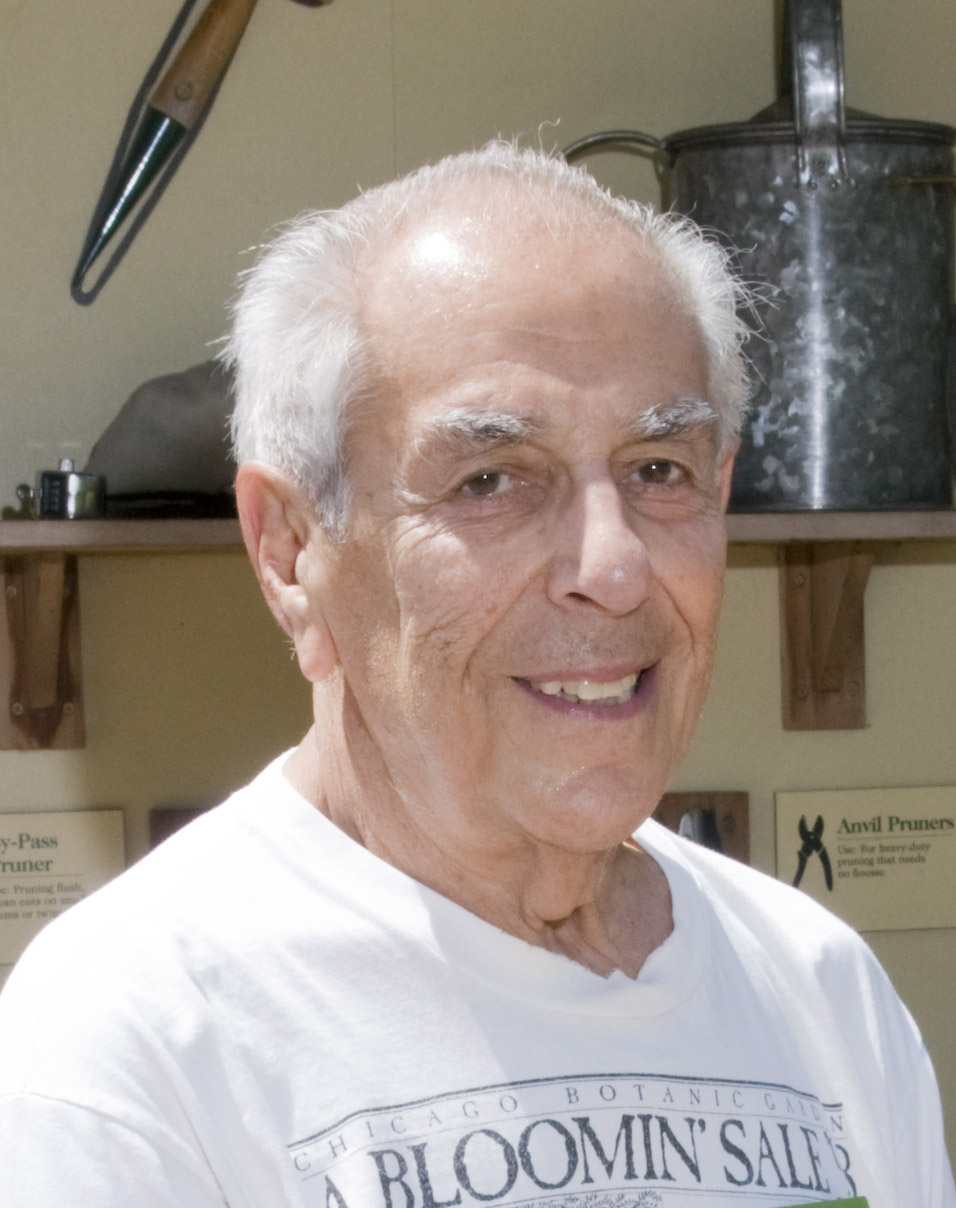
Our volunteers are awesome. We recently sat down with 16-year volunteer (and 2008 Volunteer of the Year) Sam Darin, pictured above, is famous for both his tool-sharpening skills (stop by for summer tool talk in the Fruit & Vegetable Garden on Thursdays, May through October) and his tomato-growing expertise.

tomato cages009
Three heirloom tomato beds held 19 different varieties in the Fruit & Vegetable Garden this year. With harvest complete, the beds await their leaf mulch “blanket” for the winter.

We asked a timely question:  How does a Master Gardener (Sam was Illinois’ Master Gardener of the Year in 2010) put a vegetable garden to bed for the winter? His approach is so straightforward that even first-year gardeners can follow his lead:

1. After removing spent vegetables plants, pick up all leaves and fruit from the beds, clearing them of debris that might harbor diseases or pests.

2. AFTER the first hard frost, add a 4-6” layer of chopped leaf mulch to cover the beds for the winter. (Rake dry fall leaves and store them in a garbage can; use a mower or weed whacker to chop them.)

Mortgage Lifter
One of Sam Darin’s favorite tomato varieties, ‘Mortgage Lifter’ can weigh in at over a pound apiece.

3. Beyond the bed, continue to water shrubs and trees until frost. Late fall is usually quite dry, so it’s helpful to give larger plants a good drink before winter sets in.

As Sam says, “That’s about it.” Thanks, Sam, and see you at the Garden next spring!

Tips from the October Photo Walk

PHOTO: Fall cabbageFall is a great time of year to challenge yourself to compose images that include complementary color relationships. Wet surfaces make colors more vibrant. Stone and masonry take on rich tones and show more color variation than when they are dry. This photo by volunteer Bill Bishoff was taken during a light rain. Notice how the bricks appear with a vibrant rosy surface that otherwise would appear pale.

This image also takes advantage of complementary colors to make the subject pop. Complementary colors appear opposite one another on the color wheel— blue/orange, red/green, and purple/yellow. Together, complementary colors appear brighter. In this image, Bill includes two complementary pairs—purple/yellow and red/green.

PHOTO: Photographer Bill Bishoff, keeping his camera dry.It is important to make sure you and your equipment are protected from the rain. You don’t need anything more complicated than a plastic bag and a handkerchief. Poke a hole in one end of the plastic bag for your lens, and peek in the other side when you are ready to take a picture. The handkerchief helps to dry off any raindrops that fall on your lens. If you use a UV filter on the end of your lens, you can safely wipe it dry it without worry of scratching the lens. If any damage occurs, you need only replace the filter, not the lens. 

Keeping yourself dry is also a good idea. If you are caught without an umbrella, there are plenty of dry vantage points around the Garden. You could appreciate the vistas from the comfort of McGinley Pavilion, or enjoy the solitude of McDonald Woods from the woods shelter.

During fall, sunny days can become scarce, but an overcast or rainy day can also be a great photo opportunity.

Join us on the first Saturday of every month for a photo walk in the Garden. We’ll cover a different subject each month and take some photos together.


Warbler Spotted in McDonald Woods

I love Warblers! They are amazing and beautiful little birds. They migrate thousands of miles each year. A few of these jewels breed in the Chicago area, but most only pass through for just a few weeks each spring and fall on their way to breeding grounds. I marvel at their journey. They fly when the winds are favorable, and look for green spaces to spend the day fueling up on insects before heading out again for the next leg of their journey. I can only imagine how good the Chicago Botanic Garden must look to these tired birds as they approach the city. It’s a green oasis with trees, prairies and water.

My choices of possible warbler locations in the Garden are many. Mary Mix McDonald Woods, near the entrance, is a likely place to spot many birds so I head there first. As I approach, I’m greeted by a lovely female cardinal – a nice start to my walk. I slow my pace. Many birds can be found along the edges of the woods, and I don’t want to scare them off. I walk in a few feet and I hear the chirps of white-throated sparrows, another migrating bird. After a few minutes I see the flittering of small birds. Yes, here are my beloved warblers. They are first-year yellow-rumped warblers, hopping from tree to tree picking off bugs. One poses just long enough for me to focus and fire off a few shots. Another migrating bird makes a brief appearance, the Brown Creeper, scooting quickly up one tree and then another. I hear a call from the top of the trees. I focus my camera lens on the sound to find a yellow-bellied sapsucker. So many birds, and I have yet to make it off the first bridge! – All this in less than half an hour! I am anxious to see what else is around, so I start walking the paths. The rest of the woods are surprisingly quiet. I remind myself that when the birds are “hopping,” THAT is the place to be. It is not “better” someplace else. It’s good lesson in life as well. The grass is not greener on the other side!

I hope to see more warblers before the fall is over. There will be birds moving through for weeks to come. A good time to check for warblers is after a night of winds from the north. The birds will fly with the wind and will drop down onto the Garden in the morning. The woods, prairie, and top of the waterfall garden are all great places to check for new arrivals.

Warblers move so fast and are often hidden behind leaves and branches. It is a real treat for me when I get a good shot of these tiny birds. I probably toss 2/3 of all the shots I take. The best advice I can give to you is to get out often and to practice as much as you can. It WILL be worth it!

Photo shot with a Nikon D300s camera, Nikon 80-400mm lens, hand-held, 1/500, f7.1, ISO 800.
©2012 Carol Freeman

Enchanted Kale Forest

PHOTO: a variety of kale plants are growing in the raised beds of the Children's Growing Garden.

We’re all adjusting to the recent drop in temperature, but some plants actually thrive in cooler weather. Check out the redbor kale in the Grunsfeld Children’s Growing Garden. Forget bonsai, these kale varieties look like a miniature forest. Notice the branching leaf shapes are very similar to the trees in the background.

If you look at the kale from just the right angle, it appears to be part of woods that surround the garden.

PHOTO: The branching pattern of the kale leaves resemble miniature trees.See what I mean?

Kale is a member of a plant group called Brassica, which also includes broccoli, cauliflower, cabbage, and mustard. These plants grow well in the cooler months, and so they make excellent spring and fall crops. Since they come in a rich range of colors (dark greens to dusty teals to deep purples), and have an attractive variety of leaves (from smooth to lacy to ruffled), they are a favorite for fall garden displays.

Come to the Garden this month and take your picture near our enchanted kale forest!

Visit chicagobotanic.org/learningcampus/growinggarden for more information on the Grunsfeld Children’s Growing Garden.

An Autumn Surprise

colchicum
Crocus in autumn? No, it’s colchicum, a fall-flowering corm that holds quite a few surprises.

Every garden should hold a few surprises.

In fall, the Landscape Gardens deliver a good one: bright lavender patches of Colchicum, commonly known as autumn crocus or, less commonly, meadow saffron. Popping up suddenly through the groundcover, the flowers can stop visitors—and bloggers—in their tracks. With the current streak of balmy weather, the colchicum seem to be lasting even longer this year, begging a deeper look into the surprises that this bulb (actually a corm) holds up its leaves.

Surprise #1: It’s not a crocus.

Short, goblet-shaped flowers and spring-like color cause the confusion between colchicum and crocus, but there’s an easy way to tell them apart: count the long stamens in the center of the flower. Six stamens? It’s a colchicum. Only three? It’s a crocus. Colchicum’s flowers are much larger, too, and its leaves are long and strappy, rather than short and grassy.

Surprise #2: Spring leaves, fall flowers.

Expectations run high in spring, as colchicum’s wide leaves emerge, flowerless, to do their work, pulling sunlight’s energy into the corm underground. Then the leaves retreat for the summer. Time passes…and then the surprise comes, as clumps of flowers, leafless, emerge from the same spot in fall, a pleasing reminder that gardening is powered by patience.

Surprise #3: It’s not the source of saffron.

Although colchicum’s common name is “meadow saffron,” it doesn’t produce the flavorful red stamens of kitchen/culinary fame—that distinction belongs to Crocus sativus, a true crocus that also blooms in fall (along with its leaves—you can see why it gets so confusing). Unlike that crocus, colchicum has less showy stamens that cannot be eaten because…

Surprise #4: It’s poisonous.

The whole plant is: flowers, leaves, stamens, everything. Site it accordingly in your yard.

This weekend, three beautiful colchicum varieties will be sold at the Fall Bulb Festival—‘Lilac Wonder,’ which you can see in the Home Landscape Garden now; ‘Waterlily,’ a well-named, ruffled variety; and ‘Album,’ the classic white colchicum. Like most bulbs, colchicum corms are planted in late fall so they can settle in before next year’s bloom.

In the meantime, we wonder: what surprises does your garden hold?