Darwin’s Orchid and the Wardian Case

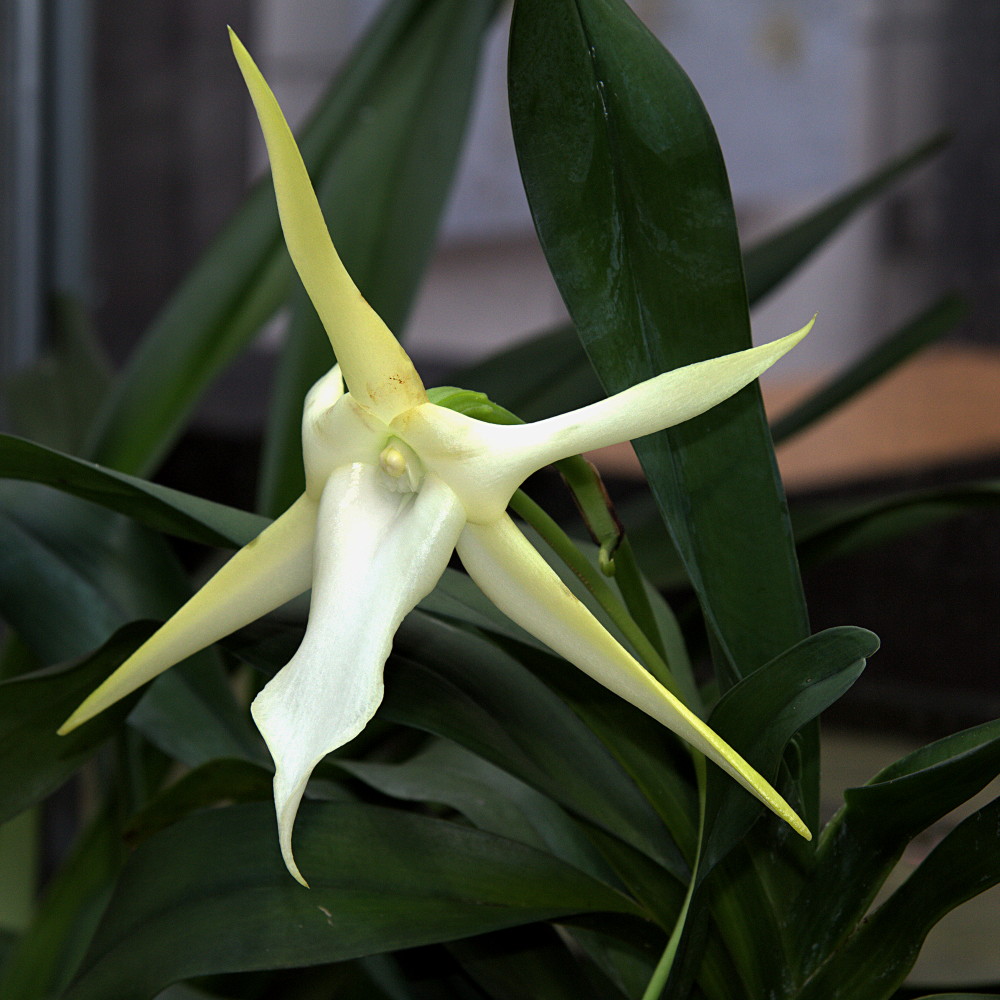
There’s something very special about this orchid. Can you tell what it is?

PHOTO: Closeup of Angraecum sesquipedale bloom.
A native of Madagascar, Angraecum sesquipedale is an epiphyte that prefers the drier branches and trunks of trees as a host.


The nectar of this orchid resides almost entirely at the tip of the orchid's spur.
The nectar of this orchid resides almost entirely at the tip of the orchid’s spur.

If you guessed that it was the long tubular structure coming from the back of the flower, you are right! That spur contains energy-packed nectar and is the reason this plant has a place in history.

Discovery

Angraecum sesquipedale was first described in 1822 by French botanist Louis-Marie Aubert du Petit-Thouars and would be shrouded in mystery for decades after. It arrived in the United Kingdom 33 years later.

ILLUSTRATION: an illustrated plate of Angraecum sesquipedale from 1822.
An illustration of Angraecum sesquipedale from Histoire particulière des plantes orchidées recueillies sur les trois îles australes D’Afrique de France, de Bourbon et de Madagascar (1822) .

At the time  this orchid was discovered, transporting plants from one continent to another was extremely difficult and often unreasonable. The long sea journey, combined with polluted conditions in industrialized cities, made it difficult to collect and maintain specimen plants. This would all soon change.

It was in 1829 that Nathaniel Bagshaw Ward discovered the mechanism that revolutionized horticulture and botany forever. 

The Wardian Case

Nathaniel Bagshaw Ward was an English doctor who spent most of his life in eighteenth-century London. In his youth, he perused the writings of Linnaeus and spent some time in Jamaica, which fostered his love of entomology and botany. As an adult, Ward was inspired to create a wall of ferns and mosses in his own yard, but failed due to the polluted air of East London. He was distraught.

In the summer of 1829, Ward took a glass jar and placed a hawkmoth chrysalis inside, atop a bed of moist leaf mold. Ward regularly checked on the progress of the moth, finding that before it hatched, grasses and a fern emerged from the leaf mold. Ward observed that the glass jar retained moisture because as it warmed up, water evaporated, condensed on the glass, and returned to the base of the jar, never escaping. With this success he repeated his experiment and, to his delight, found that he could keep plants growing within the chamber for years. His discovery brought about the invention of the Wardian case, the predecessor to the modern terrarium. He wrote extensively about this in his book, On the Growth of Plants in Closely Glazed Cases. Soon the Wardian case became a popular feature of the parlor in Victorian society. These parlor versions, both tabletop and freestanding forms, often held one or more plants and could be rather ornate.

PHOTO: A large Wardian case, made of steel and glass—an individual greenhouse for an orchid.
One of four Wardian cases appearing in our Orchid Show this year. Wardian cases like this one could be found in parlors of wealthy Victorians.

In 1843, the Wardian case was used for the first time to bring plants from China by sea. The director of the Royal Botanic Gardens, Kew, observed that in 15 years, the Wardian case brought six times as many plants as had been imported in the last century. If you do the math, that means it made importing plants almost 40 times as efficient as regular ocean travel! This was of particular use to collectors like James Bateman, a wealthy landowner who sponsored several plant exploration trips through the Royal Horticultural Society. One such trip would bring several rare Angraecum sesquipedale from Madagascar to England, and in 1862, this plant would find its way to one of the prominent figures in history.

Charles Darwin

By 1862, Charles Darwin had already become a prominent figure internationally. Having published On the Origin of Species three years earlier, Darwin was already the subject of scrutiny by religious groups and scientists who disagreed with his theories on evolution and natural selection. In this same year that he received a number of orchids from Bateman, Darwin published his book The Various Contrivances by Which Orchids are Fertilised by Insects, which proposed that Angraecum sesquipedale must be pollinated by a “huge moth with a wonderfully long proboscis” (or straw-like tongue). He proposed that it might be a Sphingidae moth since these are typically large. No such moth was known to exist on Madagascar.

Though largely overlooked by the public, his proposal became a subject of controversy, particularly in the religious community. Critics attributed any existence of such a creature to be by divine will and not natural selection; most mocked the possibility of such a moth existing. Others viewed his prediction with skepticism since only smaller moths had been discovered in Madagascar.

PHOTO: Morgan's sphinx moth, with its 30-centimeter tongue unrolled to show its length.
Morgan’s Sphinx moth, the predicted pollinator. Photo by Esculapio (Own work) [GFDL or CC-BY-SA-3.0], via Wikimedia Commons

In 1903, 21 years following Darwin’s death, a subspecies of moth known as Xanthopan morgani praedicta, Morgan’s Sphinx moth, was found in Madagascar. This moth has a wingspan of 5 to 6 inches and a proboscis of 10 to 12 inches long. The subspecies name, praedicta, was intended as an homage to Darwin’s prediction that such an insect existed.

Angraecum sesquipedale, frequently referred to as Darwin’s Orchid, is currently being displayed in the Greenhouse Gallery of the Orchid Show (purchase tickets here) this year.

©2014 Chicago Botanic Garden and my.chicagobotanic.org

How to Make Mushroom Spore Prints

Mushrooms reproduce by making billions of spores that spread and grow into new organisms. You can take advantage of this phenomenon to make a beautiful print on paper.  

How to Make Spore Prints

All you need are some fresh, open mushrooms, paper, and a bowl. You can use mushrooms found growing outside or buy them from the market. When selecting mushrooms for spore prints, look for these things:

  • The cap should be fully open with the gills exposed
  • The gills should look good, not wet and mushy
  • The mushroom should feel slightly moist but not wet; dry mushrooms will not work
  • There shoud not be mold spots on the mushroom
  • They should look like mushrooms you want to eat
PHOTO: Underside of a portabella mushroom.
This portabello mushroom is good for making spore prints.
PHOTO: Shiitake mushroom.
This shiitake mushroom may be a little old—notice the brown spots on the cap’s edges—but should work.

First, you should remove the stems. I use scissors so I don’t pull up or damage any of the gills.

Place the mushrooms with the gill side down on a piece of paper. Mushrooms with dark gills, like portabellos, have dark spores that show up well on white paper. Shiitake mushrooms have white gills and spores that will show up better on black paper. Some mushrooms make both dark and light spore prints.

PHOTO: Mushrooms, gills down, sitting on black construction paper.
These four shiitake mushrooms were placed on black paper. They will be covered with a bowl and then left overnight.

Place the paper on a tray or other surface that can handle something wet sitting on it because moisture from the mushrooms will soak into the paper and anything underneath it. Cover the mushrooms with a bowl to prevent them from drying out. Really ripe mushrooms will make a print in an hour, but I suggest that you leave them overnight to be sure you get results.

In the morning, carefully lift your bowl and the individual mushrooms and see what you get. If the paper absorbed a lot of moisture from the mushrooms, it may need to dry before you see the print very well—especially prints made on black paper. Portabello prints often show well-defined gills. Shiitake gills are not as straight and rigid as portabello gills, so you’ll get less gill definition in the print and a more wavy, swirling print. If your mushrooms are too wet, or are starting to rot, you’ll get more of a watercolor effect instead of a sharp print.

PHOTO: Mushroom spore print.
If all goes well, billions of spores will fall from the mushroom and produce a pattern that resembles the gills on the underside of the cap, like this portabello mushroom print.
PHOTO: Mushroom spore print.
Four shiitake mushrooms leave ghostly impressions on black paper. The swirled edges were made by the uneven surfaces of the mushroom caps.
PHOTO: Mushroom spore print.
The fine lines on this print look like they might have been drawn by an extremely sharp pencil, but the spores that compose the image are much smaller than the tip of a pencil.

A Little More about Mushroom Spores

Garden scientist Louise Egerton-Warburton recently told me, “Plants are cool, but fungus rules.” As a mycologist, fungus is her passion. Now, we aren’t really interested in competition or ranking organisms by levels of interest or importance because every living thing needs the others to survive. But the fact remains that we tend to forget about smaller things, especially those that tend to be hidden from view, so let’s take some time to meditate on mushrooms.

PHOTO: Stinkhorn fungus.
This stinkhorn fungus, Mutinus elegans, is growing out of the ground, but that is where its resemblance to green plants ends. It’s named for its obnoxious odor, which attracts flies that help distribute its spores.

Scientists used to think of mushrooms and other fungi as special kinds of plants. The problem is that, unlike plants, fungi do not get energy from photosynthesis. They are composed of different kinds of cells, they complete a different life cycle, and let’s face it: they don’t really even look like plants. So fungi are now grouped in their own kingdom of organisms, and nobody expects them to be anything like plants.

There are many different kinds of fungus, so for simplicity, let’s just think about the familiar mushroom with its stem and cap. This structure is actually the reproductive part of the organism, in the same way fruit is a reproductive structure in plants. (But we are not comparing plants and fungus!) Beneath the soil where you find mushrooms growing, there is a network of branching thread-like structures, called “hyphae,” which grow through the dead plant and animal matter in the soil and absorb nutrients. This is the main “body” of the fungus. As the fungus digests organic matter, it decomposes, making it useful for plants.

PHOTO: Laetiporus sulphureus fungus, or "Chicken of the Woods".
This “chicken of the woods” fungus, Laetiporus sulphureus, doesn’t look like a mushroom, but it also produces spores.
PHOTO: Mushrooms decomposing bark on the forest floor.
The fungus that produces these mushrooms is decomposing leaves and sticks that have fallen to the forest floor.

Back above ground, when conditions are favorable, a mushroom grows up from the hyphae. It matures and releases spores, which are like seeds. (It’s really hard to get away from comparing fungus with plants!) Spores are structurally different from seeds, even though they function to spread the organism in a similar way. Spores are microscopic and are so small that mycologists measure them in microns. A micron is one millionth of a meter.

PHOTO: A ruler measures the tip of a pencil lead.
How many spores could fit on the tip of a sharp pencil? A lot! No wonder the spore print is so fine and delicate!

Look at a metric ruler. See the smallest lines that mark millimeters? Imagine dividing a millimeter into one thousand equal parts. Fungus spores measure 3 to 12 microns. It hurts my eyes trying to imagine a spore sitting on my ruler. We can only see them when there is a mass of them on a spore print. Mycologists use a micron ruler built into their microscopes to measure the individual spores.

Tiny but essential: Fungus rules.

©2014 Chicago Botanic Garden and my.chicagobotanic.org

Five Seed-Starting Secrets

Anticipation is running high for Seed Swap!

PHOTO: A dried sunflower head.
Panache sunflower (Helianthus annuus ‘Panache’) shown in its native seed packet.

It’s always a fun day with a community vibe, as Chicago area gardeners gather to swap seeds, stories, and green-thumb tips. A special bonus of 2014: keynote speaker Ken Greene (founder of the terrific Hudson Valley Seed Library) will be available during the swap to answer questions and offer “sage” seed-starting advice.

With that in mind, here are five simple secrets for seed-starting success:

1. Quality seed starter. Give your seeds a healthy jump start by planting them in a really good seed starting mix. Don’t skimp on quality here—plants grown in inferior mix will never perform like those grown in a high-quality medium. Some adjectives that should describe the product you buy: sterile, fine-grained, free-draining, fluffy, uniform. One brand we’ve had success with: Black Gold.

2. The back of the pack. It’s a simple step that can make a big difference: read the back of the seed packet before you sow. It’s full of important and helpful information—often spelled out in great detail—such as planting depth, days to germination, and watering requirements. Save the seed packs after you sow, too, since there’s often valuable transplant and harvest info there as well.

3. D.I.Y. pots. You don’t need a fancy setup to start seeds. D.I.Y.ers can make their own paper pots; recyclers can put egg cartons to good second use; and the organically minded can replace plastic with peat or compost pots that go straight into the ground and disintegrate as the season progresses. Reusing last year’s plastic pots? Wash them out thoroughly and rinse in a 10 percent bleach solution to knock out fungus and residues before filling with starting mix.

4. The right light. A strong light source is crucial for stimulating plant growth. Without it, plants turn leggy, making them weak and more susceptible to breakage. Consider full southern window exposure as a mere starting point—even better is a grow light that can be raised with the plant’s height, while offering the 12 full hours of strong, even light that seedlings need.

PHOTO: Bean sprouts.
Beans sprouted in dampened paper towel.

5. Self-watering system. Started seeds in years past, only to have them dry out and wither before you know it? You may be a candidate for a simple capillary mat/self-watering system. After filling pots with seed starting mix, set them on the specially-designed mat/tray—fill the tray with water, which the mat draws up to the pots, keeping them properly moist without being waterlogged. The system is a boon to those who can’t water every day; an optional lid helps keep humidity high. They’re available at many nurseries and online.

At Seed Swap, Garden experts and master gardeners from our Plant Information Service desk will be available to chat, but we’ve found that the best way to get an answer is also the simplest and most satisfying: turn and ask the gardener next to you.  

Looking forward to seeing you at the swap!


©2014 Chicago Botanic Garden and my.chicagobotanic.org

Let it Snow

If you’ve been around Chicago in the past month, you’ve probably noticed the sort of weather we’ve been having.

Snow covers the grass of the Elizabeth Hubert Malott Japanese Garden in 2013. This protected grass can expect good growth in spring.

You may even be bitterly cursing the snow and hoping winter will end, cheering this week’s thaw and higher temperatures. What you might not know is that all this snow has a number of benefits that will help your garden and landscape later this spring.

PHOTO: Closeup of bright red, raisiny eastern wahoo berries.
The fruit of eastern wahoo (Euonymous atropurpureus) creates a striking contrast against the snow.

Snow is a great insulator!

As winter presses on, the ground freezes deeper and deeper. This prolonged cold soil can damage roots over time. Snow helps create a blanket that reduces freezing of the soil. Warmer soil keeps microbes more active, which helps break down any plant waste that is in the soil, releasing nutrients. As a result of this insulation, your plants will have a much better start in spring!

Snow brings an important nutrient into the soil: nitrogen.

There are not many ways for nitrogen to enter the soil. While planting legumes and adding fertilizer are the most common ways we add nitrogen to soil, the weather provides nitrogen as well! Nitrogen is abundant in the atmosphere and is most easily collected by falling snow. As the snow melts, it deposits the nitrogen into the ground. (Apple trees and other plants benefit greatly from nitrogen deposited by snow.) When the ground is soft, plowing the snow into the soil will give the greatest benefit. Snow is sometimes called the poor man’s fertilizer.

PHOTO: Bare, yellow willow branches against a blue sky.
The yellow whips of this willow make an excellent contrast to the snow in most landscapes.

Don’t forget, snow is water!

When snow melts, it provides moisture for evergreen trees and shrubs. This moisture helps keep these plants happy and healthy throughout the winter. You won’t see damage right away, but a few years of snow-free winters can cause health problems in your trees.

Last but not least, snow can be very attractive in a landscape.

Snow makes plants with ornamental fruit, flowers, and bark stand out in the winter landscape. Plants like holly, ornamental grasses, euonymus, crabapples, roses, birches, ghost bramble, striped maple, dogwoods, willows, hazels, winter hazels, and witch hazels are only a few of many very attractive plants for a winter landscape. Dogwoods and willow varieties often will have young growth that is orange, yellow, or red. These same colors appear in the fruit of euonymus, crabapples, roses, and holly. Look for varieties that will complement your landscape.

If you find that snow is weighing down branches in your landscape and disfiguring the appearance of your shrubs or young trees, brush off the snow regularly and prune in the spring to remove any dead or broken branches.

PHOTO: Boxwood and hemlock trees against a fence in winter.
Evergreen trees and shrubs like boxwoods and hemlock need water through the winter to stay healthy.
PHOTO: Boxwood in winter; its branches weighted down with snow.
Boxwoods are prone to damage from heavy snows. Minimize damage by removing snow as soon as possible from the branches.

When the snow melts, check your trees and shrubs for damage near the trunk of the plant. Rodents, particularly voles, take advantage of winter snow cover and feed more aggressively on tender bark of young trees. If your lawn has developed paths of dead grass from these garden pests, rake affected areas of the lawn, apply a light application of fertilizer and seed the affected areas if damage is severe.

While many of us are hoping for an end to this winter, this abundance of snow is promising us a great spring!

©2014 Chicago Botanic Garden and my.chicagobotanic.org

How to Select a Good Orchid

After visiting the Orchid Show (purchase tickets here), you may be inspired to try growing an orchid in your home, but for the new orchid grower, selecting an orchid may seem overwhelming. Here are a few tips to get you started. 

(Can’t play the movie above? Watch here on YouTube.)

A healthy orchid.
A healthy orchid. Notice the plump pseudobulbs (stems), smooth green leaves, and beautiful flowers. If you look closely, you’ll even see new buds forming.

1. Know yourself, your growing environment, and what you’re buying.

Orchids live in a wide variety of habitats and come in a wide variety of sizes, so you’ll want to make sure that you choose one that’s well suited to your home and to your schedule. For example: if you have lots of bright, direct sun in your home, a Cattleya will do very well, but a Phalaenopsis may struggle. If you have questions about an orchid’s growing conditions, you can always ask the grower you’re buying from, or check out the American Orchid Society’s Culture Sheets. Also, make sure that your plant has a tag identifying it, or that you get its name and put a tag in the pot right away. There are thousands of orchid species and hybrids, and often it’s difficult to identify a plant on the flower alone. Having a tag will help you to always remember what species or hybrid your orchid is.

2. Choose a plant you really like.

This may sound obvious, but orchids aren’t like other house plants. Most only flower once a year  so you will probably need some good motivation to keep caring for it when it’s not in flower. Also, sometimes the shock of moving from the greenhouse to your house will cause orchids to skip a year in flowering. Don’t lose all hope though! There are some orchids that flower continuously for most of the year, and others from which you can get multiple flowerings in a year.

3. Only buy a healthy plant.

PHOTO: Closeup of an adult soft brown scale with offspring (tiny pollen-sized dots).
Soft brown scale (Coccus hesperidum) and offspring on Phalaenopsis.

The easiest way to tell if a plant is healthy is to look at it. It should have smooth green leaves, fleshy, plump pseudobulbs (if present), and no bugs. Discoloration and spotting of the leaves may be due to cultural conditions, but it may also be a sign that the plant has a virus. Unlike people, orchids don’t recover from viruses. Like people, however, they can spread the virus to other plants in and around your home.

Leaf pitting, scaring, and holes also may be cultural, but more likely are an indication of bugs. Bugs are small and can be difficult to spot. Some examples are soft brown scale and the longtailed mealybug. These bugs are quite common and quite difficult to get rid of once you have them. They survive by feeding on the sap of the plant, sucking away its life and leaving behind ugly marks. Although the adult bugs are usually easy to spot, the juveniles are easy to miss because they’re tiny and hard to see.

PHOTO: An otherwise healthy orchid shows a yellowing leaf with pale scale spots.
Yellowing and pitted leaves are signs of the stress this orchid is suffering because of a scale infection.
PHOTO: Closeup of an adult longtailed mealybug with young.
Close-up of an adult longtailed mealybug with offspring.

4. Consider the flower.

You have basically two choices when buying an orchid: buy one that’s flowering or about to flower, or buy one that’s not in flower. Especially for the beginning grower, buying orchids in flower is often the better choice. The biggest reason is that you get to see your orchid flower at least once. People who grow orchids will readily tell you about how many they’ve killed—it’s just part of the learning process. If you buy your plants in flower and they die, it’s not really any worse than buying a bouquet of cut flowers. (Orchids are about the same price, and the flowers last much longer.) Another reason to buy when the plant is flowering is so that you can be sure that you like the flower, and that it has no abnormalities that you find unattractive. 

5. Look for new growth.

This is an indication that the plant is doing well and will continue to do well. Often, next year’s flowers come from this year’s growth, so if there’s no growth, there may also be no blooms. You can find new growth in two ways: new leaves or green tips on the roots. Roots sticking out of the pot are no problem and are the easiest to check.

Find an orchid at the Orchid Marketplace, open weekends throughout the Orchid Show.


©2014 Chicago Botanic Garden and my.chicagobotanic.org