Practice Shelf Awareness with Local Fungi

One of the most recognized lines from Shakespeare is the following: “Something is rotten in the state of Denmark.” You would have to read Hamlet to get the backstory, but one thing I know as an ecologist, is that we would be in a lot of trouble if there wasn’t a whole lot of rot going on all over the place.

You can probably imagine when walking through our oak woodland, that if things were not constantly rotting, you would be up to your eyeballs in dead leaves, and it would be almost impossible to walk anyway, because of the mass of dead branches and logs lying all over like a bunch of pick-up sticks.

PHOTO: Trichaptum biforme (a hardwood decomposer).
Trichaptum biforme is a hardwood decomposer.

Although there are a tremendous number of organisms that are involved in the rotting process, fungi are the very most important component of this team of decomposers. A tremendous number of species of fungi live in the McDonald Woods at the Chicago Botanic Garden; they can be broken up into two basic categories: those that form symbiotic relationships with living plants (mycorrhizal), and those that decompose organic matter (a.k.a. the rotters).

PHOTO: Another Trichaptum biforme (Violet-toothed polypore).
Another Trichaptum biforme (violet-toothed polypore)

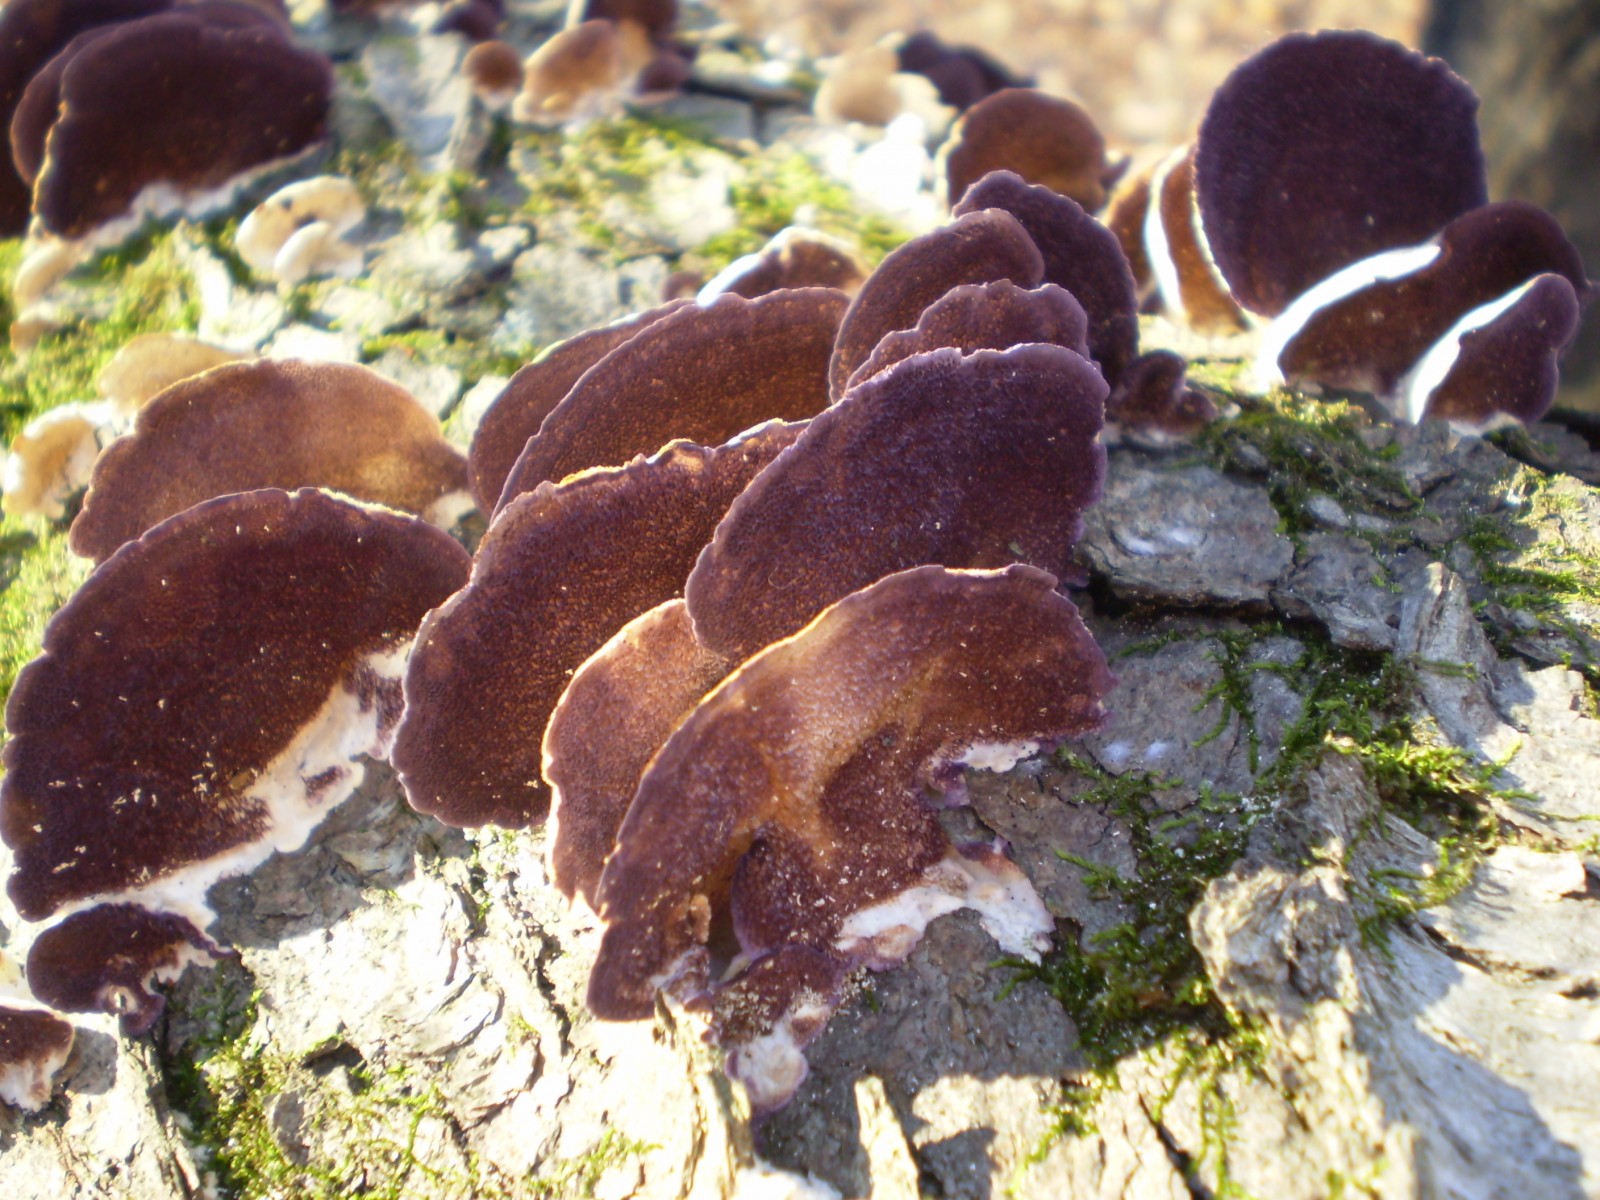
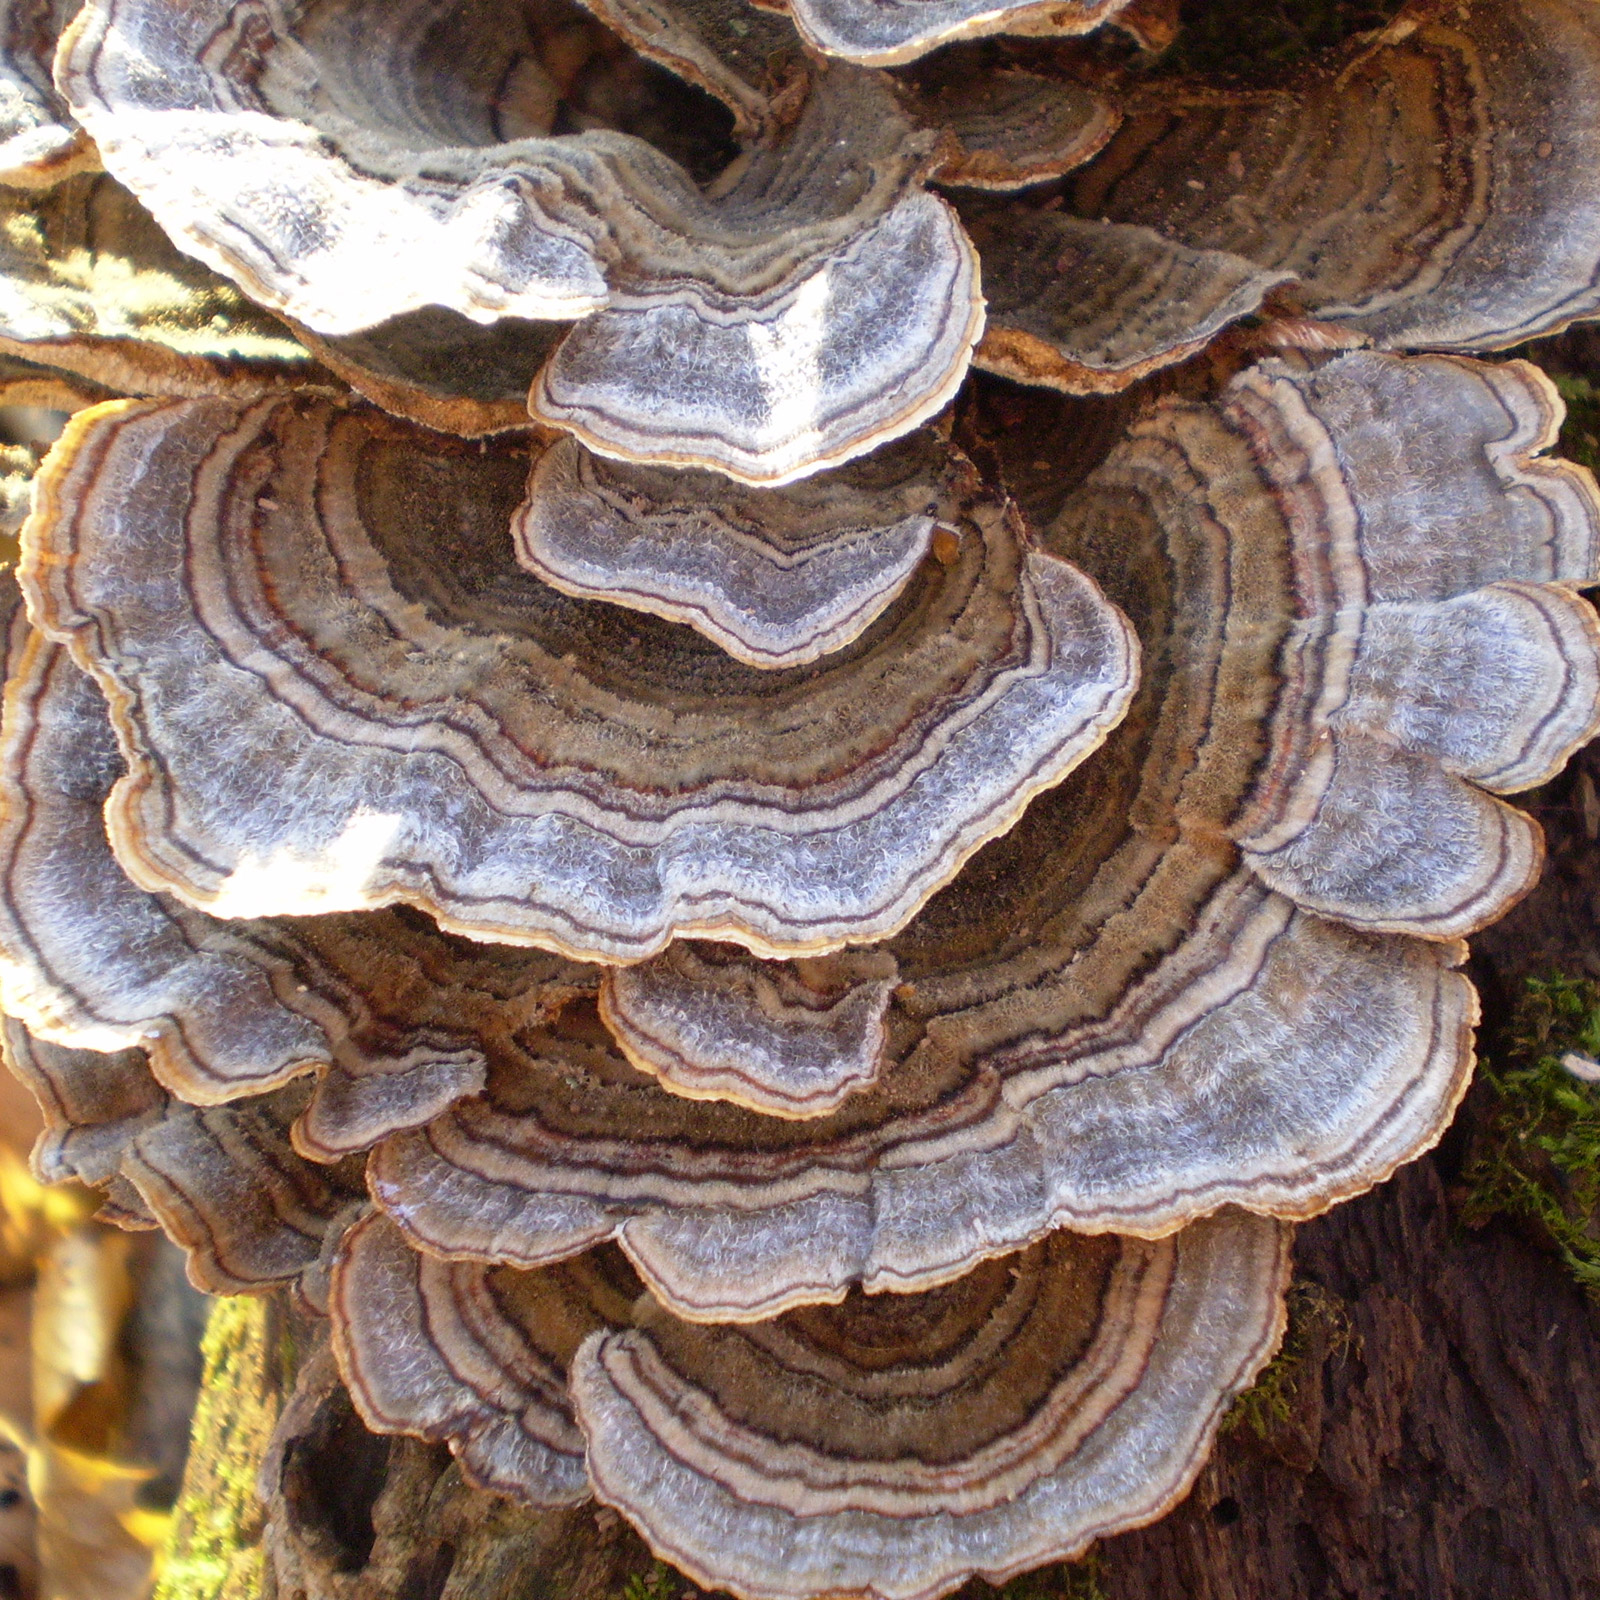
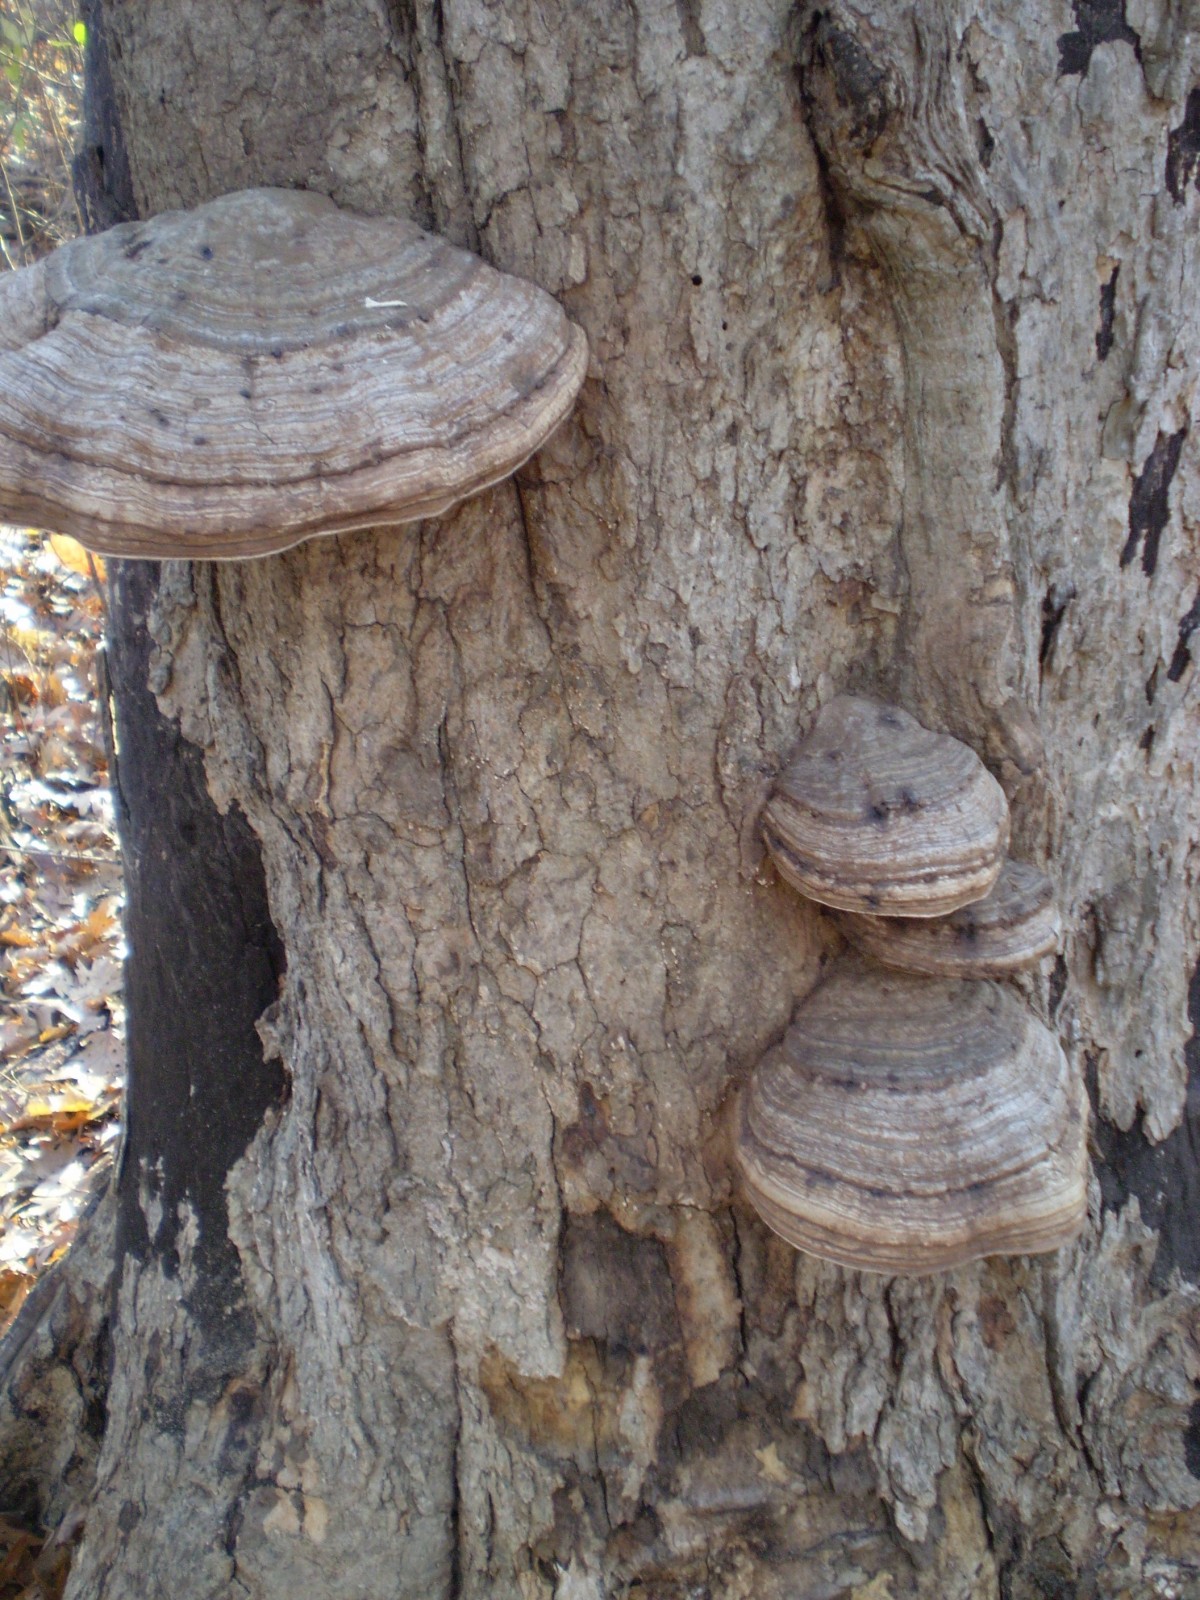
While walking through the woods the other day, I tripped over a downed log and came face-to-face with one member of those decomposers, the bracket fungi. These familiar fungi, also known as shelf fungi, have a characteristic growth form. Most do not produce a stalk (stipe) that supports their cap. Instead, whether on a standing tree or on a log lying on the ground, the cap is attached directly to the wood and projects out horizontally like a shelf or awning.

Gravity causes tropism (the turning or bending in plants and fungi toward or away from an external stimuli), which causes the shelves to orient horizontally out from the wood. This is interesting to observe, especially when a standing dead tree that has shelf fungi falls to the ground, and the new fungi orient in a different direction after the tree falls. (This is one way that you can discover if a tree was dead before it fell to the ground.)

PHOTO: The beautiful layers of Trametes versicolor, or turkey tail fungus.
The beautiful layers of Trametes versicolor, or turkey tail fungus

Just like most of the “mushrooms” we find growing on the ground, these shelf fungi are the fruiting bodies of an organism that we seldom see. The actual organism is a spiderweb-like structure that is either sprawled out within the soil or, in the case of the decomposers, spread throughout the dead plant material.

What is important about these decomposer fungi is that they are able to breakdown cellulose and lignin—the building blocks of plants, and two materials that are unable to be decomposed by almost any other organism. Therefore, without the help of these fungi, we would be swimming in a sea of dead plant material, and all those nutrients and minerals would be locked up—unavailable for other plants to use.

Many of the shelf fungi differ from other fungi, not only because of their growth form, but also because they are usually very woody or leathery in nature. ( I can imagine that people mistake some of these fungi for a deformity in the tree when they feel them and realize that they are as hard as a rock. This is not true of all shelf fungi; some are soft and squishy and quite fragile.)

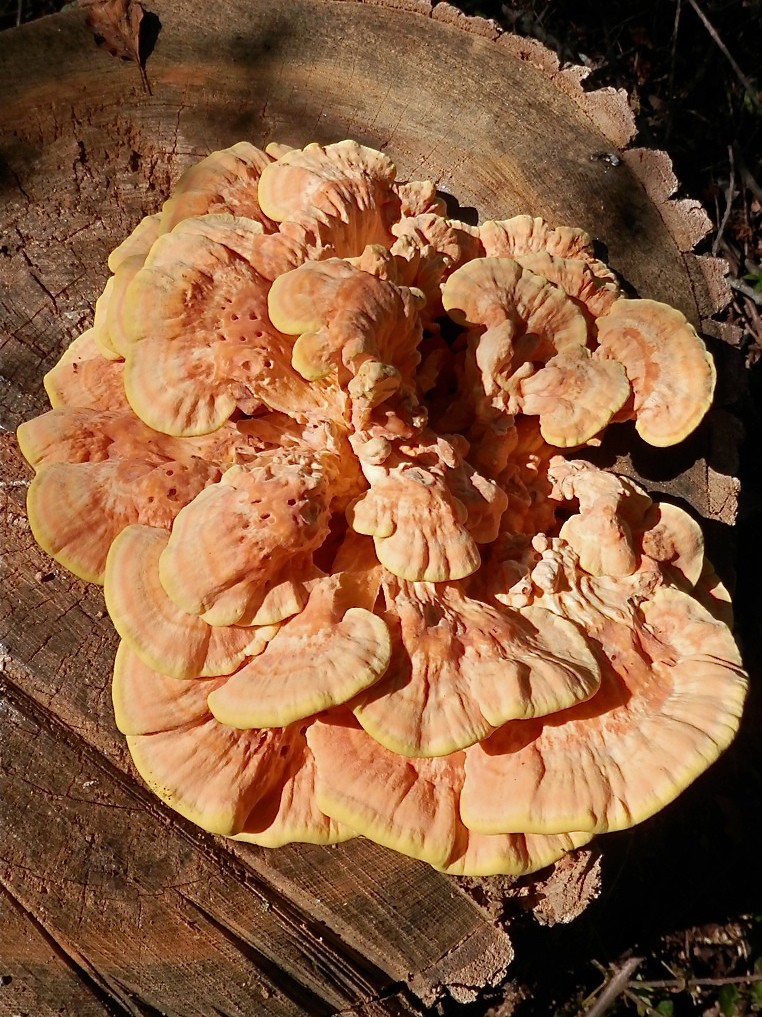
Some common shelf fungi are the artist’s conk (Ganoderma applanatum), the horse hoof fungi (Fomes fomentarius), the turkey tail fungi (Trametes versicolor), and the sulphur polypore (Laetiporus sulphureus).

PHOTO: Ganoderma species fungus.
Ganoderma species fungus
PHOTO: Sulphur polypore, or chicken-of-the-woods fungus (Laetiporus sulphureus).
Sulphur polypore, or chicken of the woods fungus (Laetiporus sulphureus)

The type of decomposition that takes place is referred to as either white rot or brown rot. In white rot, the fungi breaks down the lignin and leaves the cellulose behind. Wood that is being decomposed by white rot fungi turns off white and stringy. In brown rot, the fungi decompose the cellulose and leave the lignin behind. Brown rot fungi turn the wood reddish-brown and crumbly. In combination, the two types of decomposers reduce even large tree trunks to their component nutrients and minerals and make them available to the environment for living plants to use.

PHOTO: Stereum ostrea, or false turkey tail fungus.
Stereum ostrea, or false turkey tail fungus

Although some of the shelf fungi are interesting and quite attractive, like the turkey tail and violet tooth fungi (Trichaptum biforme), it is not a good sign to see them growing on your favorite shade tree. Some of these shelf fungi can be found on living trees where disease or damage has caused the decomposition process to begin, and may not portend a bright future for the tree. You might also see some of the fungi sprouting from structural elements of your home if the wood is unprotected and exposed to excess moisture—another sign of trouble.

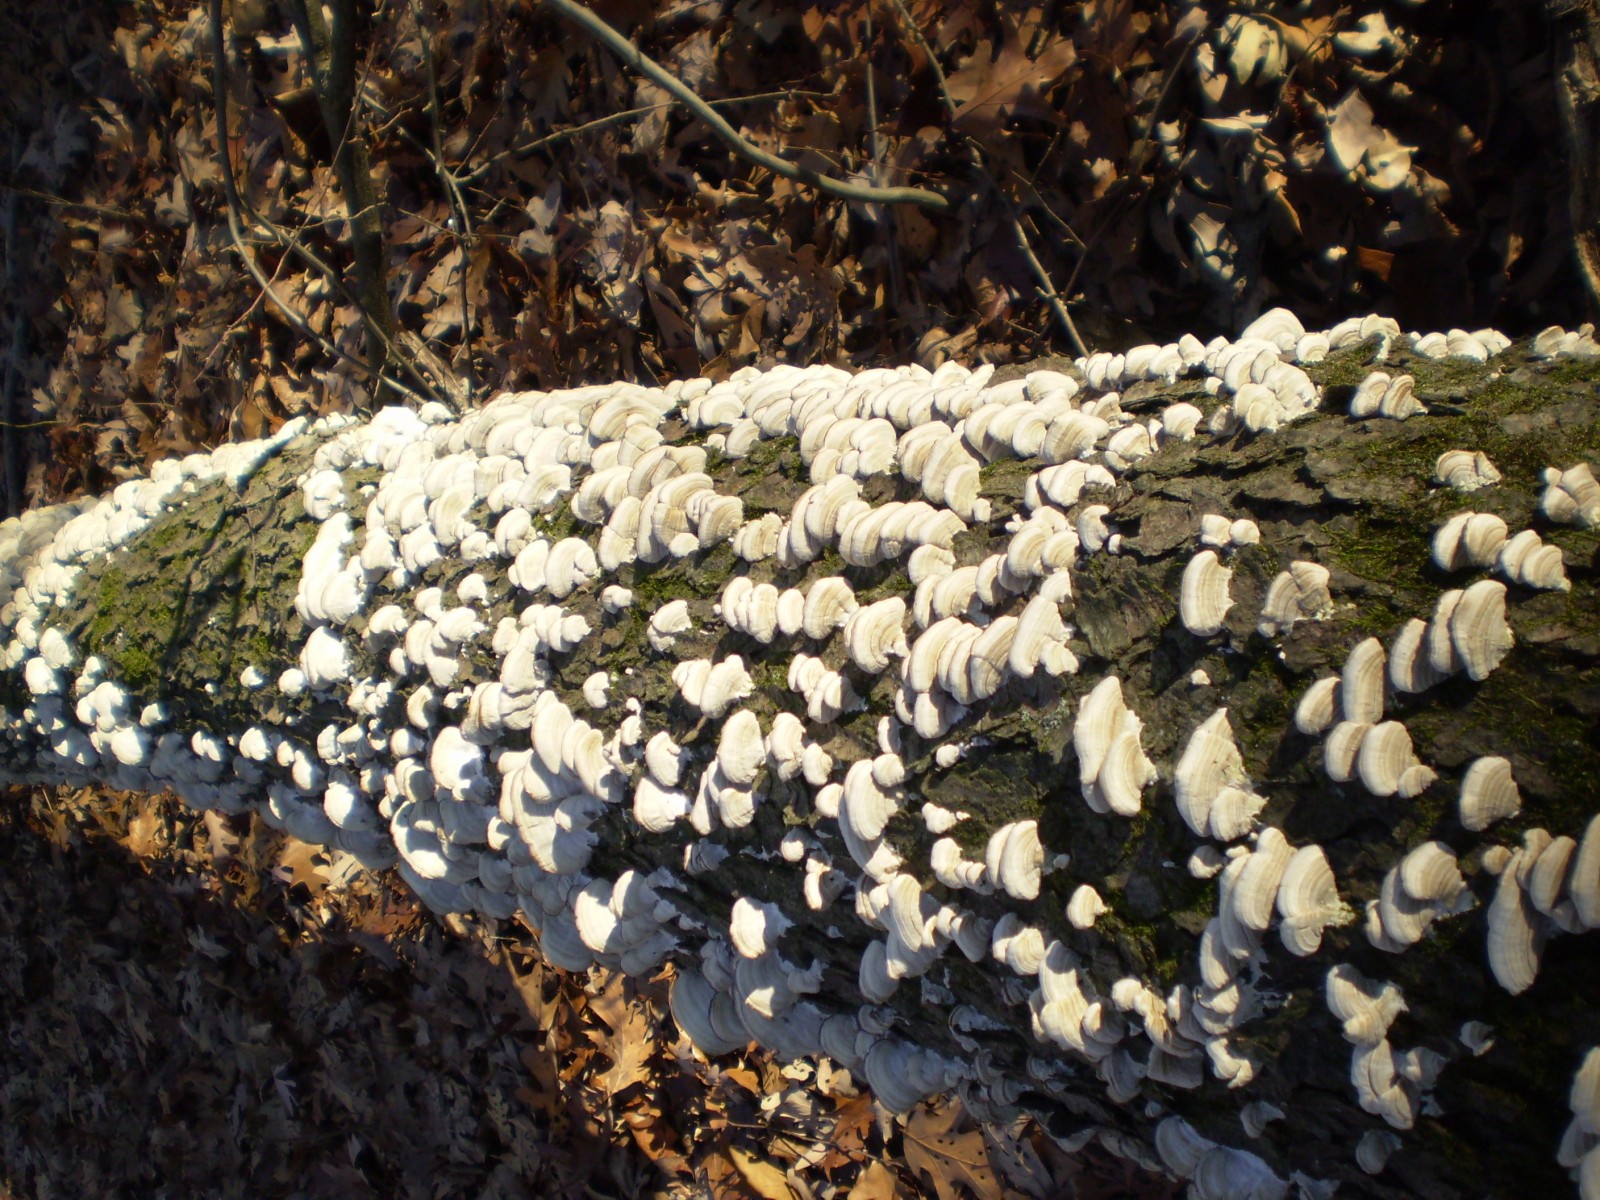
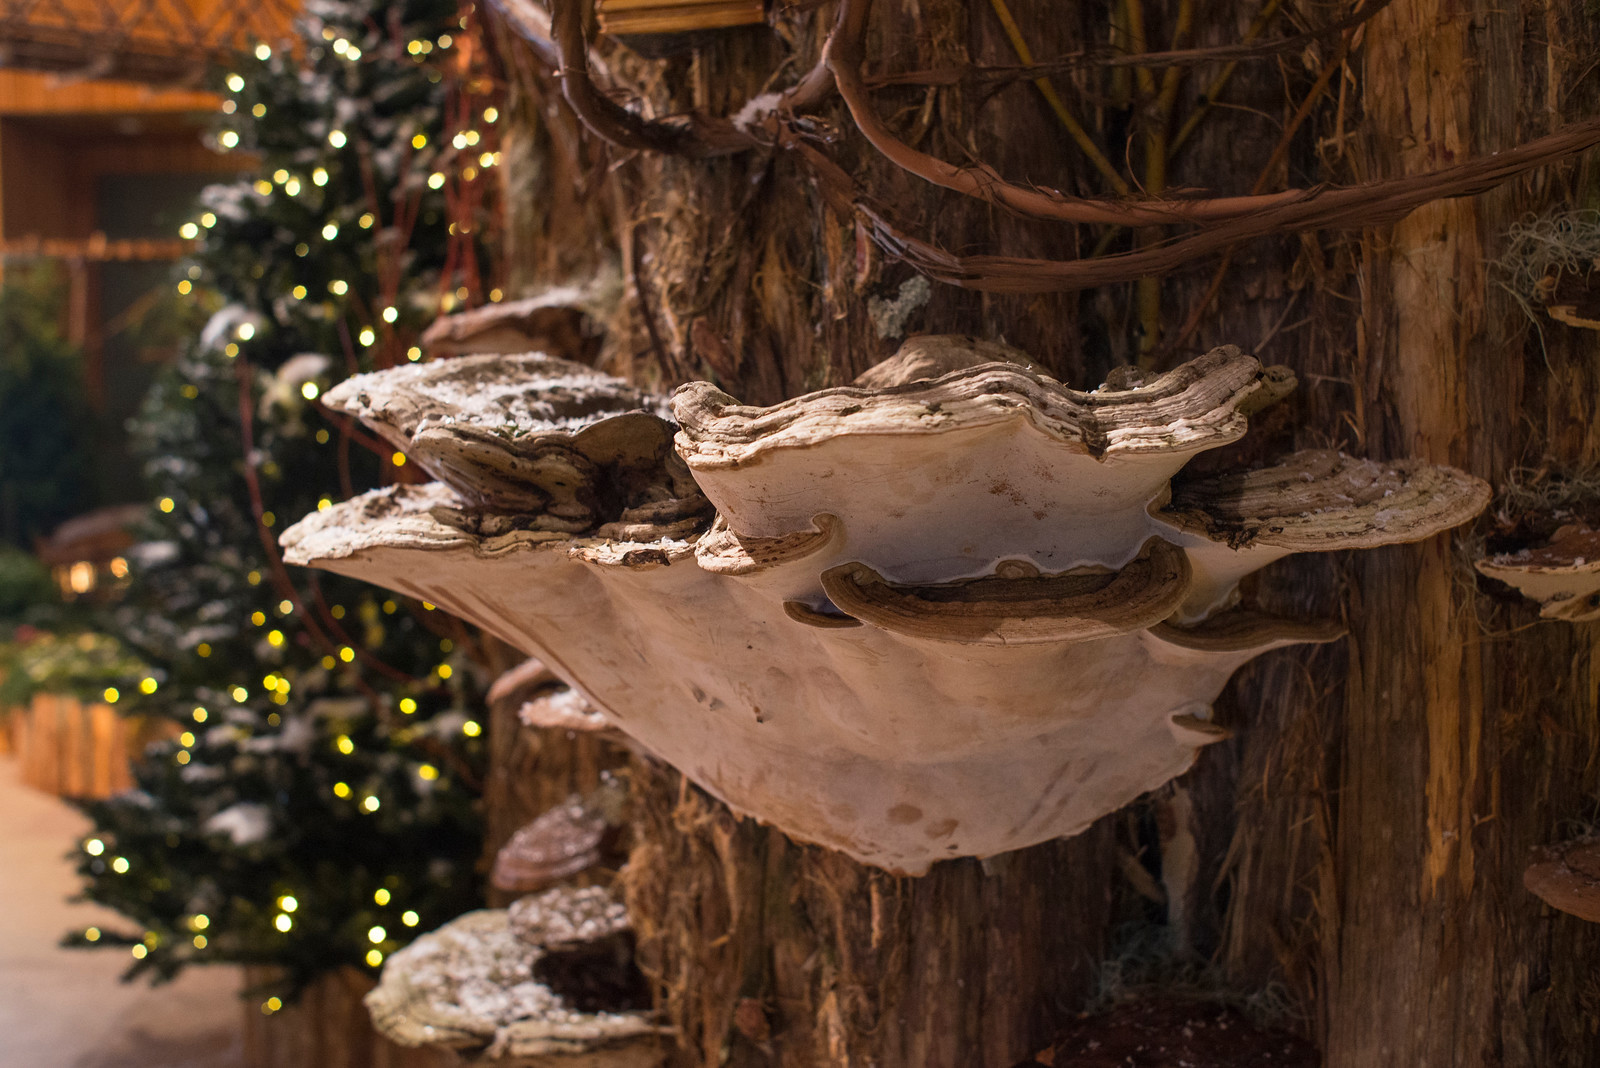
Some of the shelf fungi are very prolific and can occur in the hundreds on a single log, or they might be one giant shelf that can be more than a few feet across and weight 50 to 100 pounds or more. One of these large examples can be seen in our Wonderland Express exhibition.

PHOTO: Shelf fungus on display in Wonderland Express.
Shelf fungus on display in Wonderland Express
PHOTO: Ganoderma lucidum fungus.
Ganoderma lucidum

It should also be noted that these shelf fungi have some aspect to them that are of interest other than their role in decomposition: while most species are woody and unpalatable, the chicken of the woods (Laetiporus sulfureus), is considered one of the best fungi for eating. There are also several species of shelf fungi thought to have medicinal properties, including the attractive Ganoderma lucidum (known as reishi in herbal medicine).

So next time you are out hiking in one of our local forest preserves, consider the “shelf life” around you, and what the woods—and life—would be like without them.

Find out more about the natural world at the Garden and in your backyard: learn about Lepidoptera, bats, and grubs.


©2015 Chicago Botanic Garden and my.chicagobotanic.org

The Gift of Bonsai

Bonsai are often given as gifts around the holidays. Unfortunately, many of these trees don’t survive very long. In this blog, I will cover some of the dos and don’ts about purchasing a bonsai as a gift, tell you where you can get quality trees, and give a little information on what to do if you receive one of these wonderful trees as a gift yourself.

PHOTO: Juniper bonsai for sale at a large garden center.
Juniper bonsai for sale at a large garden center

During the holiday season, little areas pop up in megastores and mall kiosks to sell bonsai (or “mall-sai,” as I call them). These bonsai are reasonably priced, cute, and seem to be a perfect gift for the horticulture enthusiast on your list. But before buying that little tree, there are a few things to consider.

Tree health is essential. 

PHOTO: Glued-down rocks on a gift juniper bonsai.
Glued-down rocks on a juniper bonsai

Often, a tree’s leaves will give you a good indication of its health. Waxy, shiny leaves and the indication of new growth are signs that the tree is healthy and actively growing. Dull, spotted, or damaged leaves are things to look out for. These may be indications a tree is unhealthy or stressed.

Be sure to gently feel the foliage, especially on junipers. Junipers can stay green even after they have died off. If branches are brittle and dry, avoid that tree.

It is also a good idea to feel the soil. If a tree is bone dry or standing in water, that should be a concern. Many of these trees are mass produced this time of the year. They are grown out in 3-inch plastic pots, removed, and placed in bonsai pots with the root ball untouched or wired down. Most trees are covered with standard potting mix instead of bonsai soil, which can retain too much moisture for many species. Often, rocks are glued to the surface for aesthetics, but they also hold the tree in place so they don’t fall out while the tree is being shipped. This is a lot of stress on a tree—especially in the winter. These trees are usually repotted in spring and often come from southern states.

The changes in climate, humidity, and daylight may also contribute to tree stress. Many of these trees do well when purchased, but the added stress they go through increases your chances for failure.

Buying a tree from a reputable nursery will increase the chances of success.
Local and national retailers that sell quality trees include:

Now that you know what to look for, and where to find it, let’s discuss a few of the more common bonsai species that work well for beginners.

Bonsai for beginners

PHOTO: Banyan ficus.
Chinese Banyan ficus (Ficus retusa var. microcarpa)
PHOTO: Willow leaf ficus.
Willow leaf ficus (Ficus nerifolia / Ficus salisafolia)
PHOTO: Green Island ficus.
Green Island ficus (Ficus retusa ‘Green Island’)
PHOTO: Little Gem ficus.
Little Gem ficus (Ficus benjamina ‘Little Gem’)

Among the most popular tropical bonsai trees are the ficus, due to their adaptability, vigorous growth, and many varieties. There are more than 825 different ficus species of evergreen trees, shrubs, and woody climbers. All of these trees should be kept indoors when temperatures are below minus 40 degrees Fahrenheit, and most prefer bright light and high humidity levels. In most cases, a south-facing window will work well. If your light is low indoors, additional lighting is a good idea. There are many kinds of supplimental lighting on the market so finding a size and shape that fits your needs should be easy. Our midwestern homes tend to be dry in the winter (due to heating), so misting your trees daily with a spray bottle is also a good idea. Doing this will increase the humidity and prevent leaf loss. Providing an evaporation tray is another good way to provide supplimental humidity. Avoid putting trees where forced air heat will blow on them. This will dry out the leaves and cause stress to the tree.

Some ideas for the more advanced bonsai enthusiast:

PHOTO: Snow Rose serrissa in flower.
Snow rose serrissa (Serissa foetida) in flower

Snow rose serrissa (Serissa foetida) also make great bonsai. They have small foliage (some variegated), great bark, and produce little white or pink flowers. They are more sensitive to watering and environmental changes than ficus, however, so this tree might be better for someone who is a little more experienced.

PHOTO: Bougainvillea bonsai.
Bougainvillea bonsai

Bouganvillea are another popular bonsai species. They are best known for their paper-like flowers in a variety of colors. Though a tropical plant, they like a their soil on the dry side, since they live mostly in sandy soils. They take well to pruning, grow quickly, and will produce flowers all year long.

PHOTO: Baby jade bonsai.
Baby jade bonsai (Portulacaria afra)

Baby jade (Portulacaria afra) is a succulent bonsai. Well-draining soil is important to the health of this tree. Over-watering is one of the main problems with this species. The leaves should be shiny and plump when it is well watered. Wait until the leaves start to shrivel just a bit before watering. Dull, shriveled leaves are a sign the tree is very dry or unhealthy.

PHOTO: Juniper bonsai.
Juniper bonsai (Juniperus sp.)

Junipers make great bonsai material. They can be stored indoors, but require very high light levels and do not like to be over-watered. Many people store their junipers in a protected cold area for the winter. Knowing the source of your juniper gift is important. If the tree was purchased from a tropical climate and you put it outside, it will most likely not do well with the abrupt change in temperature. Likewise, if you get a juniper that was in winter storage and bring it indoors, that tree will suffer too.

When giving a bonsai as a gift, be sure to include care information to ensure your friend or loved one will have to tools to maintain this wonderful gift of bonsai. If you receive a tree as a gift, get as much information as you can on that tree to ensure you can properly care for it.

Just in time for those getting bonsai this season, take a bonsai class at the Chicago Botanic Garden.


©2015 Chicago Botanic Garden and my.chicagobotanic.org

Make a Mini-Terrarium Holiday Ornament

For one December session of our Plant Explorers after school program at Chicago International Charter School—Irving Park, the students made living ornaments for the holidays.

This tiny terrarium project can have a calming influence on a potentially hectic holiday, because green and growing plants make us feel more relaxed. It requires you to find some live moss, but it makes an extra special decoration for kids—and adults—who love plants. 

PHOTO: The finished moss terrarium ornament.
The finished moss terrarium ornament
PHOTO: Moss globe ornament supplies.
A fillable plastic globe ornament, small amount of potting soil, live moss, ribbon, and little wooden reindeer are what we used to create our ornaments. (Charcoal is not shown.)

To make your own “moss-some” terrarium ornament you will need:

  • 3-inch or larger plastic sphere ornament that splits into two halves (available at craft stores)
  • Live moss that you find growing in a shady place in your yard (or you can buy it from a garden store that sells terrarium supplies)
  • Activated charcoal (sold in garden and aquarium stores)
  • Soil
  • About 12 inches of decorative ribbon
  • Any miniature item you want to add for whimsy (optional)

Separate the halves of the DIY ornament. If your ornament is like mine, it has little “loops” for attaching a hook at the top. Start by tying a 12-inch piece of ribbon to each half of the ornament through the loops.

In one half of the ornament, add about a teaspoon of activated charcoal. Fill the rest of that ornament half with very wet soil to about a half inch below the top.

PHOTO: Tying the ribbon a the globe ornament.
Use whatever decorative ribbon you like, but make sure it’s narrow enough to fit through the ornament loops and that it’s knotted securely.
PHOTO: The moss ornament is almost complete with charcoal, soil, moss, and reindeer!
The moss ornament is almost complete with charcoal, soil, moss, and reindeer!

Place the moss on top and gently press it into the soil. If you like, add a miniature object to add a little whimsy. Craft stores have lots of miniature objects that would look good in this ornament. We chose these woodcut reindeer to look like the animals were walking through a forest. And there were enough in the pack for all 15 students to get one. Use whatever you like!

If you have a spray bottle with water handy, it helps to give the moss leaves a gentle misting before closing the ornament.

PHOTO: Moss globe terrarium ornament.
Seal the moss in a closed terrarium ornament. The moss can live inside this globe indefinitely.

Place the other half of the ornament on top, but instead of lining up the two loops, put them at opposite ends so that you can hang the ornament ball sideways and not disturb the arrangement. You can tape the two halves together with clear tape if you are concerned about them coming apart. I suggest only taping the sides near the loops rather than wrapping it all the way around so the tape is less obvious and you can open the ornament later if you want to.

The moss just needs light from your home to survive through the holidays. Moisture will evaporate from the soil and will collect on the insides of the ornament. It will roll back down to keep the moss watered indefinitely.

Now you’re wondering if (and how) the moss will survive. I have your answers: read on.

Some Facts About Moss

Mosses are simple plants that scientists classify as bryophytes.

What you see as a clump of velvety green carpet is actually hundreds of tiny individual moss plants clumped together. Botanists refer to these as gametophytes.

PHOTO: A close up of moss seen from above shows the tops of hundreds of individual plants clumped together.
A close-up of moss seen from above shows the tops of hundreds of individual plants clumped together.
PHOTO: Seen from the side, the moss looks like a tiny, dense forest.
Seen from the side, the moss looks like a tiny, dense forest.

Mosses do not have true roots. They have rhizomes that anchor the plant to the soil and send up buds for new individual moss plants, but the rhizomes do not transport water like true roots. Mosses absorb water, nutrients, and carbon dioxide through their leaves. 

The rhizomes are fine and grow at the surface of wherever they are planted, so they do not require deep soil. As a result, moss can grow in any porous surface, like tree bark or a stone (but maybe not on a rolling stone!). So moss can thrive in the small amount of soil in your ornament. The moisture sealed inside the globe will keep the air humid and supply the leaves with water.

Mosses also do not flower or make seeds. They produce tiny spores that are difficult to see without magnification. The spores are carried by wind until they fall, and there they wait for the right conditions to grow into new moss plants.

PHOTO: A single moss gametophyte grows from a root-like rhizome.
A single moss gametophyte grows from a root-like rhizome.
PHOTO: Moss reproductive structures.
The tips of the taller slender structures are sporophytes that will release spores and continue the life cycle of the moss.

If your moss dries up or becomes dormant, do not despair! You can bring it back to life by soaking the dry clump in water and keeping it moist. This will reinvigorate the dormant moss and activate spores that are lying hidden in the dry moss, enabling them to grow into new moss.

PHOTO: Moss terrarium ornament with deer.Find more fun projects for the holidays! Make Spicy Greeting Cards and Rock Candy, or a Grapefruit Bird Feeder. ‘Tis the season for a little Christmas tree taxonomy!


©2015 Chicago Botanic Garden and my.chicagobotanic.org

Top 10 Gardening Gift Books…

Gardeners love to read about gardening. Therefore, gardeners love books as holiday gifts. But which books?

When we learned that horticulturist Lisa Hilgenberg had built up a working botanical library for herself at home, we asked her for suggestions. She took the question to heart. Titles flew. In fact, it was hard to winnow the list down! Here, then, are Lisa’s top ten favorite gardening books for gift-giving.

PHOTO: Book cover of Les tomatoes du prince Jardinier
Les tomates du Prince Jardinier by Louis Albert de Broglie

Les tomates du Prince Jardinier by Louis Albert de Broglie

PHOTO: Horticulturist Lisa Hilgenberg with fold-out from Le Potager du Roi.
Fold-outs in Les tomates du Prince Jardinier speak to tomato diversity like nothing else in print.

Know gardeners who grow tomatoes? Gift them this book, then bask in their reactions. Louis Albert de Broglie, the Gardener Prince, grows 650 tomato varieties at Le Château de la Bourdaisiére in Touraine, where he’s established the French National Tomato Conservatory.

Under the nom de plume “Le Prince Jardinier” (he’s a member of one of France’s noble families), de Broglie, whom worldly Americans may know as the current owner of the Parisian shop Deyrolle, has authored one of the most spectacular books you’ll ever open—and it’s a revelatory look at tomatoes. Includes recipes, fold-outs, and a book-within-a-book of garnishes. In French, available online.

PHOTO: Book cover of Vegetable Literacy.
Vegetable Literacy by Deborah Madison

Vegetable Literacy by Deborah Madison

“When it debuted in 2013, Vegetable Literacy became my new favorite cookbook,” Lisa says. “It’s so aesthetically pleasing, so beautiful to look at, and it elevates horticulture to its proper place.” Madison organizes her book by the families of plants, showing gardeners and cooks how and why vegetables from the same botanical family can be substituted in recipes. “It’s a soothing, orderly, nurturing book,” Lisa says, “and it’s botanically correct. It’s a great gift for deepening the gardener/cook connection.” Check it out at our Lenhardt Library. 

PHOTO: Book cover of Thoughtful Gardening.
Thoughtful Gardening by Robin Lane Fox

Thoughtful Gardening by Robin Lane Fox

Well known to British gardeners for four decades as the gardening columnist for the UK’s Financial Times, Robin Lane Fox deserves a place on more American gardeners’ bookshelves. Thoughtful Gardening collects a series of his columns, organized by seasons, into an easy-to-read book that’s charming and witty, yet sensible. “I read it in snippets, adding sticky notes, underlining, revisiting it every year,” Lisa notes. “It brings a fresh perspective through both historical information and hands-on experience.” Available to read at our Lenhardt Library.

PHOTO: Book cover of Art and Appetite.
Art and Appetite : American Painting, Culture, and Cuisine by Judith A. Barter and Annelise K. Madsen

Art and Appetite: American Painting, Culture, and Cuisine (Art Institute of Chicago) by Judith A. Barter and Annelise K. Madsen

The companion book to the Art Institute’s 2013 exhibition of the same name, Art and Appetite illustrates nothing less than the history of American food through its art. From a still life of cherries in a hat to Andy Warhol’s soup cans, the book skillfully and entertainingly marries food, food history, cooking, and art. So filled with facts and historical connections—chapter one alone tackles “Thanksgiving: The Great American Food Fest”—that it’s impossible to put down. Vintage recipes included. Available online.

PHOTO: Book cover of Le Potager du Roi.
Le Potager du Roi by Pierre David, Gilles Mermet, and Martine Willemin

Le Potager du Roi by Pierre David, Gilles Mermet, and Martine Willemin

Lisa’s 2014 gardening travels in France included a trip to “the kitchen garden of the king” at Château de Versailles. King Louis XIV’s 25-acre vegetable garden employs the same methods of growing, preserving, and storing today as it did in the late seventeenth century.

“America’s early gardening history was tied to France,” Lisa explains, “and it’s thrilling to see the gardening methods still in practice, the thousands of varieties of old pears and apples and fruit, and the detailing of the espaliers—it all ties directly into my work today.” The layout, the photography, the history—what a great gift! Available online.

PHOTO: Book cover of Vascular Plant Families.
Vascular Plant Families by James Payne Smith, Jr.

Vascular Plant Families by James Payne Smith, Jr.

A gift for the garden geek and plant nerd, Smith’s book focuses on plant families and taxonomy, including flower structures, pollination, and the fine details of botany. “I consult this book all the time,” Lisa reveals, “and it has the most wonderful illustrations!” Members, check it out at our Lenhardt Library. 

PHOTO: Book cover of Kitchen of Light.
Kitchen of Light by Andreas Viestad

Kitchen of Light by Andreas Viestad

The host of TV’s New Scandinavian Cooking goes directly to the source for his food, foraging for ingredients, eating flowers, and using just a few ingredients to make fresh, clean, simple outdoor meals. “Cookbooks are wonderful gifts when you make the right connection with the right cook,” Lisa muses. “Scandinavian or not, adventurous cooks will use it constantly.” Available online.

PHOTO: Book cover of Knott's Handbook for Vegetable Growers.
Knott’s Handbook for Vegetable Growers by Donald N. Maynard and George J. Hochmuth

Knott’s Handbook for Vegetable Growers by Donald N. Maynard and George J. Hochmuth

According to Lisa, “It’s the vegetable grower’s bible, and a truly useful gift.” Now in its fifth edition, Knott’s Handbook is the resource for row spacing, seed planting, soil information, weed management, post-harvest handling…all in one very important resource. If you don’t buy yourself a copy, read it at our Lenhardt Library. 

PHOTO: Book cover of Around the World in 80 Plants.
Around the World in 80 Plants by Stephen Barstow

Around the World in 80 Plants by Stephen Barstow

When author Stephen Barstow and his wife—both vegetarians—moved to Norway, vegetable growing went from hobby to necessity. Tour the world’s food plants with the man who holds the world’s record for most edible ingredients in a single salad (537). “It’s the book I’m reading now,” says Lisa, “and it’s dedicated to Château de Valmer, where we send our Regenstein Fruit & Vegetable Garden interns to work each year.” Our Lenhardt Library has it on the shelves, too. 

PHOTO: Book cover of Nothing Ever Happens on My Block.
Nothing Ever Happens on My Block by Ellen Raskin

Nothing Ever Happens on My Block by Ellen Raskin

“This is the book that started it all—the catalyst for my library,” Lisa says. A book from her childhood that seemingly has nothing to do with gardening, Nothing Ever Happens on My Block is about awareness—or, rather, Chester Filbert’s lack of awareness, as he claims boredom while the block around his house seethes with interesting spies, pirates, monsters, and fireworks. It’s a fun gift for all ages—and especially those who know that awareness is one of the great secrets to great gardening. Available online.

Order any of these books through our Amazon Smile link and 0.5 percent of the profits go to support the Chicago Botanic Garden! Or bookmark smile.amazon.com/ch/36-2225482

Visit the Regenstein Fruit & Vegetable Garden at the Chicago Botanic Garden for more inspiration.


©2015 Chicago Botanic Garden and my.chicagobotanic.org

D.I.Y. Mustards

What’s the oldest thing in your refrigerator? Chances are that it’s the almost-but-not-quite-empty jar of mustard.

Conditioned by decades of backyard barbecues, brightly colored squeeze bottles, and grab-’em-by-the-handful packets, Americans are at last tuning in to the taste of homemade condiments.

The time has come for homemade mustard—and you won’t believe how easy and tasty it is.

Start with the Basics

As always, we turned to program horticulturist Nancy Clifton to learn the how-to’s. Within five minutes of starting her demo for us, she had the first batch of mustard whipped up:

PHOTO: The ingredients for a basic, homemade mustard.
The basic mustard-making ingredients

Nancy Clifton’s Basic Mustard Recipe

½ cup dry mustard powder*
¼ cup cool water (see tips on temperature below)
¼ cup white vinegar
¼ teaspoon salt
2 to 3 teaspoons honey

Whisk ingredients together. Pour into clean Mason or Ball jars and set aside on a pantry shelf for two weeks, to allow the spice’s heat to mellow to the degree desired. Sample out of one jar periodically to test the heat level as you wait. It takes about two weeks for mustard to reach “mild.”

(*Local to the Chicago area? Find mustard powder available in bulk at Penzeys or The Spice House, or purchase online.)

Mustard-making Tips

  • Mustard powder makes a much stronger spread than mustard seeds. Best bet? A combination of both.
  • Hot water mellows mustard’s heat—use hot instead of cool in any recipe if you prefer less bite.
  • Soak whole grain seed in vinegar and water for 48 hours to soften it before using it in a recipe. Keep the seeds submerged, not floating.
  • Freshly made mustards should mellow for 2-4 weeks at room temperature on a pantry shelf. Refrigerate after the desired pungency is reached. Homemade mustards last 6 to 12 months in the refrigerator.
PHOTO: Mustard powders and seeds.
Clockwise from top left: hot mustard seed, yellow mustard powder, a finished basic yellow mustard, brown crushed mustard seed, and medium-hot mustard seed.

Next, Get Creative

After making that first quick batch of basic mustard, Nancy passed around ten jars of flavored mustards for us to sample. Revelations all!

By tinkering with the basic ingredients—using cider or champagne or balsamic vinegars, adding fresh or dried herbs, experimenting with different whole mustard seeds, adapting recipes from cookbooks and the web—Nancy had us all exclaiming over the freshness, complexity, and surprise of mustards in these flavors:

  • Basic Mustard with Summer Savory
  • Herbed Tomato Mustard
  • Dilled Mustard
  • 5-Spice Mustard
  • Balsamic Vinegar Mustard
  • German Whole Grain
  • Dijon
  • Grainy Mustard
  • Herb & Shallot Mustard
  • Jalapeño & Cumin Mustard

Mustards make a sandwich (and a hot dog, as any self-respecting Chicagoan knows), and homemade mustards will forever change your approach to sandwiches. Try mixing hot mustards with mayo for a deliciously different spread. You’ll also rethink deviled eggs…potato salad…pork tenderloin…veggie sauces…and salad vinaigrettes.

A Hot Gift Item

PHOTO: Uncapped mustard varieties showing different flavors, colors, and textures.
Homemade mustard in a single jar or assortment makes a great gift that’s sure to be enjoyed!

Homemade mustards make awesome gifts. Need a football season party gift? Check. Hostess gift? Check. During the holidays, gift neighbors, co-workers, and foodies with a package of three different mustards in quarter-pint jars—delicious and memorable!

Experiment, and build your gift stock—remember that it takes a couple of weeks for mustard to mellow—and the next time you’re cleaning out the refrigerator, recycle that old jar of yellow stuff and replace it with a jar of your own fresh, tasty, homemade mustard.

The Plant Connection 

PHOTO: Brassica nigra in seed and in flower. The seeds are contained in conical pods called silique.
Brassica nigra in seed and in flower. The seeds are contained in conical pods called silique.

Yes, mustard seed comes from a plant—three different plants, in fact. All are in the Brassica family.

Brassica nigra = black mustard seed
Brassica juncea = brown mustard seed
Sinapis alba = white mustard seed

And yes, you can grow your own mustard plants for seed—just be sure to harvest it all, as mustard can quickly self-sow and take over a garden bed.

Looking for more tasty, homemade gift ideas? Make some Vanilla Spice Apple Butter with scientist Pati Vitt, or see what other gifts gardeners give!

©2015 Chicago Botanic Garden and my.chicagobotanic.org