Star Appeal for the Holidays

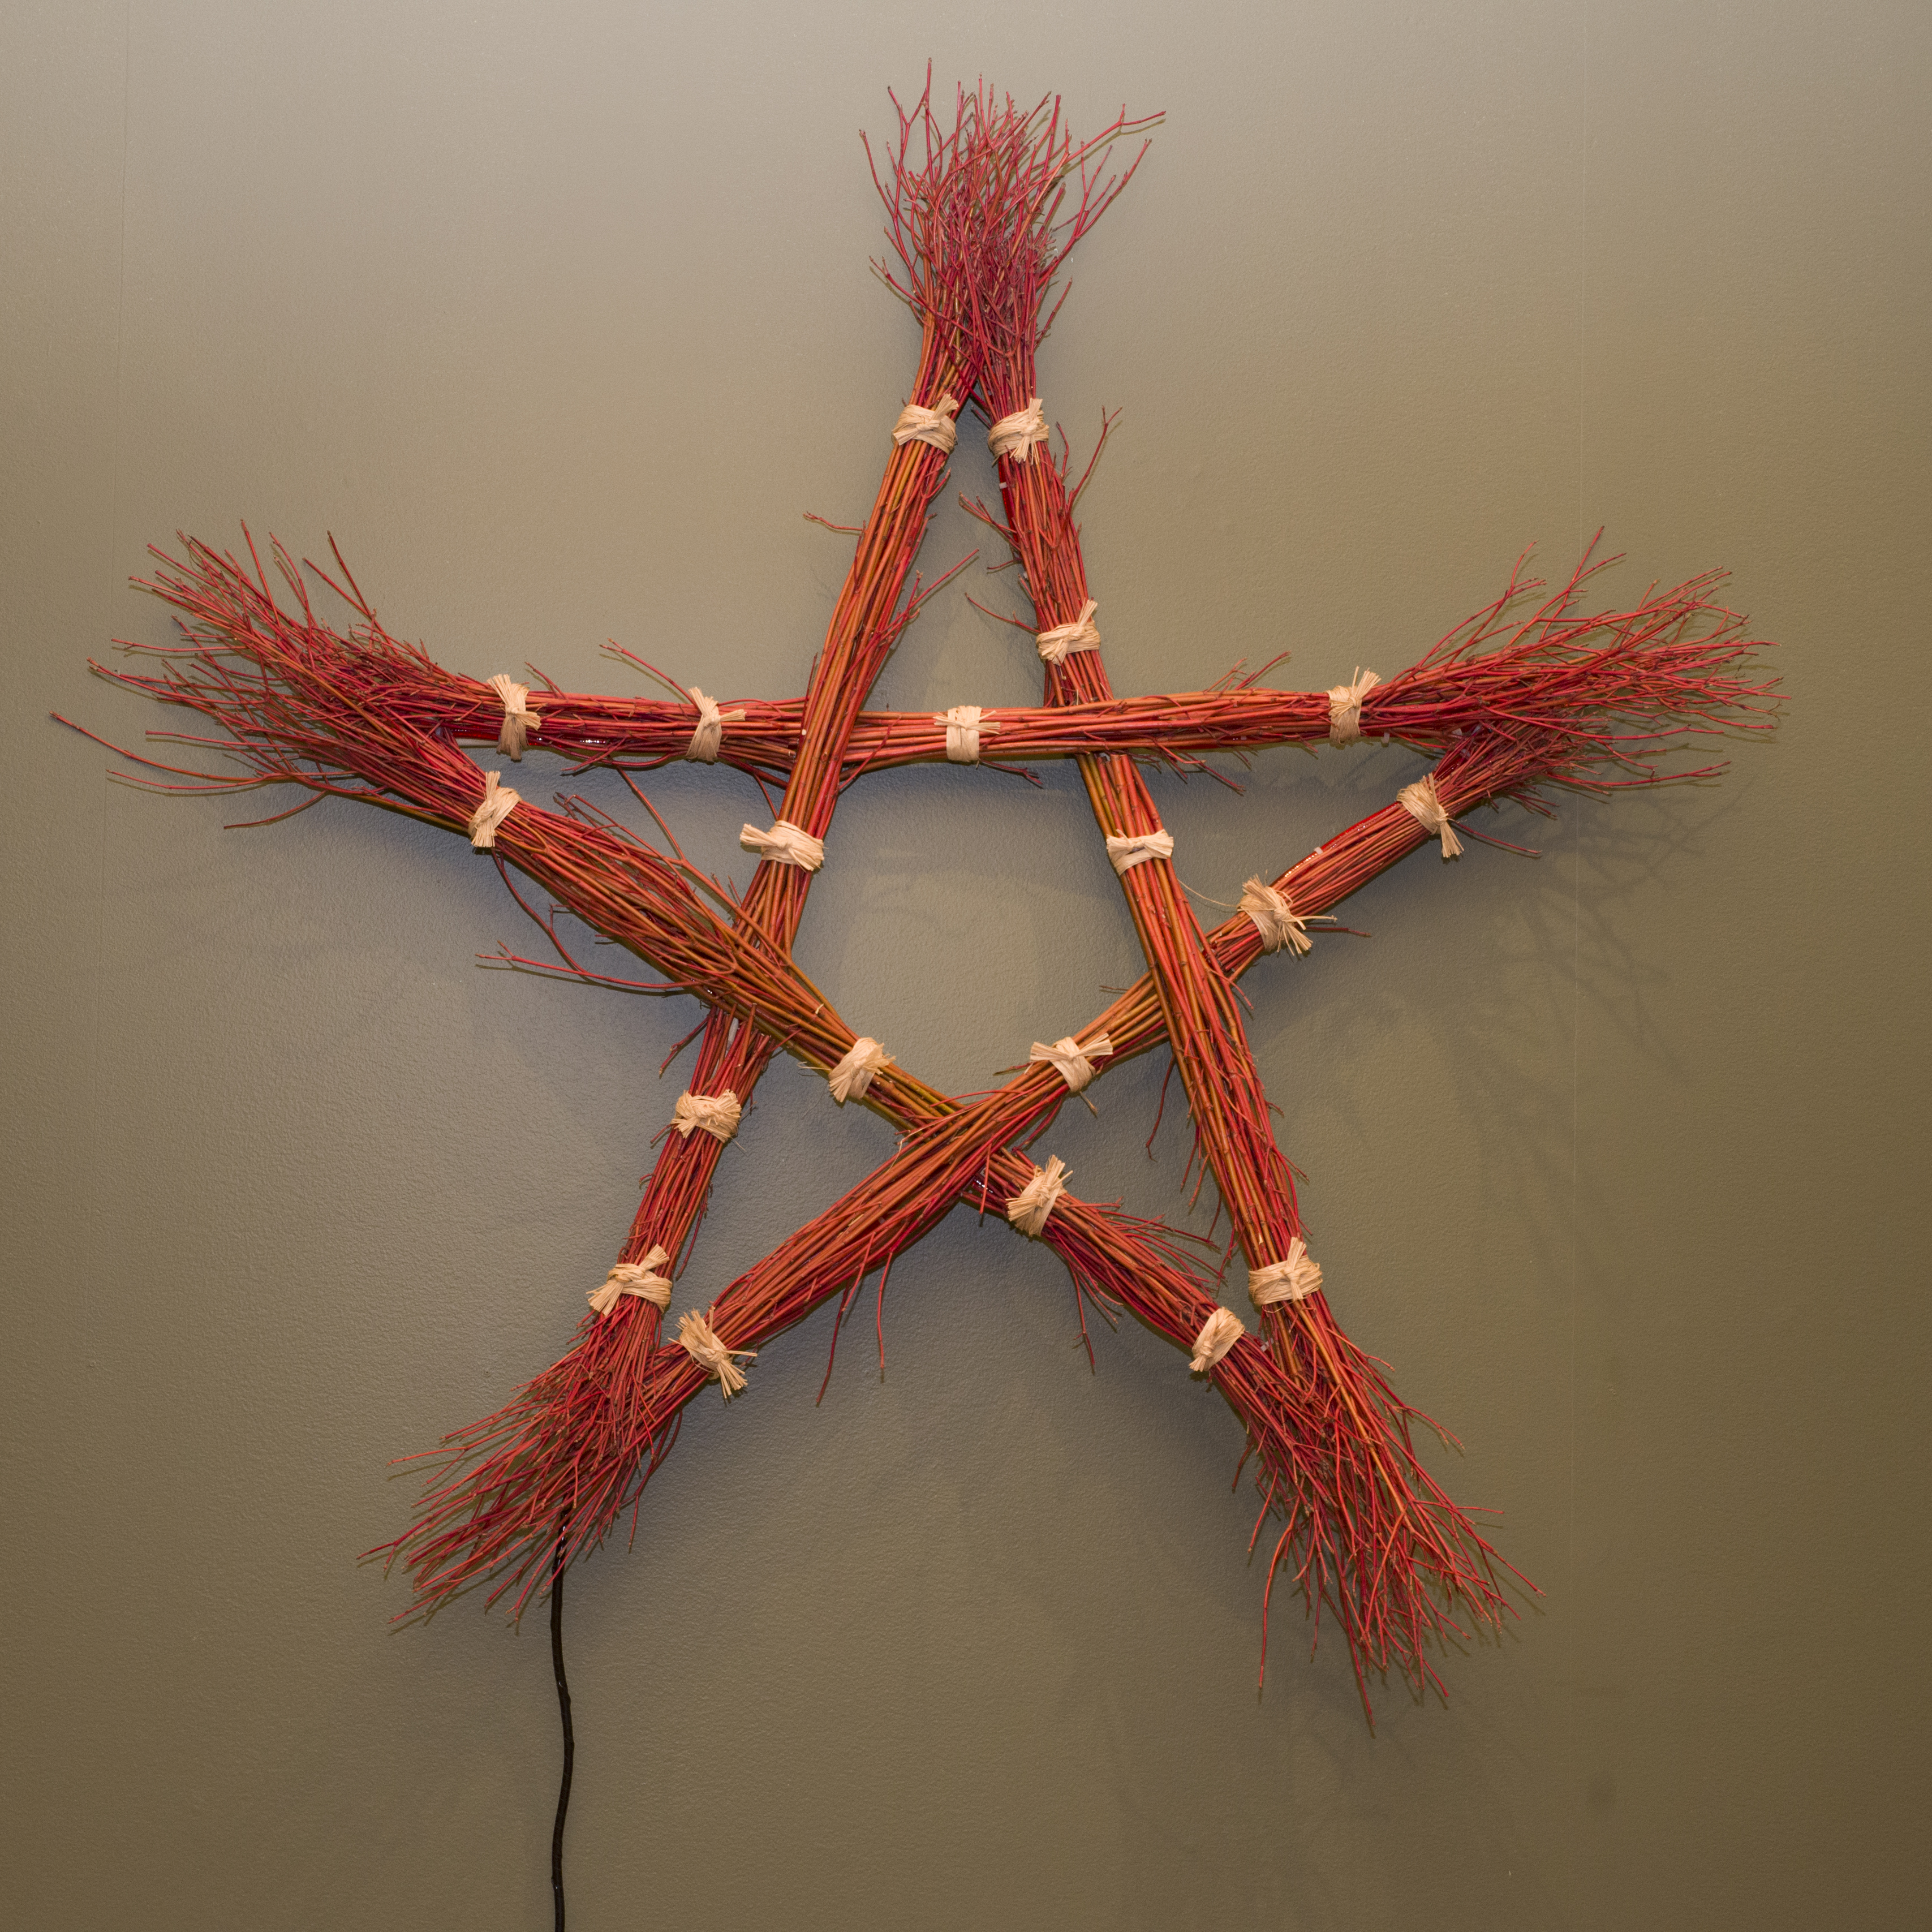
You don’t have to be Martha Stewart to fashion this charming star-shaped wreath from branches, raffia, zip ties, and a little duct tape.

PHOTO: Heather models the finished star wreath.
Heather models the finished star wreath.

Find additional inspiration with a selection of wreaths created by Chicago Botanic Garden staff a few years ago.

Just follow these step-by-step instructions from Heather Sherwood, one of our very creative senior horticulturists, to get your own star appeal for the holidays. Heather has selected red-twig dogwood (Cornus sericea) for its warm, cheery color, but the star can be made from any combination of branches and natural materials, including evergreens (such as junipers) and corkscrew willows. If taste dictates, you can bling out with bells, bows, glitter, or other embellishments. Here’s how Heather does it:

Difficulty Level: Intermediate
Time Needed: Two hours
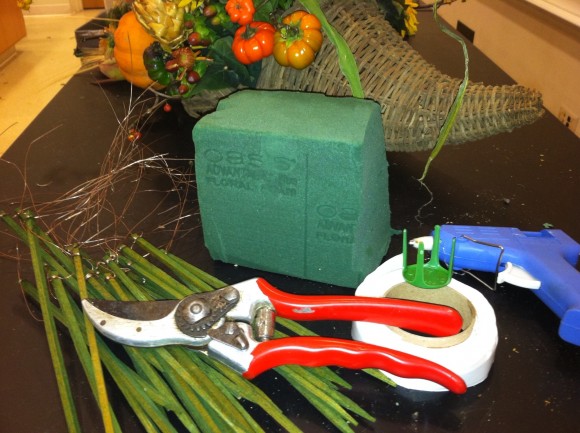
Materials:  

  • Heavy scissors
  • Pruning shears
  • A large working surface
  • Five heavier red-twig dogwood branches roughly 3/8 of an inch in diameter, cut into equal lengths. Heather recommends 30-inch lengths for a front door wreath. You can use shorter lengths to make a smaller star. This will use less plant material and may be quicker and easier to assemble. The base can also be constructed of wooden dowels.
  • Five 4-inch lengths of duct tape  (Heather recommends black)
  • 20 plastic zip ties (Heather likes 6-inch ties, but shorter ones will do)
  • Five 1½-inch bundles of red-twig dogwood branches cut in roughly 22-inch lengths (or slightly more than two-thirds of the length of the base branches)
  • Five 1½-inch bundles of twigs cut in roughly 11-inch lengths (or slightly more than one-third of the length of the base twigs)
  • Roughly 90 36-inch lengths of raffia
  • An 8-inch length of floral wire to create a loop for hanging
  • A strand of Christmas lights and additional 8-inch lengths of floral wire (optional)


To Make the Base:

You will need the five heavier branches, duct tape, and zip ties:

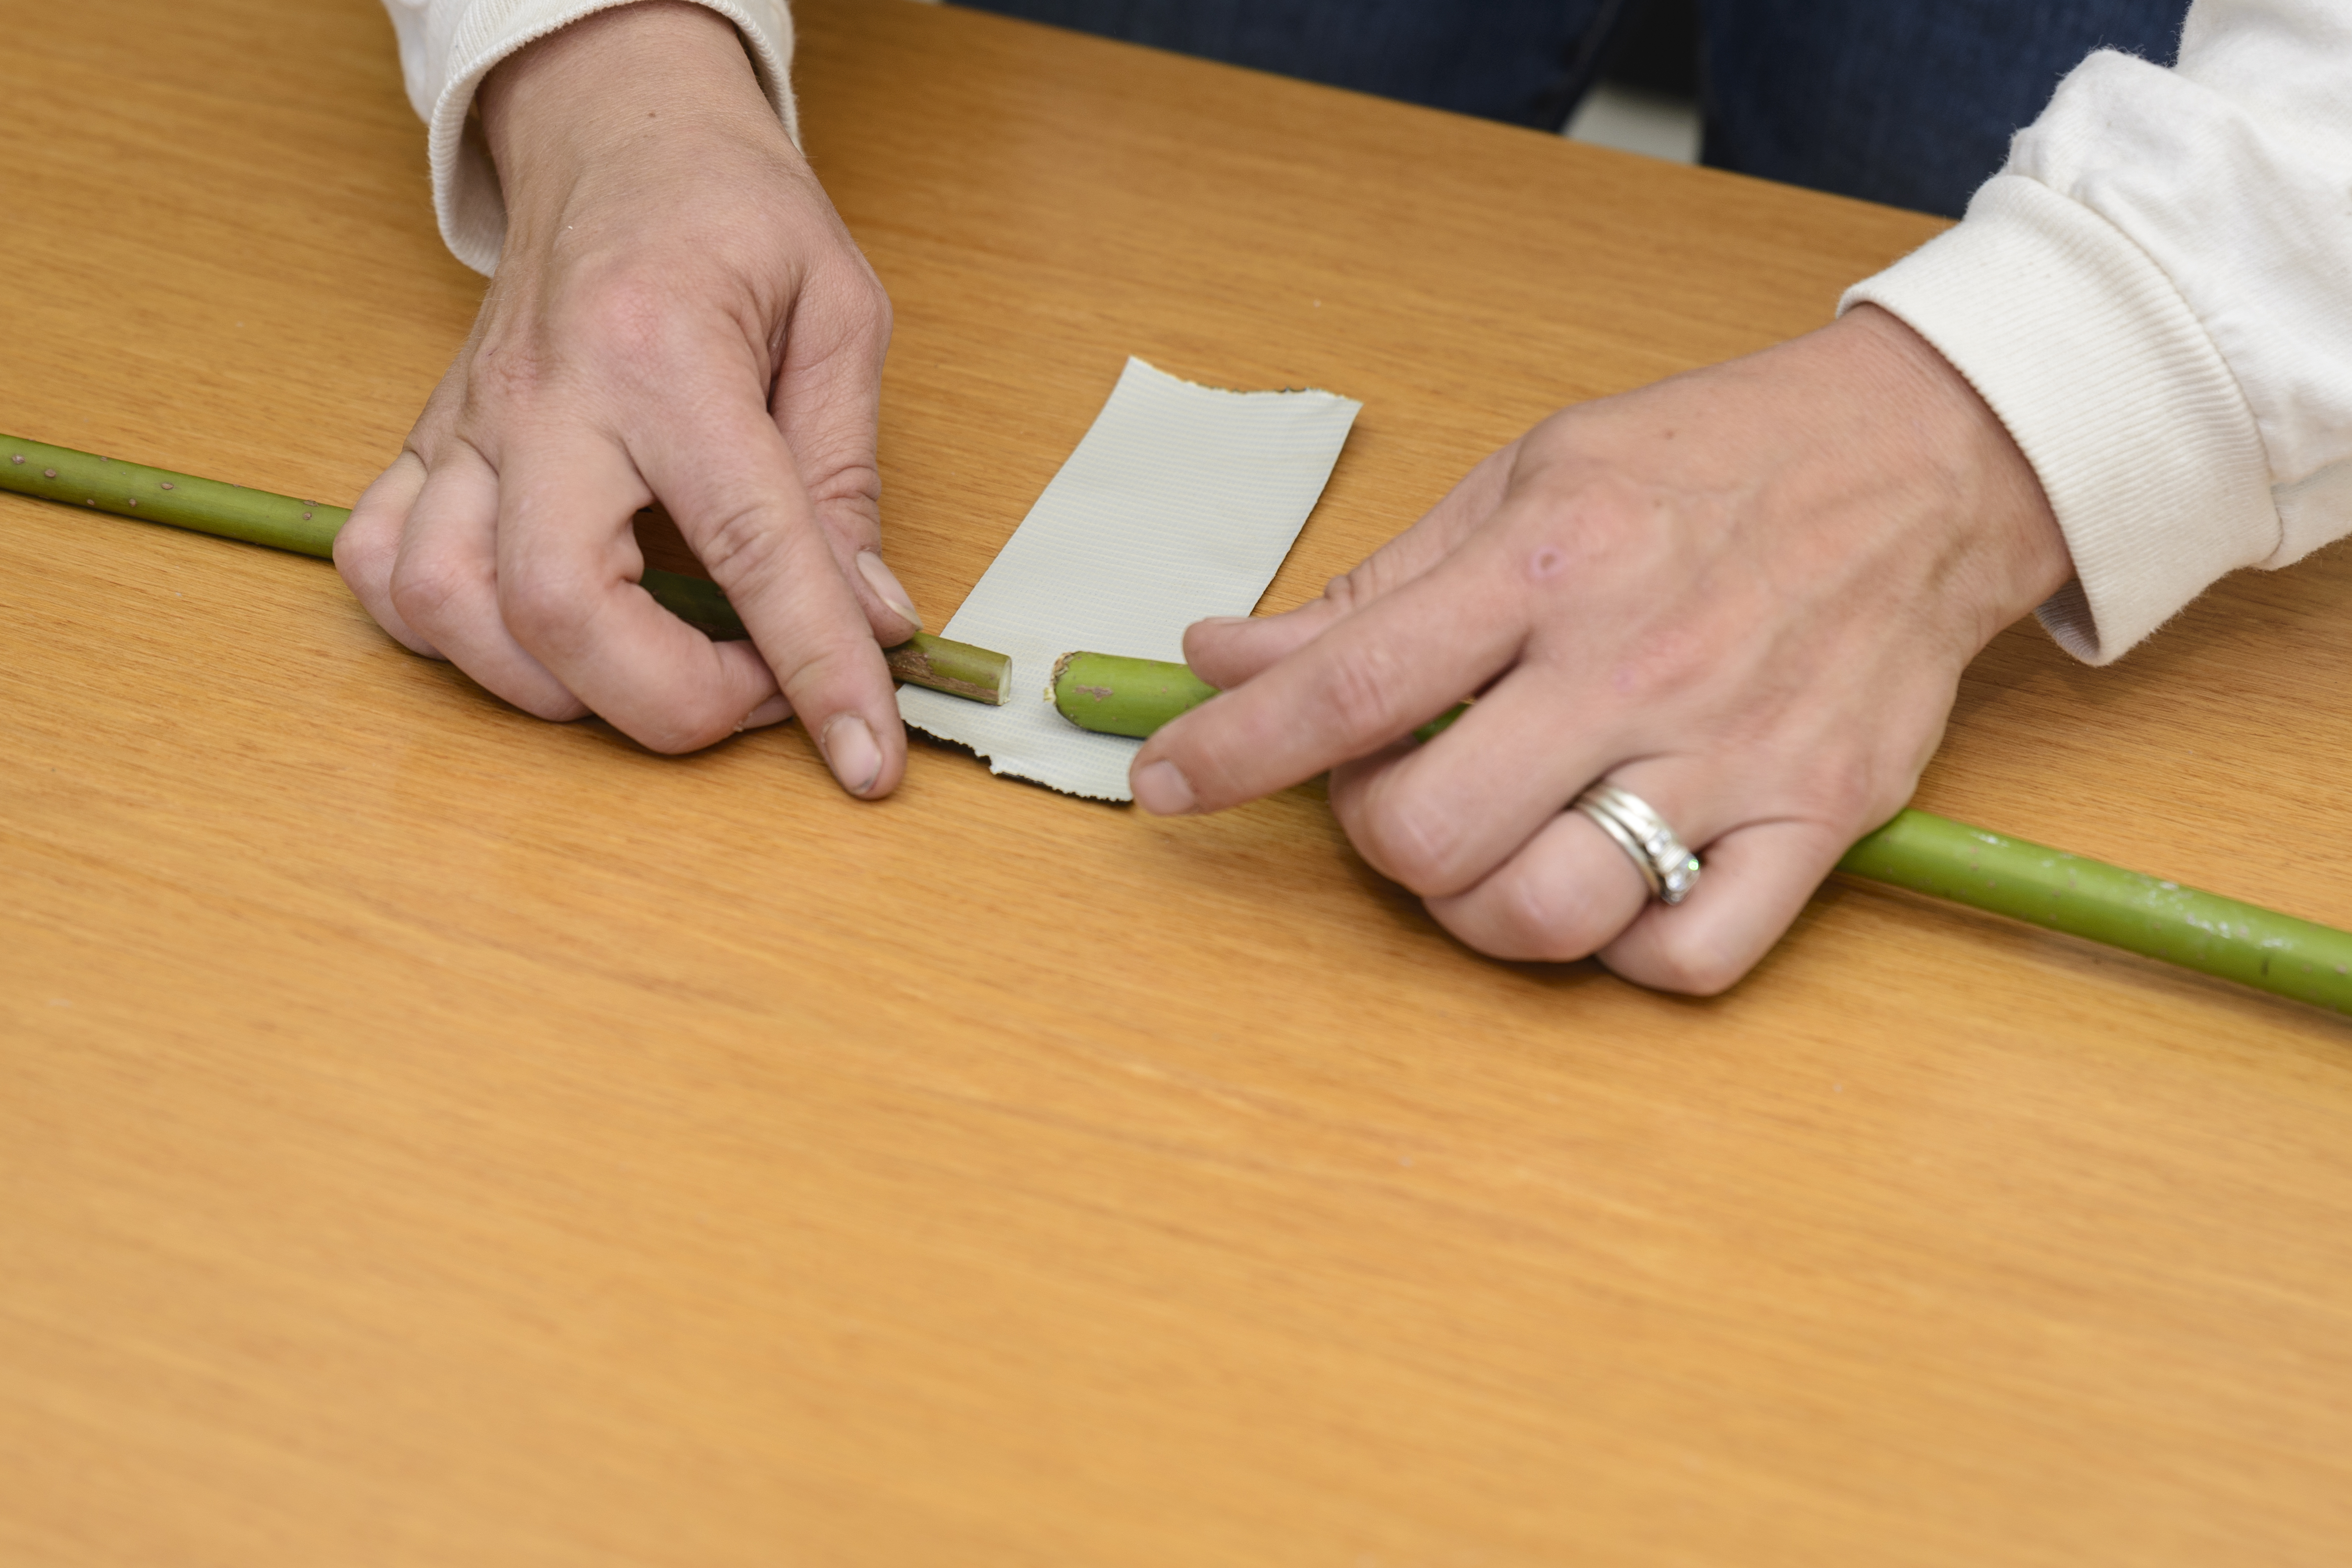
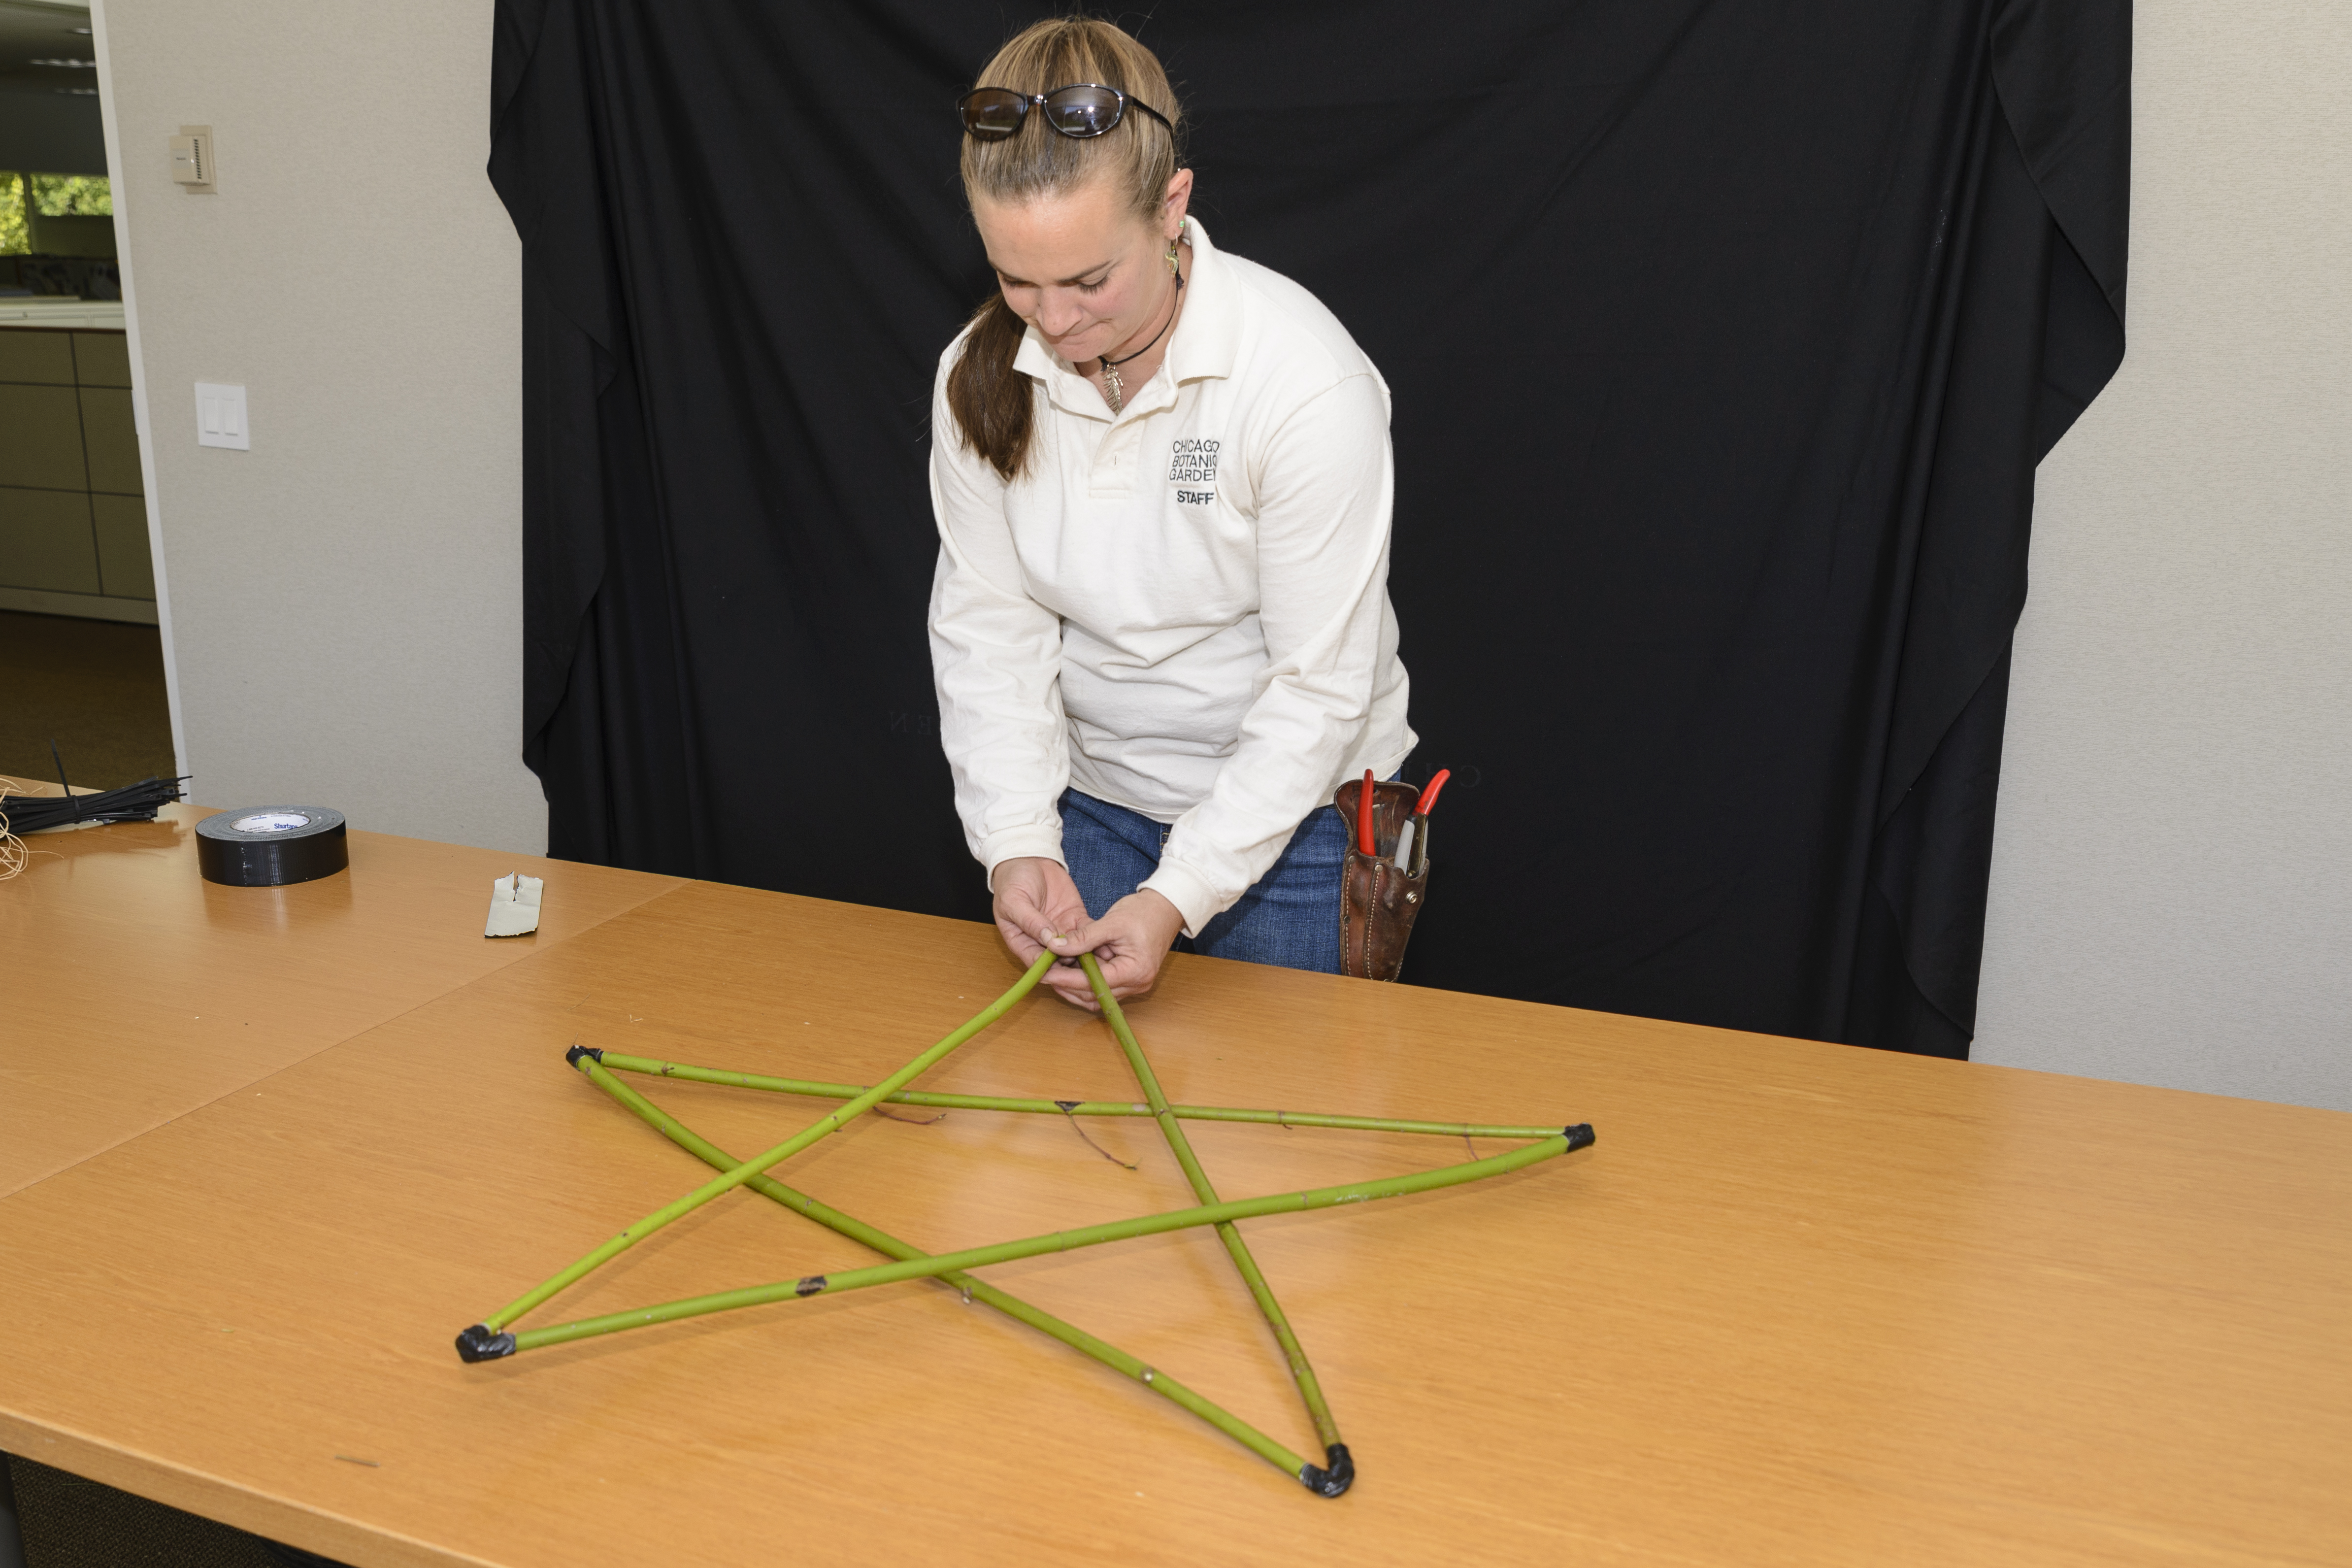
  1. Connect the five base branches into one long strand, using the duct tape to create “knuckle” joints: Place the end of the first branch 1 inch away from the top of the duct tape. Position the branch so it covers one-third of the width of the strip. Place the second branch opposite the first branch, leaving a gap between the two branches. Wrap the 1-inch end of the duct tape around the branch ends. Take the longer length of duct tape and wind it around the ends in the other direction. The joint should bend at the gap in the tape between the two branch ends. Create three more joints so that the five base branches form one very long, bendy stick.
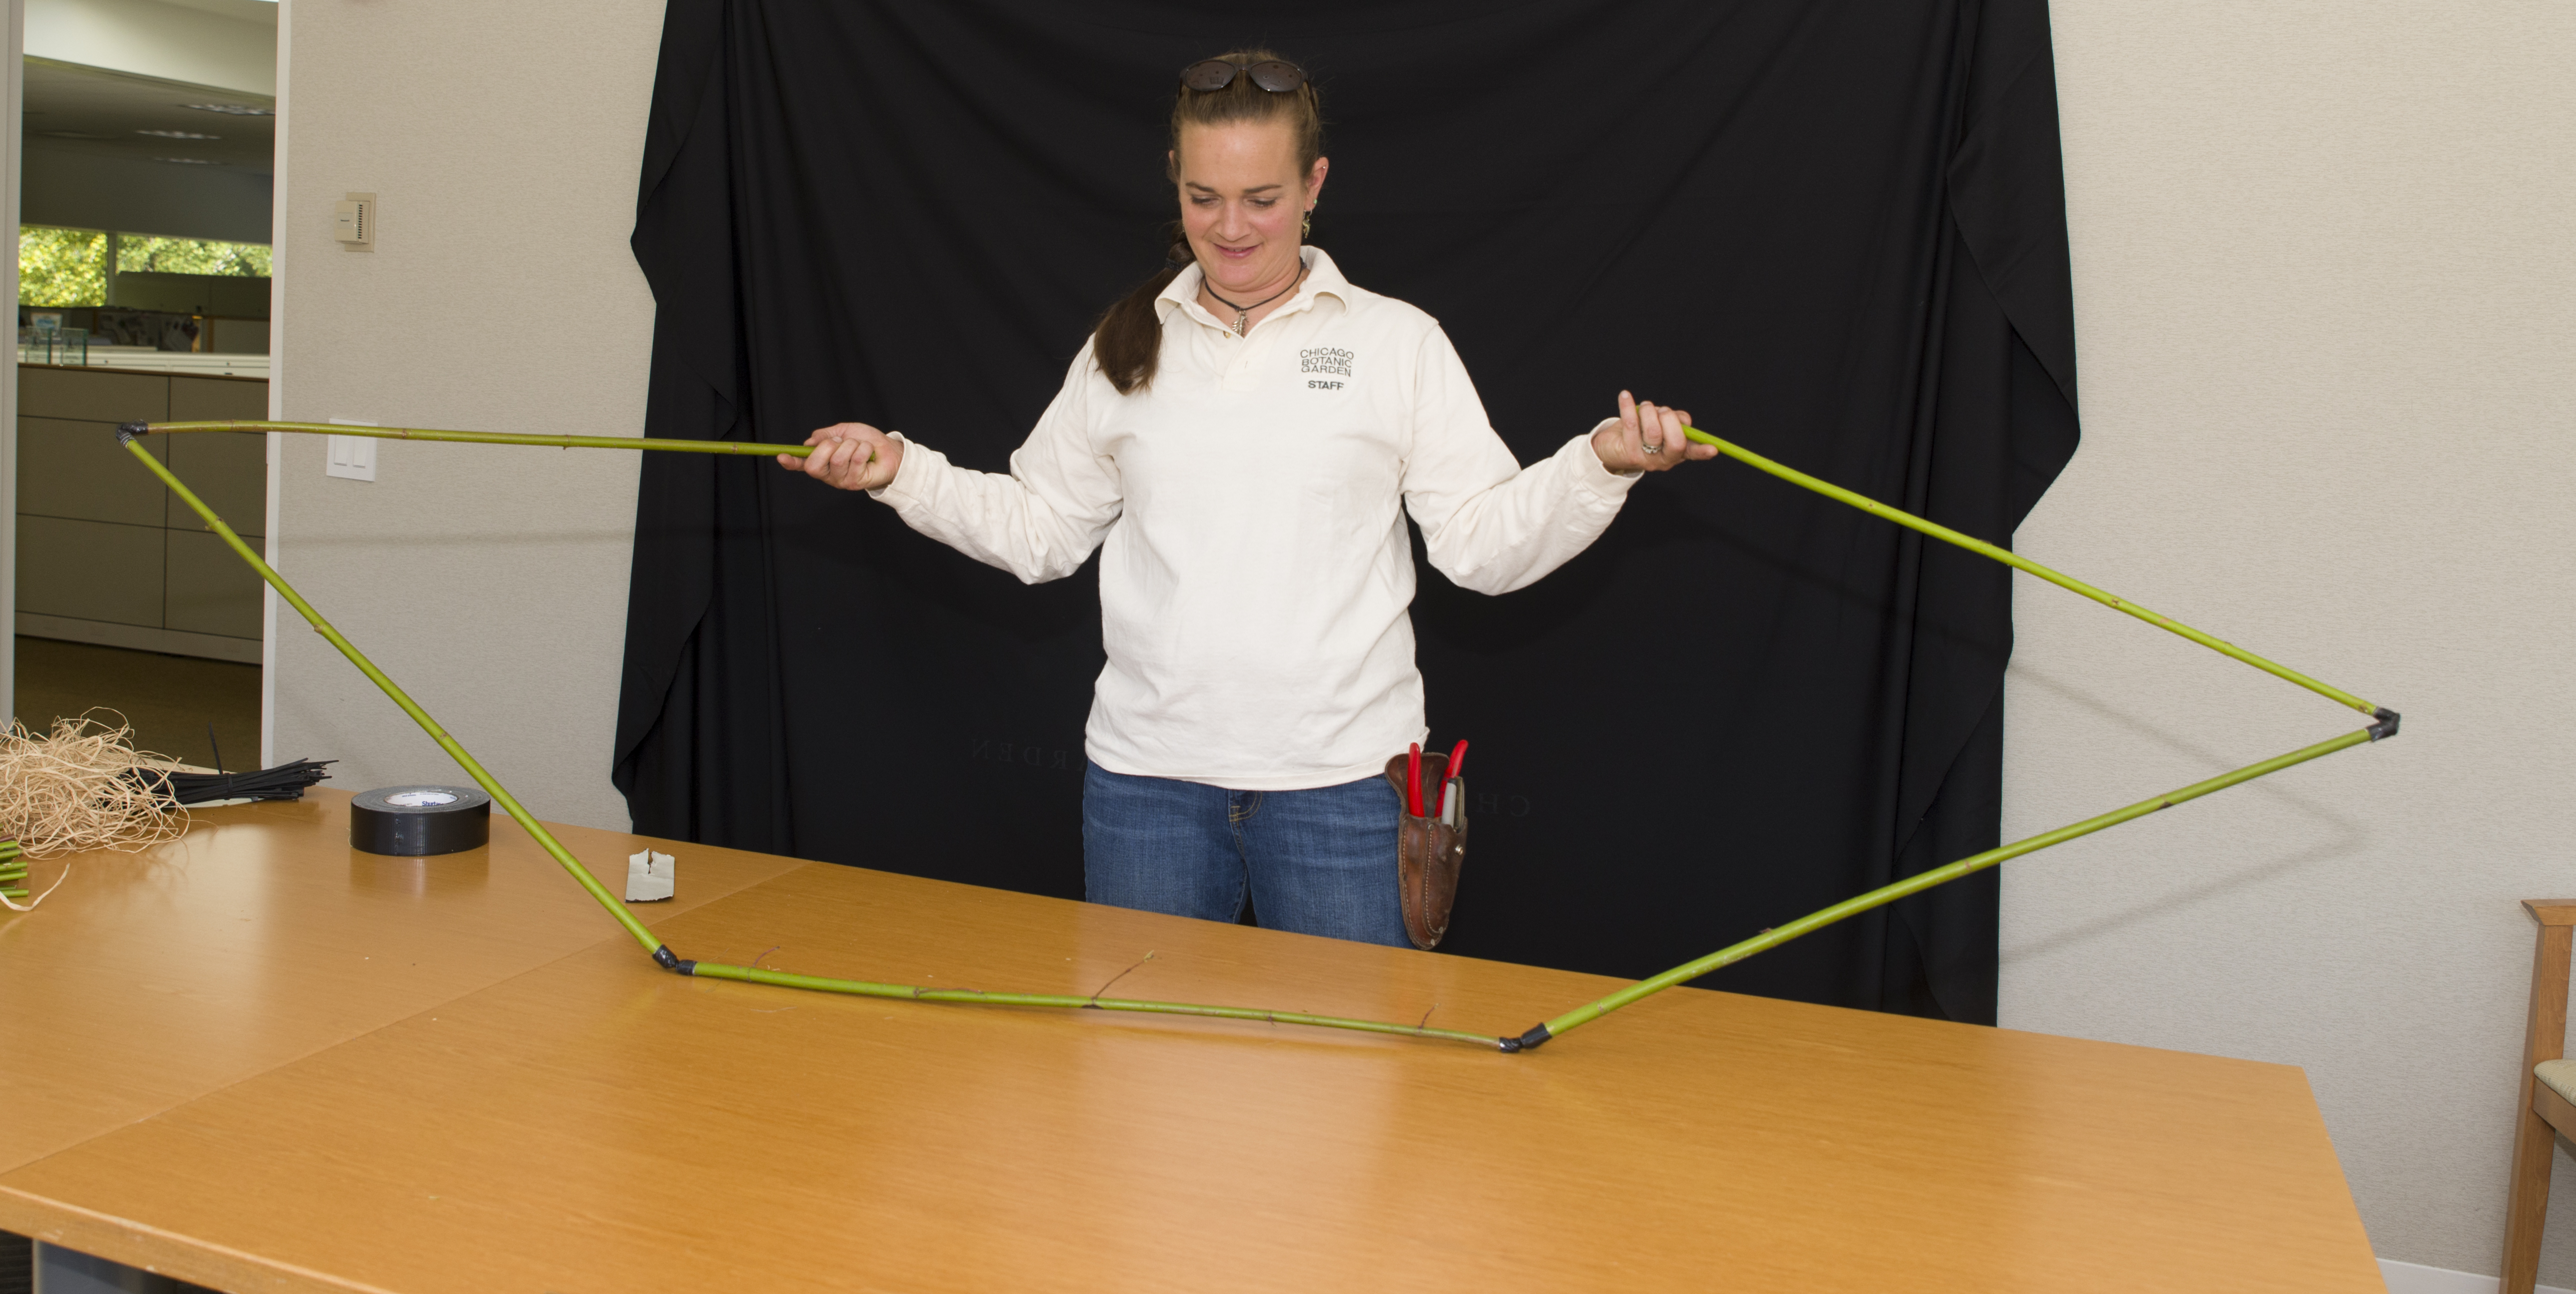
  2. Twist into a star: Hold each end of the long, connected stick and bend the first and last joints, creating a rough pentagon shape. Fold the right side of the pentagon over, then the left side. The base twigs should fall into a rough star shape.
  3. Create the final joint in the star: Notch both ends of the last piece of duct tape so it resembles a knuckle bandage. Hold the loose ends of the base sticks together, forming the last point in the star. Center the duct tape under this point. Wrap duct tape ends, one by one, around the point.
  4. Check to see that all five arms of the star are level and even. Rotate star to double check spacing of the points. Adjust as needed.
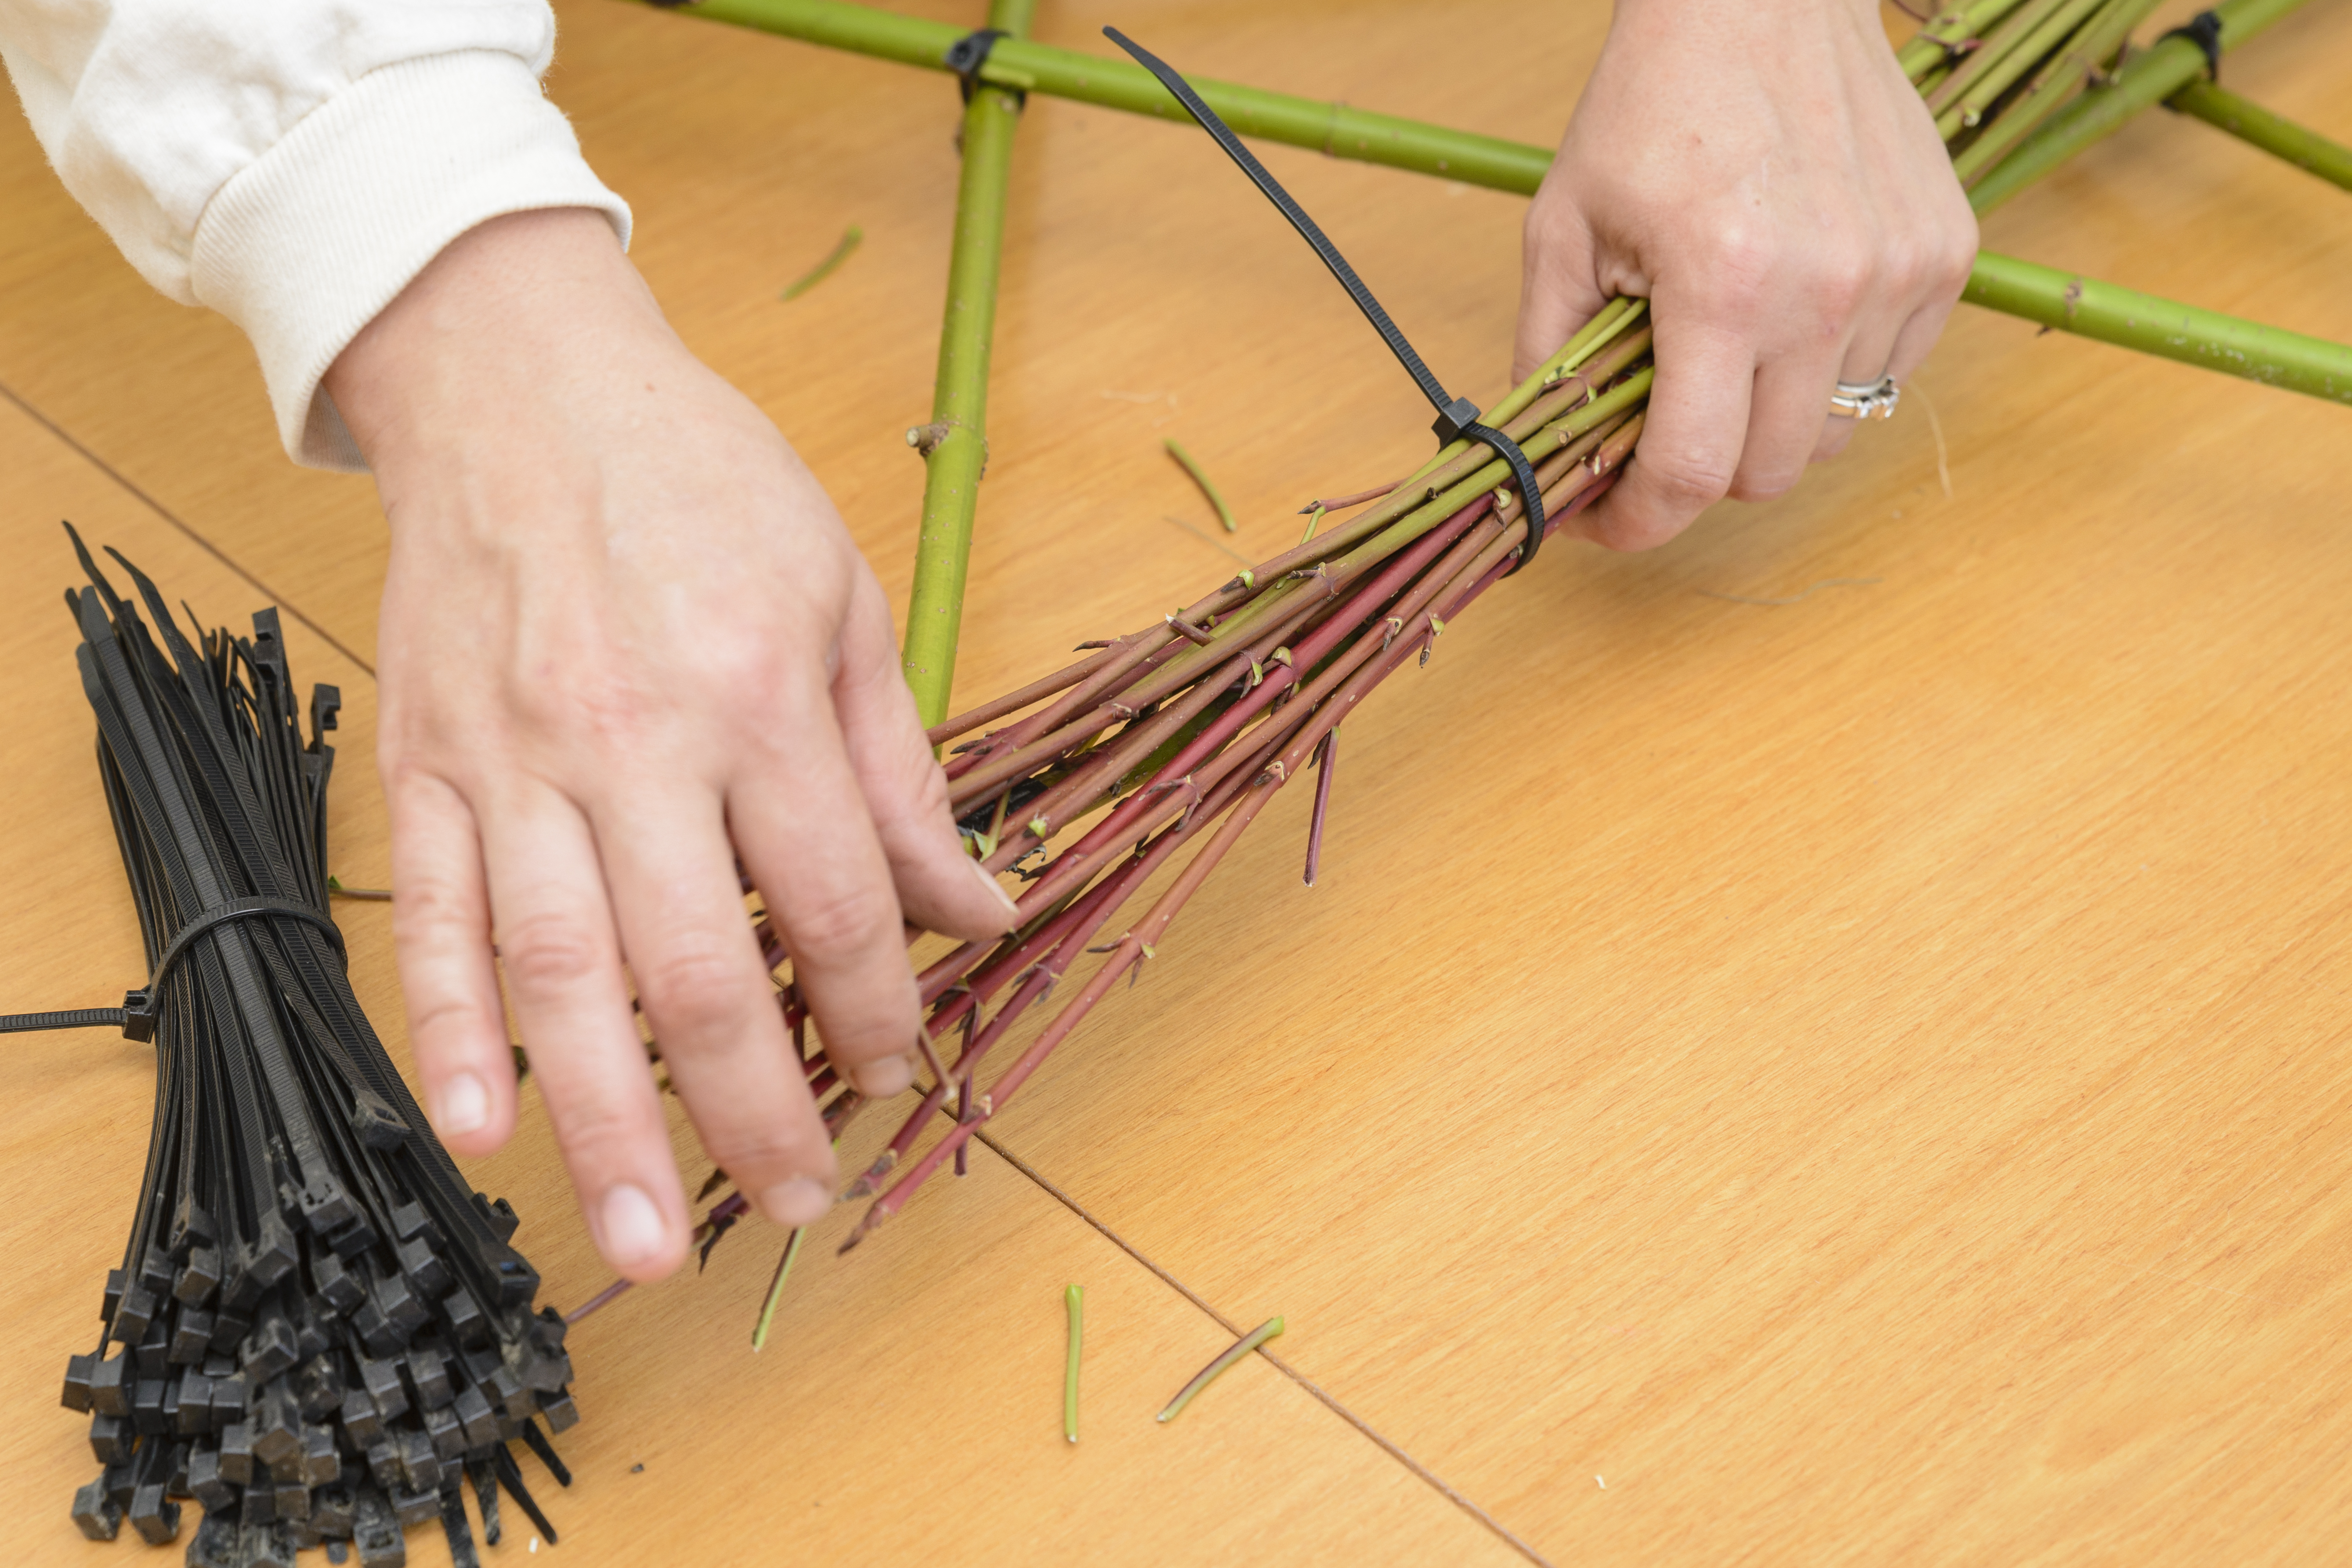
  5. Use zip ties to secure the base: You’ll see that the base branches intersect to create a pentagram in the center of the star. Loosely wrap a zip tie around each of the intersecting branches at each of the five angles of the pentagram, making sure the ties pull to the back of the star. Check again to make sure the star points are level and even. Tighten the zip locks. If you’re using freshly cut wood, remember that it will shrink and lose diameter.
PHOTO: Place two branch ends together with a gap of 1/2 inch, and tape together with duct tape.
When creating the branch joints, leave a gap between the ends when taping them together, so that the finished joint will bend.
PHOTO: Hold both ends of the long, bendy stick to create a rough pentagon shape.
Hold both ends of the long, bendy stick to create a rough pentagon shape.
PHOTO: Cross the ends over to form the star shape.
Cross the ends over to form the star shape; tape the final joint together.
PHOTO: Secure the inner joints of the base star with zip ties.
Secure the inner joints of the base star with zip ties.


Make the top layer:

You will need the longer and shorter bundles of branches, zip ties, raffia, floral wire, and optional Christmas lights.

  1. Start with the longer bundles of twigs: Lay the first bundle along a base branch, positioning the cut edges just past the inner edge of the inner pentagram. The uncut edges should extend 2 to 3 inches past the point of the star. “I want the stems to ooze around the base,” explains Heather. Secure the bundle with zip ties at two points, the middle of the pentagon, and the middle of the star point. Make sure the zip ties pull to the back of the work. Continue around the base branches, so that the pentagram and one side of each star point are covered with branches.
  2. Secure the shorter twigs. You’ll arrange the shorter twigs in a similar fashion, laying the cut edges on the outside edge of the pentagram with the natural edges covering the star point. Blend the cut edges, to give the star a woven look, and fan out the natural edges to soften each star point. Secure the shorter branches with one zip tie in the center of the star point.
  3. Double-check the placement of the bundles. Tighten and trim the zip ties.
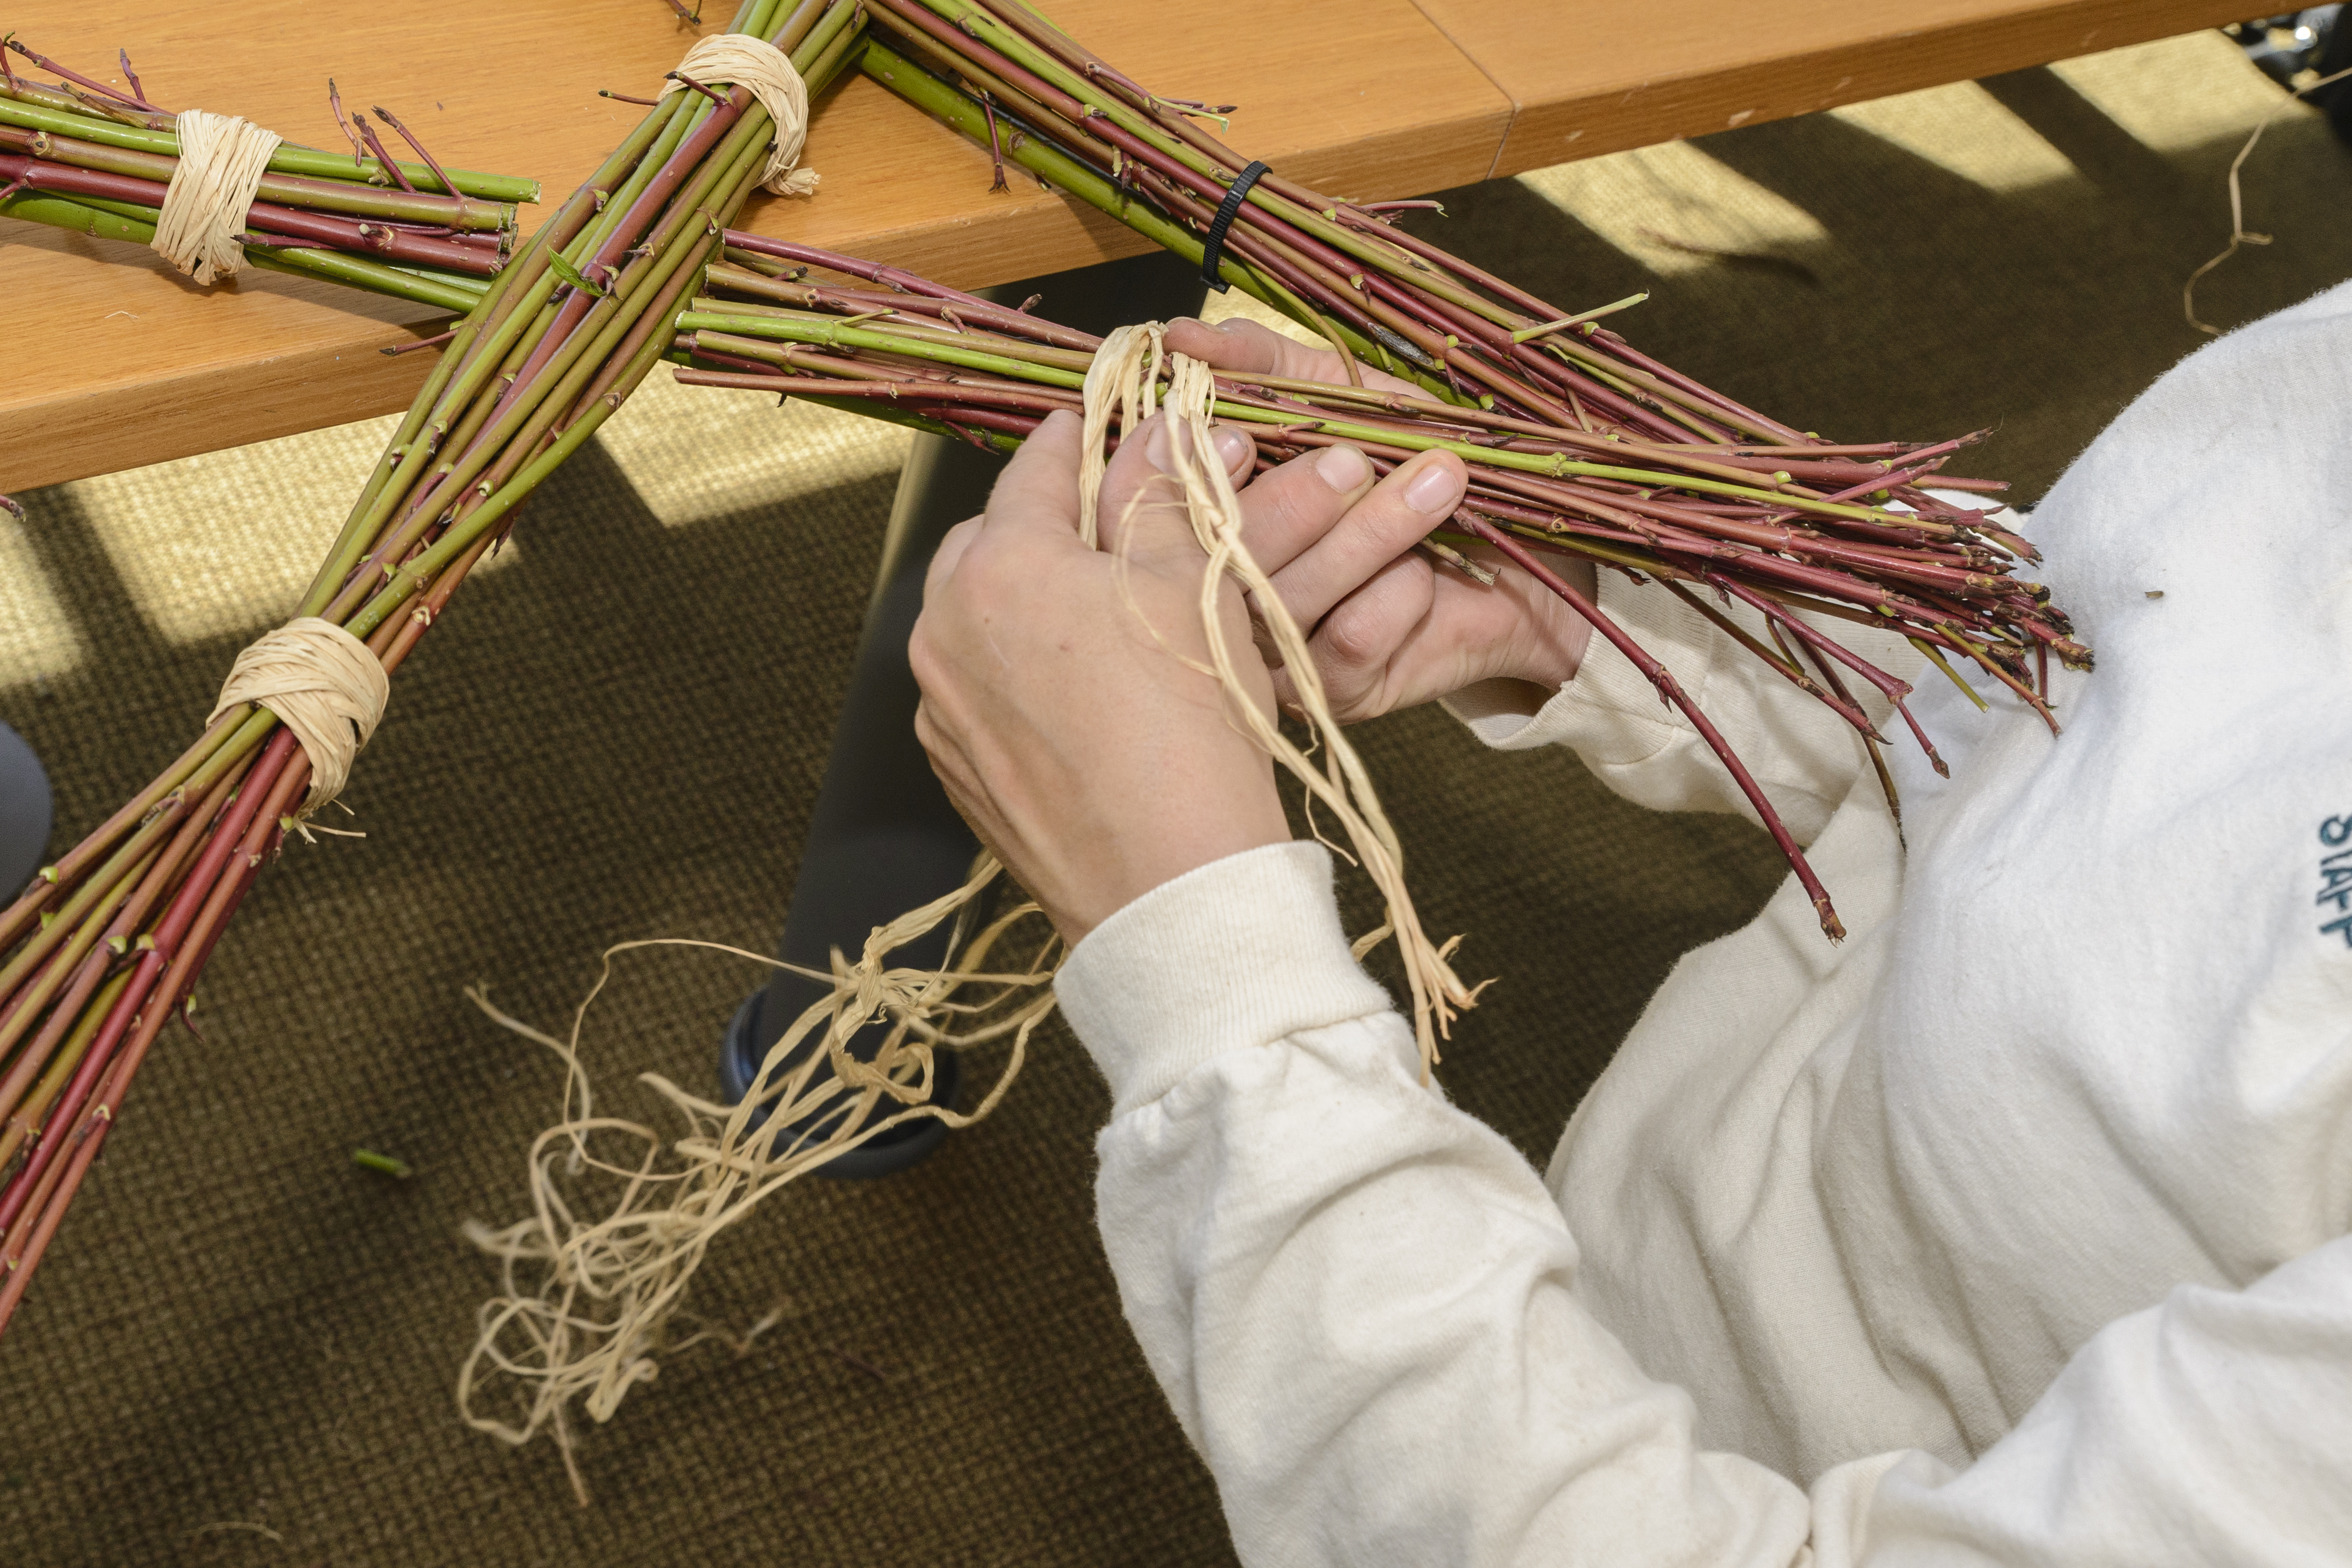
  4. Cover the zip ties with raffia: Heather has chosen a simple look, tying the raffia in the back with a square knot. You may decide to pull the knots to the front, tie the raffia in a bow, substitute ribbon for the raffia, or add other types of embellishments.
  5. Using four to five strands held together, wrap raffia around once and tie in the back. Continue winding the raffia around and around until it completely covers the zip ties and creates a nice, thick band around the bundle. Tie in the back and trim. Continue until all the zip ties are covered.
  6. Use floral wire to create a loop to hang your star.
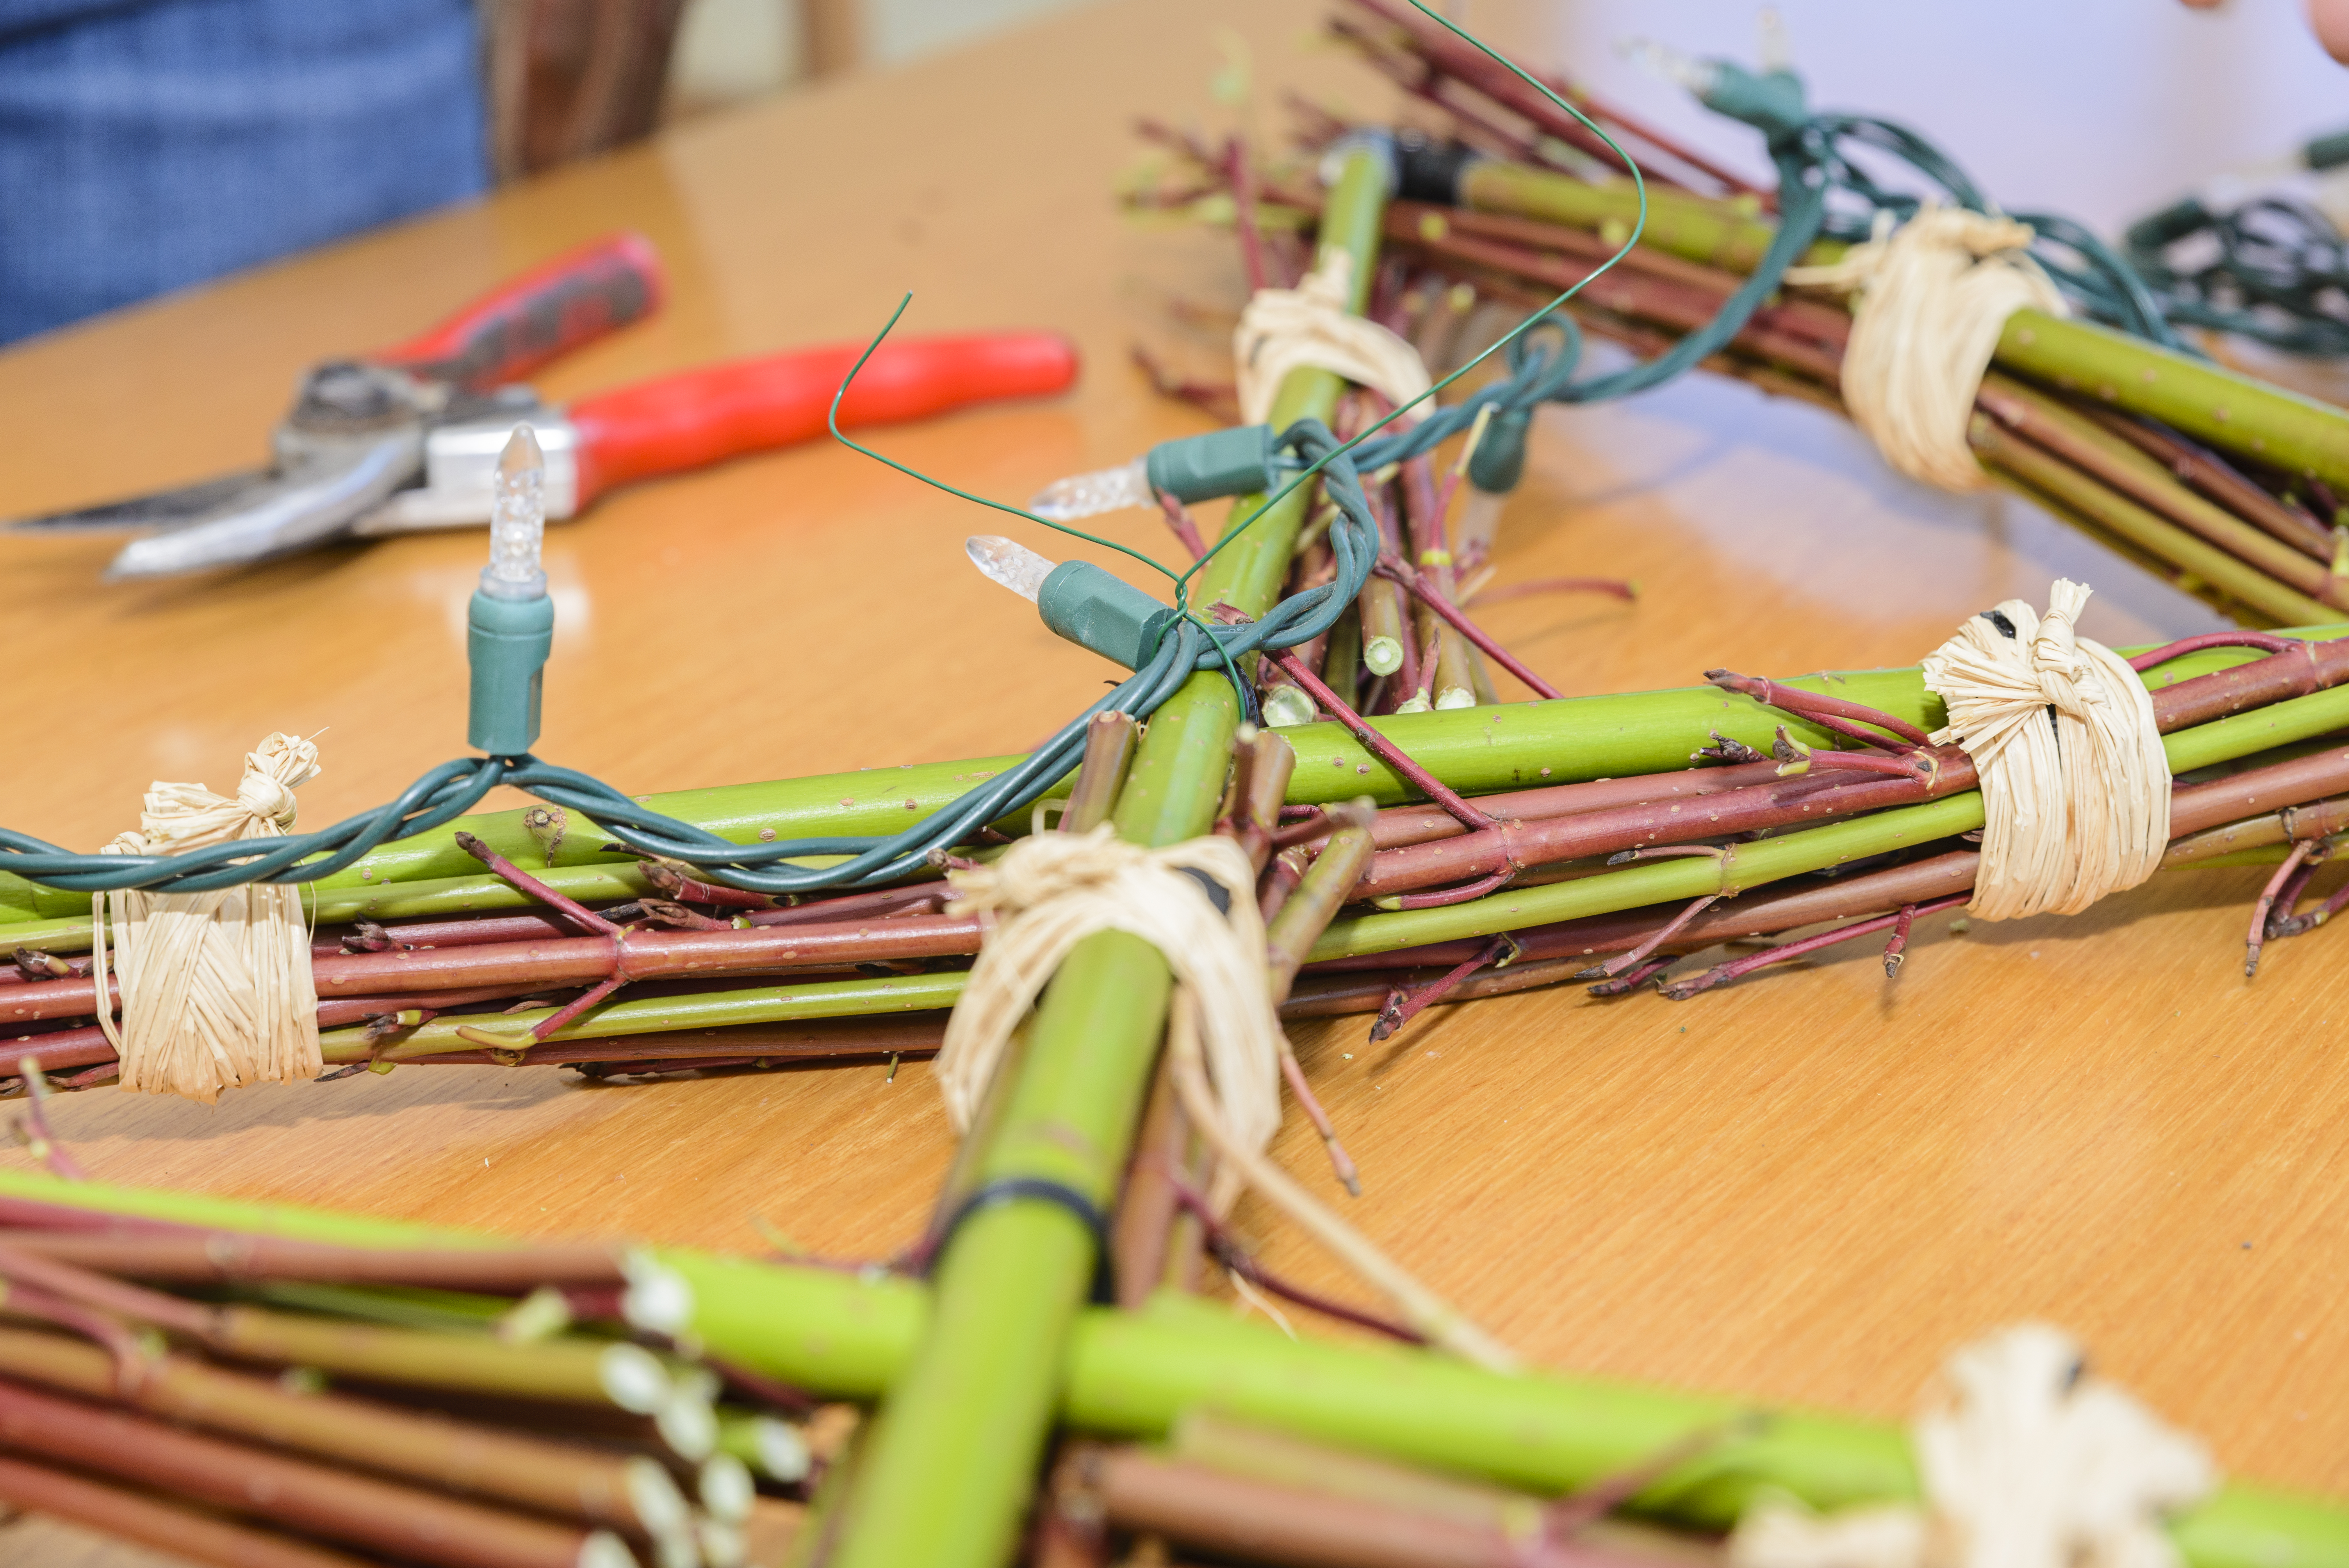
PHOTO: Start with longer twigs; uncut edges point outwards towards the star tips.
Start with longer twigs; uncut edges point outward toward the star tips.
PHOTO: Continue placing bundles; one to each side of each star point.
Continue placing bundles; one to each side of each star point.
PHOTO: Next, position and secure shorter bundles of twigs until the base is completely covered.
Next, position and secure shorter bundles of twigs until the base is completely covered.
PHOTO: Cover zip ties with raffia.
Cover the zip ties with raffia or ribbon. Knot in back.

Add lights!

You can backlight your wreath by securing a strand of holiday lights along the back of the base branches. Lay the strand along the star outline and secure it with floral wire threaded between the base sticks and the stick bundles.

PHOTO: Add lights by tying them to the back of the frame with floral wire.
Add lights by tying them to the back of the frame with floral wire.

For more holiday decorating ideas, try a class taught by Garden staff at the Joseph Regenstein, Jr. School of the Chicago Botanic Garden.

©2014 Chicago Botanic Garden and my.chicagobotanic.org

Wearable Indian Corn

I always look forward to seeing Indian corn in the market and finding it in autumn decorations. Indian corn—in its range of hues from blue to deep maroon to oranges, golds, and yellows—extends the colors of the season long after the tree leaves have faded and been raked away. It is one of November’s icons, reminding us of the cultural and botanical history of the continent.

“You call it corn; we call it maize.”

Or so the 1970s TV ad for Mazola margarine told us.

Long ago, “corn” used to be the term for any grain seed, including barley, wheat, and rye, so naturally the new world plant “maize”—botanically known as Zea mays—was labeled as another kind of corn when it was introduced in Europe. For some reason, the name stuck, and we all think of the sweet yellow stuff on our dinner plates (and its close relatives) as the one and only “corn.”

ILLUSTRATION: A comparison of teosinte vs. modern corn, Zea mays.
This drawing shows the similarities between modern corn and its ancestor, teosinte, after 10,000 years of cultivation. Illustration by Nicolle Rager Fuller, National Science Foundation

There are actually many varieties of maize-corn. Archaeologists are pretty sure that all of them resulted from the domestication and selective cultivation of the grass teosinte (pronounced tay-oh-SIN-tee), around 10,000 years ago by the people living in what is now Mexico. Over time, maize became a staple crop, yielding different varieties of nutritious and versatile grains throughout the American continent.

PHOTO: Three ears of Indian corn leaning against a pumpkin.
The farmers in my neighborhood sell Indian corn in bundles of three alongside gourds, pumpkins, and bundles of straw.

Indian corn is related to popcorn. These kinds of maize differ from other kinds in that they have a harder outer coating and a starchy interior with a bit of water inside the seed, or kernel. Popcorn pops when the kernel is heated quickly at a high temperature, causing the water inside the seed to suddenly turn into steam, inflating the starch. The sweet corn we love to eat and the dent corn used for tortilla chips and livestock feed will not produce a fluffy white snack when heated.

We can exploit these properties of Indian corn and turn the kernels into necklace beads to wear during the season. 

How to make an Indian corn necklace

You will need the following:

  • Indian corn (one average-size cob will make two necklaces)
  • a sharp embroidery needle, long, with a large eye
  • string; you can use ordinary sewing thread, but a little heavier is better
  • a pot of water to cook and soften the corn
PHOTO: Indian corn.
My daughter chose this bundle of Indian corn because she liked both the deep red of cob on the left and the pinkish seeds of the one in the middle—but not for the same necklace.

First, remove all the kernels from the cob. You can wedge a butter knife between the rows of kernels and twist to pop out the seeds. Once you get some of the cob stripped, you can rub the kernels loose with your thumb.

PHOTO: a bowl full of colored corn seeds, or kernels.
These seeds have been removed from the cob and are ready for boiling to soften them.

Place the corn kernels in a pot of water and boil for 30 minutes. (This isn’t hot enough for the corn to pop.) Test for doneness by removing three  kernels. If you can push a needle through each of them easily, they are ready. Remove the pot from the heat and allow to cool. You can add cold water to cool them faster, but be sure to leave them soaking so they do not dry out, even when you are stringing them. (Pushing the needle through dry kernels can be a painful experience.)

While the corn is cooling, cut a string about three times as long as you would like your necklace to be. (You can work in shorter sections and tie them together, but it won’t look as nice.) Thread the needle and double the string; then knot the ends.

Now, select kernels in the colors you like, or pick them up randomly so the string resembles the color pattern of the corn cob. Try to pick softer pieces. Hold each kernel by the sides, and push the needle through the middle of the kernel so that the needle is not pointing toward your finger. Then slide it down the string. Leave a few inches of string below the first piece so you have some string to tie when you’re finished.  

PHOTO: This image shows how holding the seed by the sides puts fingers out of the way of the sharp end of the needle.
It is very important to hold the kernel by its sides as you poke the needle through the middle of the seed.

If the kernel is too hard and resists piercing, do not force it! Try to push the needle through at another angle, or discard that piece and select a softer one. This is important because you will prick yourself with the sharp needle if you are not careful. In fact, you’ll probably stab yourself at least once even if you are careful, so this is not a project for very young children. 

Pack the moist seeds close together on the string. As they dry, they will shrink in size. You may want to slide them together a little tighter so the string doesn’t show, but you’ll also want to leave enough wiggle room so the necklace has flexibility. When your string of corn is long enough, allow the seeds to dry completely. Then tie the ends together and you will have an attractive necklace to wear to Thanksgiving dinner or other festive gatherings!

PHOTO: Indian corn necklaces.
The finished necklaces look great layered in different lengths and colors.

One final note: when I made a corn necklace in third grade as part of a unit on Native American culture, I was under the impression that indigenous people of long ago made and wore necklaces like this. No way. All corn was grown for food, and it  was needed to sustain the population, so it would not have been turned into jewelry. This season, we can be thankful for the plentiful food we have to eat, and we can appreciate the beautiful colors of the corn as decoration during the feast.

©2014 Chicago Botanic Garden and my.chicagobotanic.org

Cornucopia 101

It’s a big week for cooking, for getting out the china, crystal, and silver, and for setting a holiday-worthy table…but have you thought about a centerpiece yet?

A cornucopia, or horn of plenty, is a classically beautiful, easy, and crowd-pleasing way to pull together a centerpiece without a lot of fuss or expense.  I taught a fall cornucopia class at the Garden, and I had the pleasure of appearing on WGN-TV with tips for making an edible fruit-and-vegetable cornucopia. This week, I thought I’d share a few tips that both cornucopias have in common.

Whether you’re using flowers or fruit or vegetables, the process of assembling a cornucopia is basically the same. Once your supplies are gathered, it should take less than an hour to put together.


Essential tools include pruners, floral foam, and a hot glue gun.
Essential tools include pruners, floral foam, and a hot-glue gun.

Gather the basic tools

Horn-shaped cornucopia baskets are readily available at craft and hobby stores. In addition to a basket, you’ll need pruners, floral picks, a hot-glue gun, a small plastic liner tray that fits into the front of the basket, and a chunk of floral foam that fits into the tray. If you’re using fresh flowers, prepare the floral foam by soaking it in water.


Ingredients for a fall cornucopia include apples, leaves on branches, gourds, and fall flowers.

Gather the bountiful ingredients

No two cornucopias are the same; the ingredients will vary, of course, according to availability and personal taste.

For a fall cornucopia, your ingredient list might be: millet, wheat, gourds or mini-pumpkins, flowering kale, dried artichoke, green apples, stems of hypericum, a small bunch of long-stemmed mums, sunflowers with long stems, baby corn, dried yarrow, sweetgum leaves on a twig with seedpods, and a variety of nuts.

For an edible cornucopia, your ingredient list might be: an assortment of apples and nuts, Indian corn, pumpkins and squash in various shapes and sizes, and a bunch of fall flowers (widely available at grocery stores).


To begin, position the largest items by inserting floral picks into each and anchoring it in the foam.
To begin, position the largest items by inserting floral picks into each and anchoring them in the foam.

Assemble the base

Set the floral foam (dry for fruits/vegetables, wet for fresh flowers) into the small tray and into the forward portion of the cornucopia basket. Anchor the foam on a prong if desired.

Starting with the largest material—pumpkins, gourds, large corncobs, and large sunflowers. Insert floral picks and position them in the foam. Heavy, rounded items should be at the bottom, toward the front.


Build up the layers with smaller items and flower clusters filling in the gaps.
Build up the layers, with smaller items and flower clusters filling in the gaps.

Layer in the smaller items

Add picks to apples, dried artichokes, and small gourds. Layer them singly at angles to the heavy items. Try to cover the corners of the floral foam.

Next, layer in fresh or dried flowers, using them in small bunches rather than individual stems. Insert some leaning high and toward the back of the basket, and others leaning low and toward the front, creating extension and depth.


Notice how heavier items like pumpkins, cabbage, and apples are forward and low.

Fill in the gaps

Add hypericum or mums in clusters to hide empty spots. Then add single flowers as needed to help pull all the elements together. A finished cornucopia has height, balance, and both forward and backward movement.

Finish with millet for “line,” plus foliage and nuts. (The glue gun comes in handy for attaching nuts to floral picks.) The overall effect should be one of spilling bounty.

Happy Thanksgiving, everyone!

©2013 Chicago Botanic Garden and my.chicagobotanic.org

Extreme Pumpkins

Riley Obenchain conjures a feeling of mischief and magic.

He wears a tattered straw hat, trimmed with a red poppy, that looks like something a scarecrow might wear. His bushy black eyebrows dance when he talks, bringing to mind the woolly bear caterpillars abundant in the fall. A playfulness—tinged with the macabre—also shows in the jack-o-lantern characters Obenchain creates each year for HallowFest, the Garden’s popular, family-friendly celebration of Halloween.

PHOTO: Riley Obenchain with giant pumpkins.
Riley Obenchain poses with some enormous jack-o-lantern fodder in the Regenstein Fruit & Vegetable Garden.

Obenchain’s ghoulish, yet somehow gallant, jack-o-lanterns provide a mild dose of horror while eliciting smiles and laughs. There’s the tiny pumpkin gripped in the long, pointy teeth of a massive pumpkin. The little guy has a sort of “Oh, no, Mr. Bill” look on his face. The big, toothy smile on another jack-o-lantern gives a mixed message. Obenchain describes it as an “I’m-happy-to-see-you-because-I’m-going-to-eat you” look.

“I get a lot of, ‘Wow! I could never do that!’” says Obenchain, who’s helped keep the Garden’s trams, lawnmowers, and other machinery running smoothly for 35 years, “but in actuality, anyone can do this.” Here are a few of Obenchain’s tricks and techniques, gleaned in a recent interview.

PHOTO: A white pumpkin with a shocked expression and a rubber snake in its mouth.
The removed pieces of the eyes of this “Ernie” are recycled as ears; leftover mouth pieces are used for hands.

Where do you get your inspiration?

A lot of times, the shape of the pumpkin has the idea. The pumpkin determines what you’re going to carve. How is it going to sit? Is it a “Bert” or an “Ernie”? (A Bert has a more elongated shape, while an Ernie has a round, well, pumpkin head. Obenchain is cultivating a large pumpkin this year that has a sort of crocodile look to it.) 

What are your favorite tools?

I like using old-fashioned steel knives. (The steel is more rigid than stainless steel. Obenchain uses a range of sizes and keeps them sharp. He taps them into very thick pumpkins using an old hickory log that he’s kept for years. Toothpicks, bamboo skewers, or even the occasional nail can be used to patch mistakes. A trowel with a sharpened end makes a good seed scooper.)

What sorts of other materials do you use?

Long, skinny gourds for antennaes. Gourds for ears and eyes. One year I used a forked stick for the tongue of a snakelike pumpkin. (Obenchain shows photos of jack-o-lanterns carved by nephews under his tutelage. One looks a little worse for wear, with crosses for eyes and an arrow through its temples.)

What is the biggest pumpkin you’ve ever carved?

An Atlantic Giant squash (Cucurbita maxima ‘Atlantic Giant’). It topped out at 1,010 pounds. (The record-breaker could cover a small table top. Obenchain needed a hand-pruning saw to carve its foot-thick walls. The big galoot had to be moved with a forklift. Another behemoth was so long that Obenchain had to crawl inside to scoop it out, creating the ultimate Obenchain image—a man-eating pumpkin!)

PHOTO: A devilish pumpkin with lots of pointy teeth.
Carving stalks instead of using toothpicks to inset eyeballs ensures they don’t rot out and stay in place while your jack-o-lantern is on display.

While most of the pumpkins carved for Hallowfest are from outside growers, each year, Obenchain tries to grow a few giants of his own in friendly competition with other Garden staff members. This year, he’s growing another ‘Atlantic Giant’ with seeds saved from the thousand-plus-pound monster—if the raccoons don’t get it first!

Join us for HallowFest on October 26 and 27, from 6 to 9 p.m. on Saturday and 4 to 7 p.m. on Sunday, to see Obenchain’s creations for this season.


©2013 Chicago Botanic Garden and my.chicagobotanic.org

Egg-cellent adventure

Dye-ing for nature-based fun? Forgo the food coloring and kits, and go for naturally safe, naturally kid-friendly, and naturally beautiful “homemade” egg dyes instead. Dyes can be used on hard-boiled or fancy blown-out eggs. Most of what you need is probably already in your own kitchen and pantry.

PHOTO: The vegetables we use, and their accomanying egg colors.
What colors will you get? Beets = purple, yellow onions = yellow, red cabbage = pale blue.
PHOTO: the tools you'll need to create your own egg dyes
The tools you’ll need to create your own egg dyes.

Step 1: Gather your supplies.

Stainless steel utensils and glass containers won’t stain; always rinse utensils as you go from color to color, so there’s no contamination.

  • Pint and half-pint Ball jars or heat-safe glass bowls (the better to watch stuff happen!)
  • Non-reactive stainless steel or enamel saucepans
  • Strainer
  • Tongs

Step 2: Gather your ingredients.

Vegetables, fruits, and spices can all create lovely, earthy colors. We hard-boiled large, white eggs and used plain white vinegar, which helps to set the color. Here are the dozen dyes and “recipes” we tried, in order of color intensity (after about 20 minutes of steeping):

Chopped and simmered fresh carrot tops create a pale yellow dye.
We used a straightened paperclip to poke holes in an egg for blowing.
Rinse blown-out eggs thoroughly inside and out.
  • Beets = Purple. 1 large beet (cut into chunks) + 4 cups boiling water + 2 tbs. vinegar. Cool and strain.
  • Yellow onions = Yellow-orange. Skins only of 6 medium yellow onions + 2 cups water; simmer for 15 minutes. Strain and add 2 tsp. vinegar.
  • Grape juice = Magenta. 1 cup all-natural grape juice + 1 tbs. vinegar.
  • Coffee = Gold. ½ cup ground coffee + 2 cups boiling water. Steep, strain, and add 1 tbs. vinegar.
  • Red onions = Blue. Skins only of 6 red onions + 2 cups water; simmer for 15 minutes. Strain and add 3 tsp. vinegar.
  • Green tea = Light green. 6 green tea bags + 1 cup boiling water. Steep 5 minutes and strain.
  • Red cabbage = Pale blue. ½ head red cabbage (cut into chunks) + 4 cups boiling water + 2 tbs. vinegar. Cool and strain.
  • Turmeric = Yellow. 2 tbs. turmeric + 1 cup boiling water + 2 tsp. vinegar.
  • Paprika = Orange. 2 tbs. paprika + 1 cup boiling water + 2 tsp. vinegar.
  • Blueberries = Blue/Gray. 1 cup frozen blueberries + 1 cup water. Let stand ‘til room temperature and strain.
  • Carrot tops = Pale yellow. 2 cups chopped carrot greens + 1½ cups water; simmer for 15 minutes. Strain and add 2 tsp. vinegar.
  • Orange peels = Palest yellow. Peels of 6 oranges + 1 ½ cups water; simmer for 20 minutes. Strain and add 2 tsp. vinegar.

Step 3: Gather your family.

Kids love to color eggs. Guided by the recipes above, experiment with veggie/spice quantities and steep times. The longer you steep, the deeper the color—steeping eggs can even be left overnight in the refrigerator. Hardboil eggs or blow them out:

Beets, green tea bags, and orange peels all make gorgeous natural dyes.
  • Use a heavy needle or bent paperclip to poke holes in each end of a fresh egg.
  • Wiggle the needle around inside to pierce the yoke.
  • Blow strongly through one hole, collecting the contents from the other in a small bowl.
  • Rinse eggs thoroughly inside and out.
  • Don’t waste your egg contents—scramble them or use in baking.

Kids with the urge to decorate can:

  • Wrap rubber bands around eggs before dyeing for striped designs.
  • Wrap onion skins around eggs and secure with rubber bands for marbled looks after coloring.
  • Write names, etc. in wax crayon on eggs before dyeing: magic!

Step 4: Embrace the imperfect!

Naturally dyed eggs sometimes splotch or dye unevenly—we had great success with beets and green tea, but our paprika-dyed egg looked marbled and our orange peel dye gave up just a tinge of color. Nonetheless, all looked beautiful in white baskets with shredded kraft paper.

The finished product: gorgeous colors, all "homemade."
The finished product: gorgeous colors, all “homemade.”

©2013 Chicago Botanic Garden and my.chicagobotanic.org