I don’t have to look outside to know that it has been raining lately. My phone has been ringing off the hook with calls from the Illinois Poison Center requesting help with potential mushroom poisoning cases. I helped with four different cases today! Three of them involved children; the other was a case of an adult eating something that “looked good to eat.”
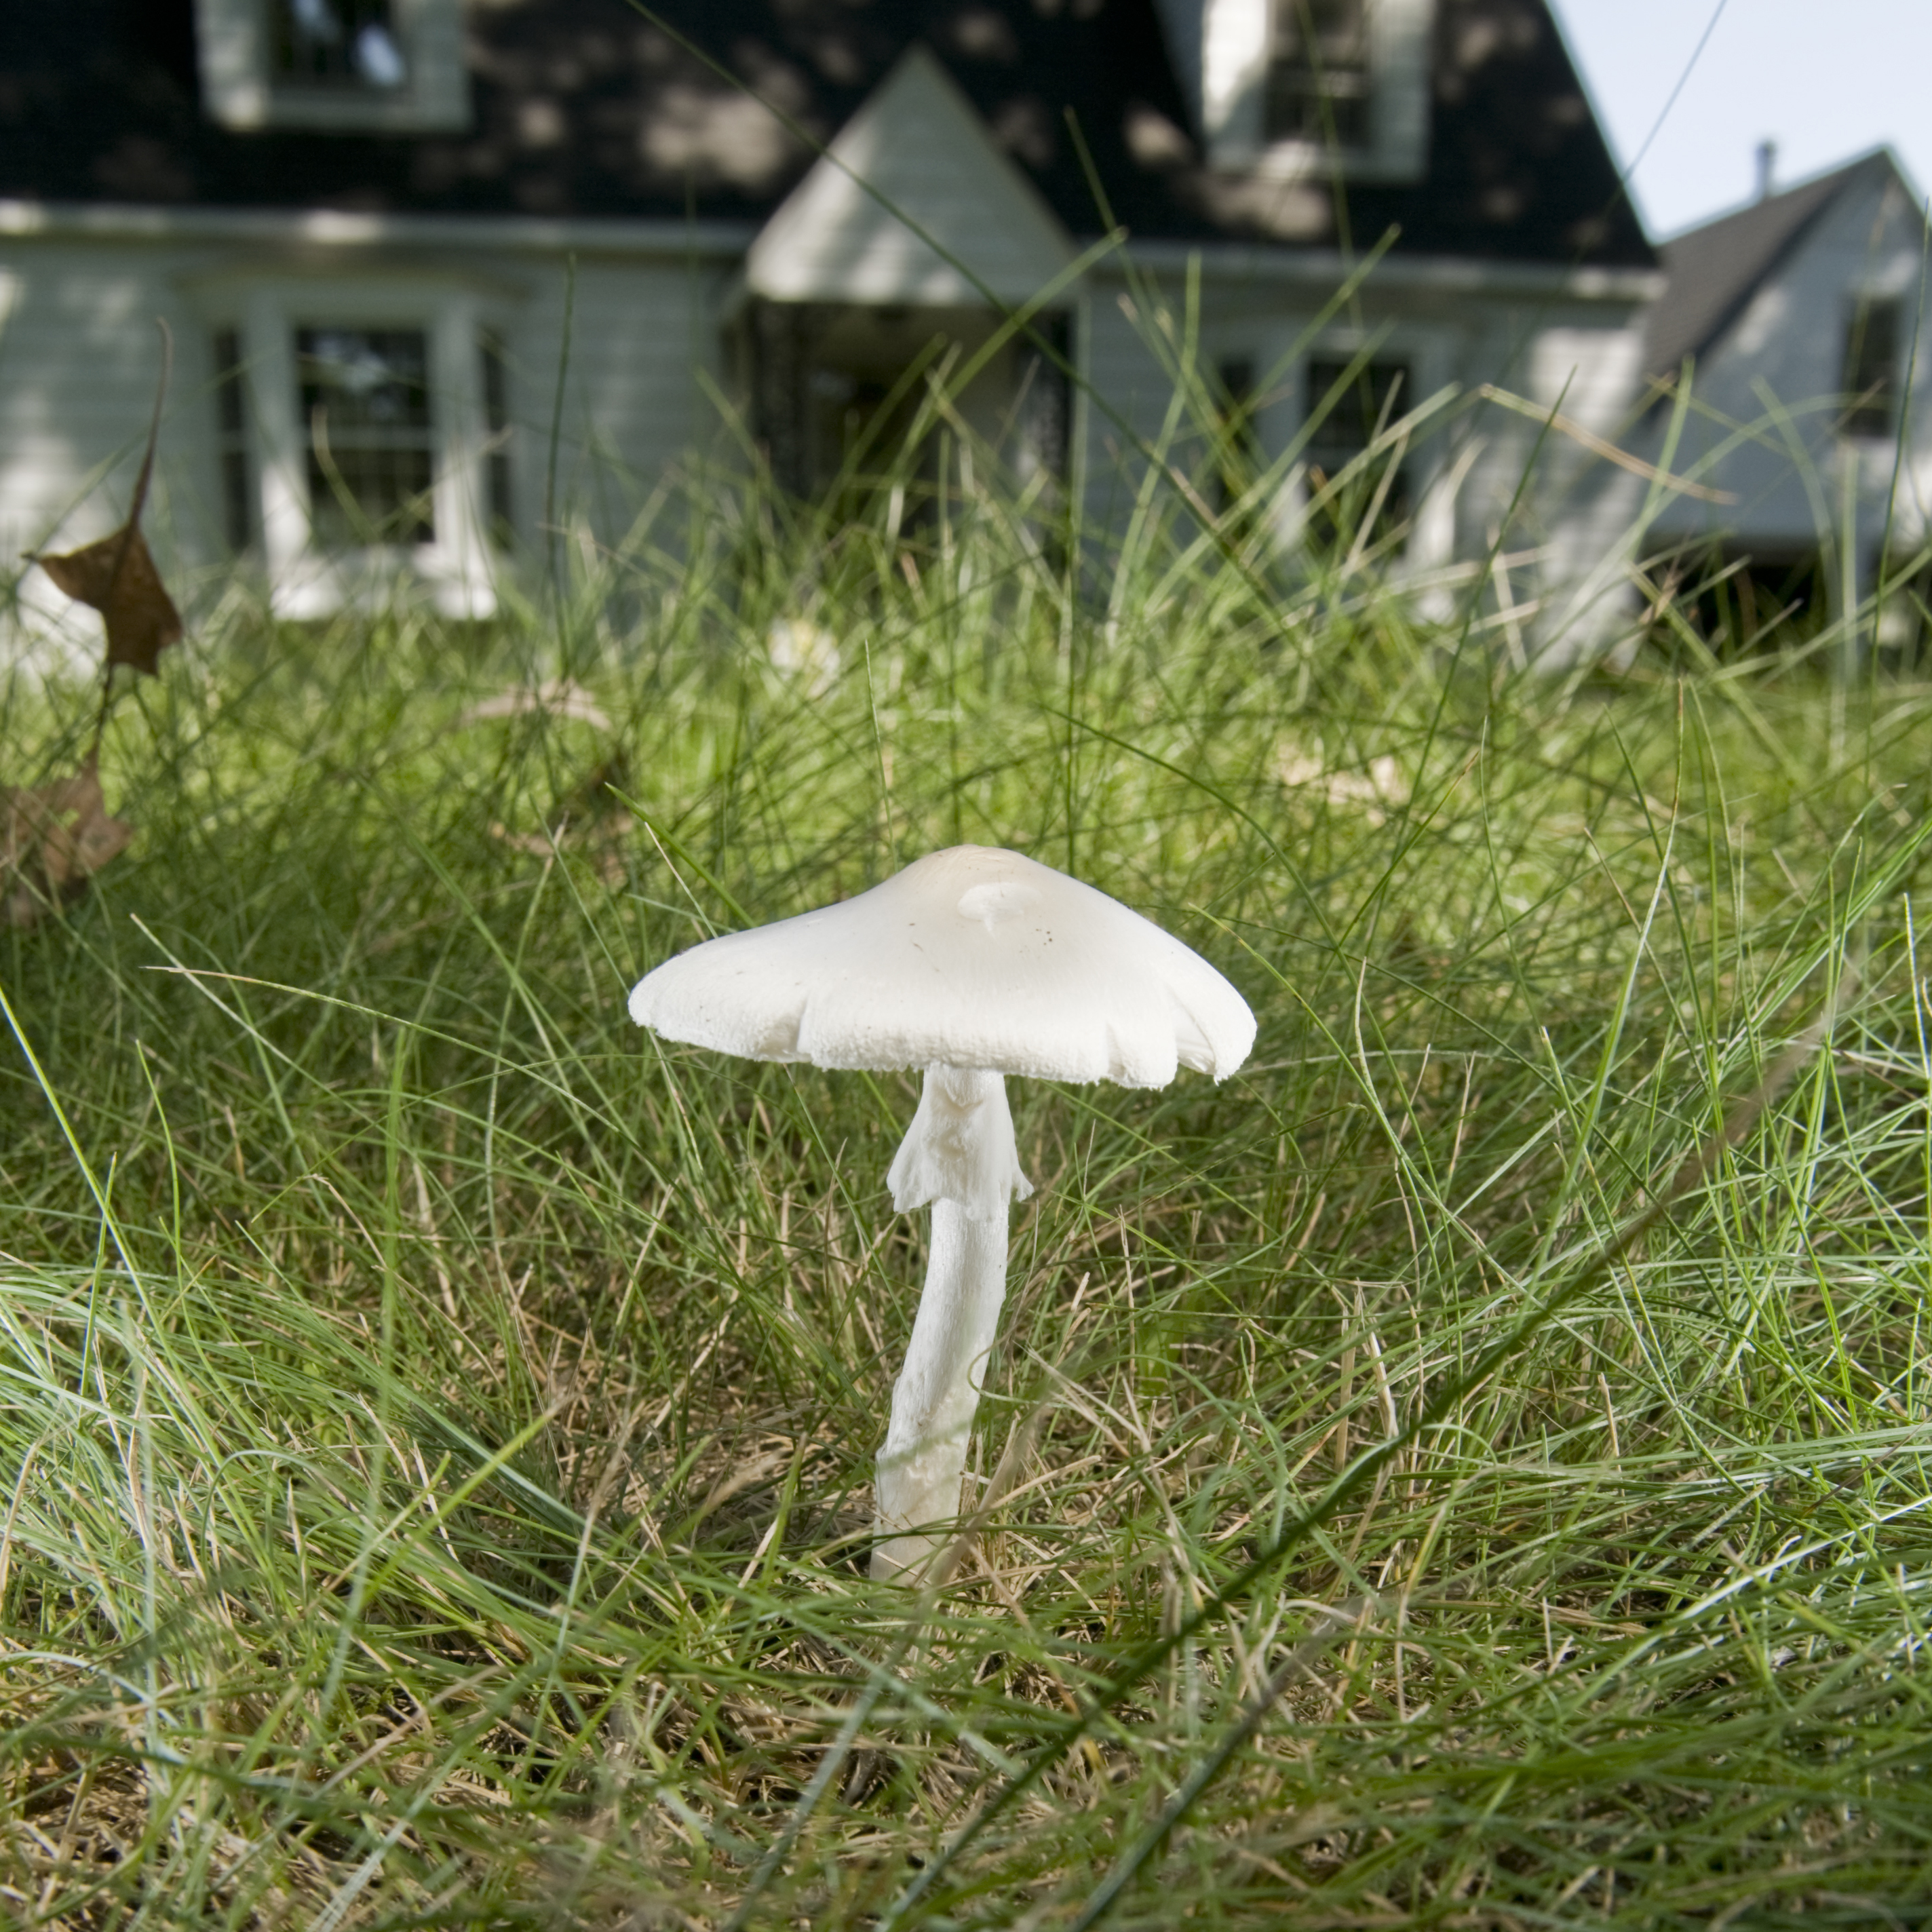
Chlorophyllum molybdites, the green-spored lepiota, was the mushroom du jour. Three of the cases involved this toxic mushroom that is commonly found in yards after summer rains. It looks lovely, and it usually won’t kill you, but I’m told that it makes one sick enough that people think that they might die. Symptoms involve vomiting and/or diarrhea, often severe, starting one to three hours after ingestion. This is the most commonly eaten toxic mushroom in the United States.
It might seem like a bumper crop of free eats in your lawn, but Chlorophyllum molybdites is toxic.
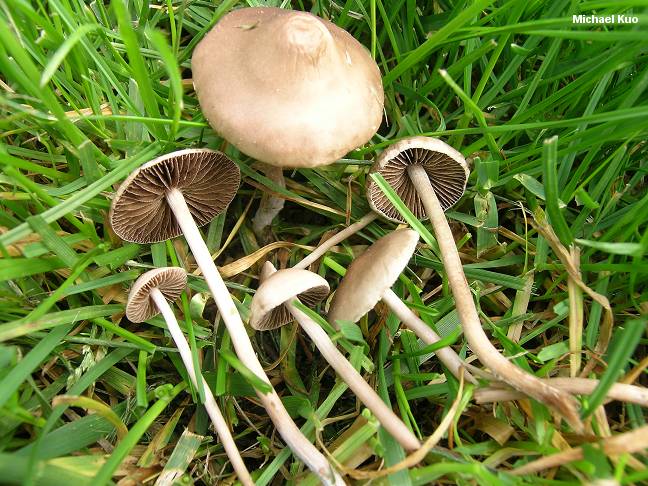
Today’s other culprit was Panaeolina foenisecii, known as the lawn mower’s mushroom, also commonly found growing in lawns. Unlike Chlorophyllum molybdites, this is no beauty. It is an LBM (little brown mushroom). It too can cause gastric upset and has been reported to cause slight hallucinations in some cases, but never in the numerous cases in which I’ve been involved.
Panaeolus foenisecii, or lawn mower’s mushroom, is also nonedible. (Photo with permission Michael Kuo, mushroomexpert.com.)
Not all mushrooms growing in lawns are toxic. But the only way to tell is to know what the mushroom is (identify it). There are no short cuts or tricks to knowing whether a mushroom is toxic or not, so think before you eat! There are a number of mushroom books that can help (I’m partial to Wild Edible Mushrooms of Illinois and Surrounding States by my colleague Joe McFarland and me). And a great way to learn mushroom identification is to join a club like the Illinois Mycological Association.
Identifying mushrooms and plants for the Illinois Poison Center and hospitals is something that I and other Chicago Botanic Garden staff gladly do. Freely sharing our expertise is part of the Garden’s commitment to the region.
If you’re reading this article, you’re likely familiar with some of the challenges facing older folks: your muscles may get weaker and ache more readily. Falls can do more damage. Your energy and endurance may wane, and your skin may get thinner. Your eyesight and memory many not be as sharp, and your fine motor skills may become less coordinated.
What can the estimated 85 million U.S. gardeners do to continue gardening as they age? Gardening provides so many physical and emotional benefits that it’s well worth pursuing. The activity may even improve problems associated with aging, such as depression, osteoporosis, diabetes, and poor sleep.
Keeping active in the garden is what our volunteers love best.
So let’s explore some ideas that might help you continue gardening despite these challenges. I’ve found that prevention, preparation, positioning, and partners—the four “P’s,” if you will—enable many older gardeners to carry on.
There is no better place to start than prevention. Since recovery takes longer as we age, let’s make sure we have less to recover from. Make a solemn oath not to go out to the garden until you are wearing proper footwear! Even if you plan to just survey the yard while barefoot with your first cup of coffee, danger lurks! Without shoes, you are more likely to fall or sprain an ankle. The damp grass can be slippery, and uneven surfaces can lead to a twisted ankle. Falls can lead to serious complications and are best avoided.
Take a few minutes to limber up your joints, especially your back and legs, before you start working in the garden. You will be much more comfortable if your muscles are warmed up. Surprising them by pulling a stubborn weed can cause pain and injury that could have been avoided.
Remember to protect your skin. That means sunscreen, a hat, gloves, and loose, light clothing. Invest in a pair of really good gloves that you will keep on no matter what the task. Cuts and abrasions in the skin of the hands are an invitation to infection. Likewise, protect your eyes from extreme brightness with sunglasses.
Prevention even applies to the end of a day in a garden. Make sure to put away all tools and to coil all hoses away from walkways. Painting the handles of tools with bright colors make them easier to spot in the garden or lawn.
Preparation is the next area where the time spent will be repaid handsomely.
Containers along a path are an elegant solution to reducing overall garden space, and making seasonal plantings easier to maintain.
Begin with a critical appraisal of the areas you tend. Note what you enjoy most as well as what you dread doing. Look at quantities of plant material, and consider the age and condition of your trees and shrubs. This is an opportunity to make some well-considered decisions and create your ideal garden. Whether you implement changes all at once or gradually, your ideal should include your favorite plants and tasks in manageable proportions.
If you do a lot of pruning regularly, decide if that is pleasurable to you. If not, hunt for some woody plants that maintain their shape naturally. If your perennials have grown into huge beds, decide if you would be just as happy with less. If so, remove your extra perennials and offer to friends or garden clubs.
If you have been forceful and unsentimental with your removal decisions, you are likely left with some empty areas that need to be filled. This is a critical juncture. In order to avoid swapping one huge garden for another, see if you can cluster your remaining plants into smaller beds. Absorb some of the newfound space with trees or shrubs that provide structural interest, but are low in their demands. Of course, you can always plant more grass, but groundcovers do a nice job with less chemicals and mowing. Another possibility is to begin raising your garden to an easy-to-reach height. Use containers or create raised beds so that you can tend the plants without getting down to ground level. Perhaps all that space where plants have been removed can be re-envisioned as walking paths among containers and beds.
Positioning is the third area to think about.
As you revise your garden, keep in mind that reaching down to ground level and up over your head are positions that demand a lot of energy. You will tire quickly unless you can work more in the midrange of your reach. Containers and raised beds bring the soil level up nicely. A raised bed that allows a comfortable approach with a knee space for sitting while facing the bed is ideal. A ledge for side sitting works for short periods of gardening. Try using a pulley system to bring hanging containers down to a workable level and then raise them back up again.
Finally, let’s think about partners.
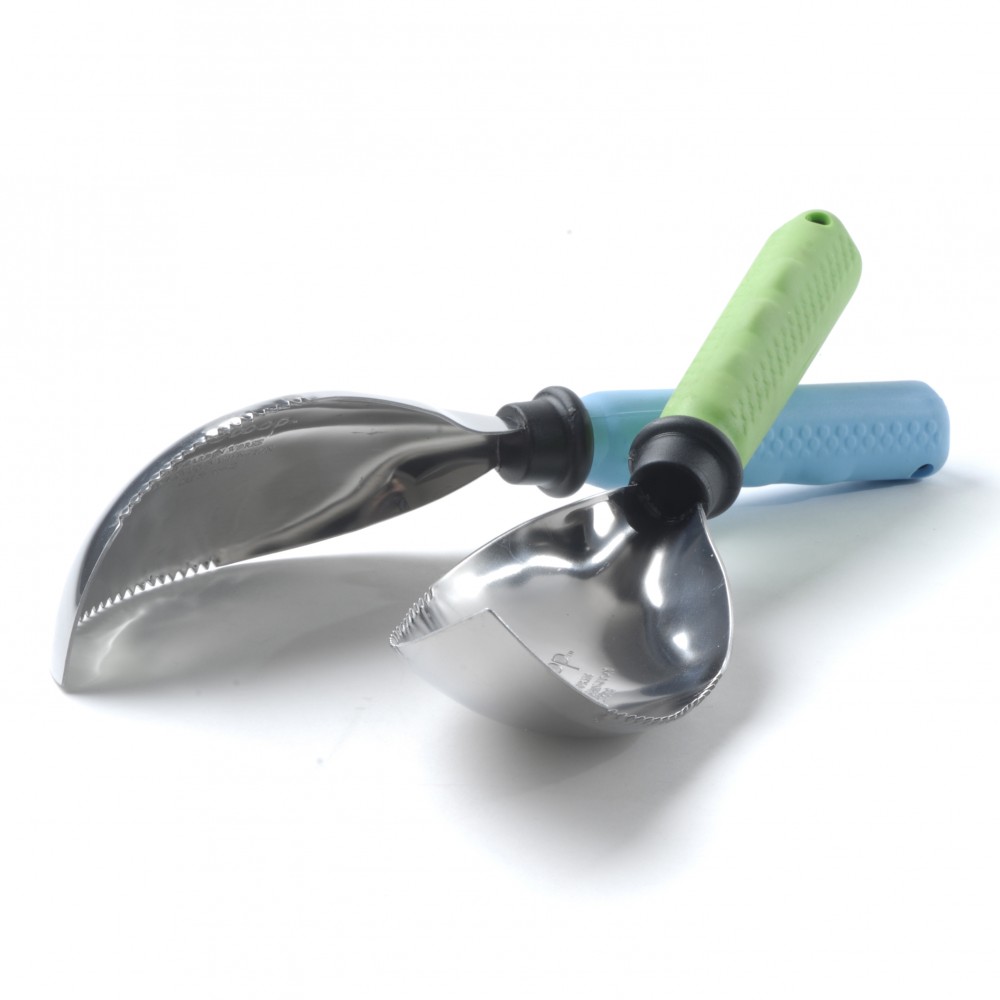
These scoop-shaped, grip-handled trowels with serrated edges combine two gardening tools into one.
Partners in gardening can be human—perhaps hired help for the most demanding or onerous tasks, such as removing weak trees. Partners can also be the wonderful tools that bolster your body’s ability. A tool that has good leverage, sharpened edges, and smooth operation of moving parts is a joy to work with. An increasing number of ergonomic tools are on the market. Look for larger, nonslip grip surfaces, handles that allow for two-handed manipulation, tool holders that distribute the workload over more than one joint, and carriers that keep tools safe and handy.
Prevention, preparation, positioning, and partners can have you gardening for a lifetime. Such a healthy hobby is worth the time and effort it takes to keep it enjoyable.
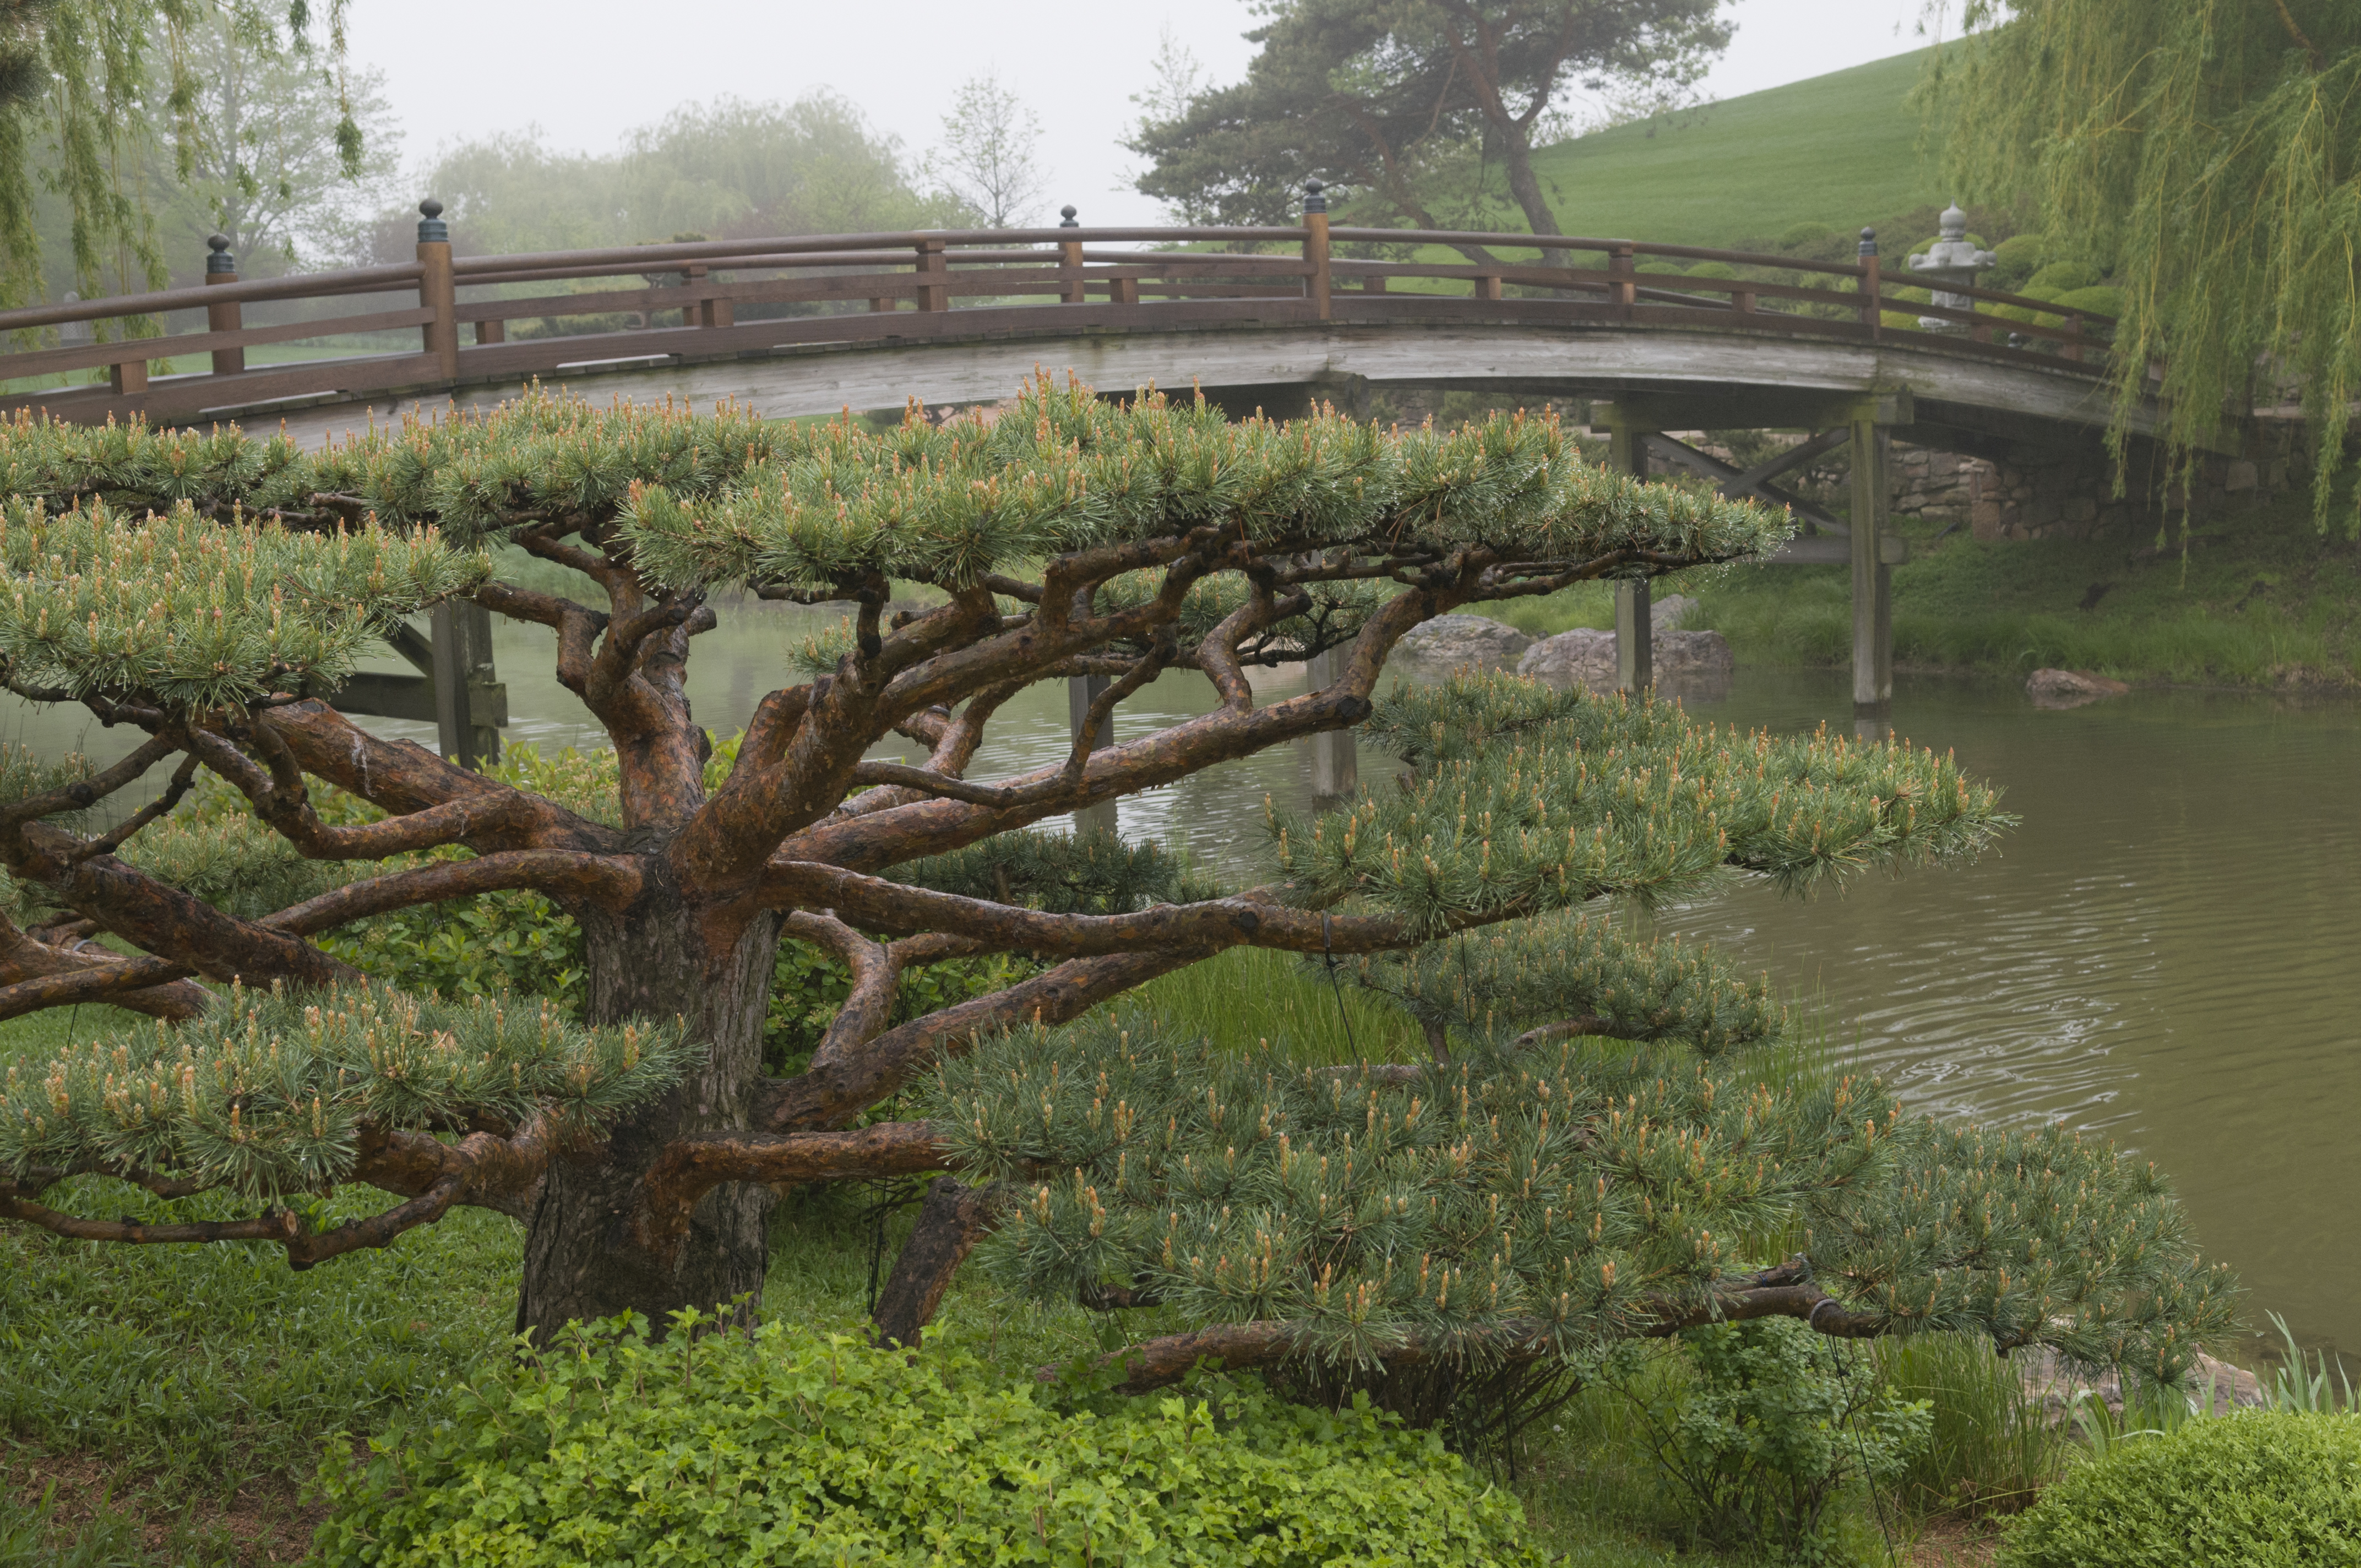
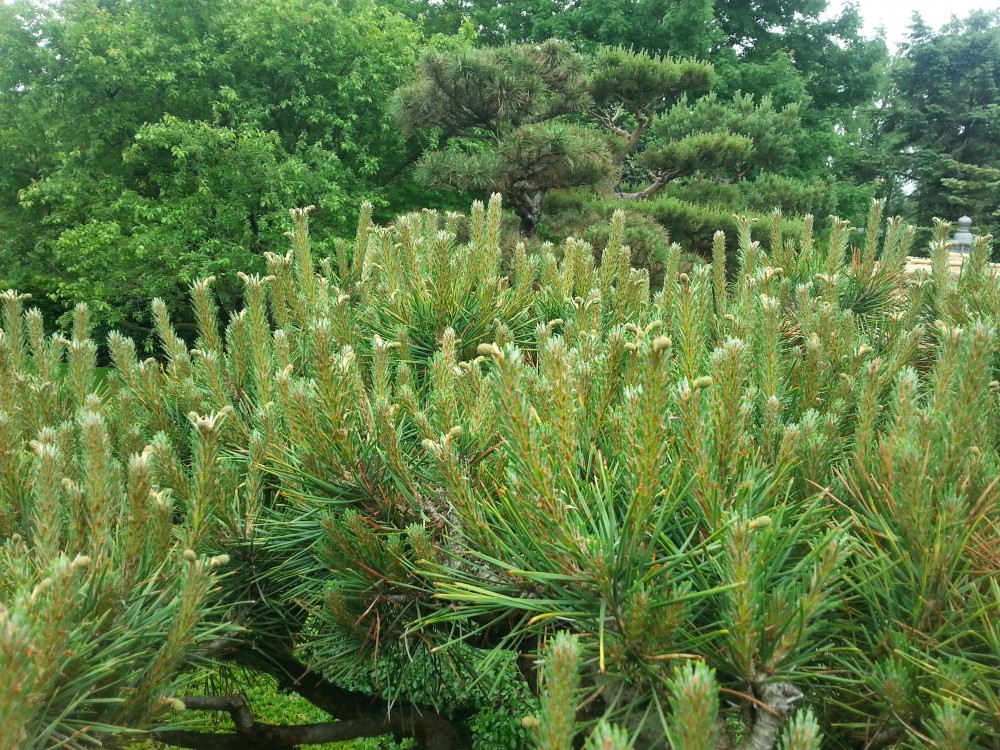
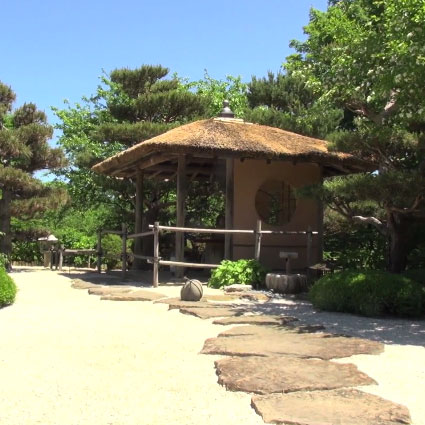
Have you been to the Elizabeth Hubert Malott Japanese Garden lately? If you have, you probably saw some of the garden staff perching in the branches of the niwaki. We’re not building nests or hiding out; we’re candling.
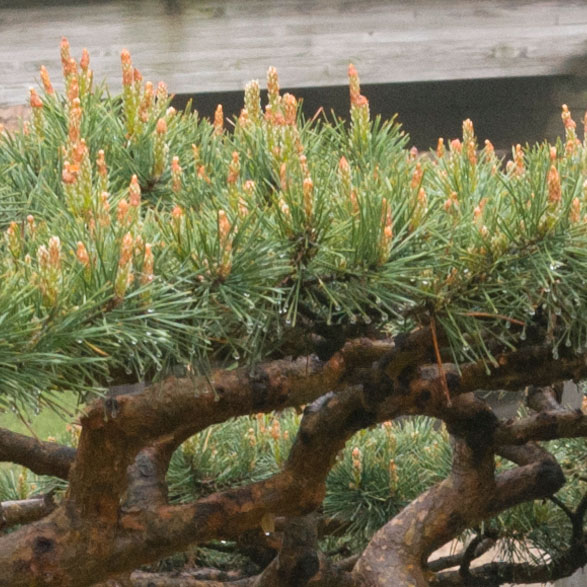
In early spring, a niwaki near the bridge stands in need of candling.
Niwaki
Niwaki, literally translated, means “garden tree.” Some people think of niwaki as big bonsai, but that relationship isn’t exactly right. Bonsai translates to “tray (or pot) planting.” While we may think of niwaki as big bonsai, we should try to think of bonsai as niwaki in a pot. The purpose of the two arts are the same; they represent the essence of the tree.
If you consider how bonsai and niwaki are styled, they give the impression of age. The trees may be windswept or upright, often with gnarled bark and wide trunks. We achieve these effects by holding branches vertically with string tied to the ground, with fall pruning, and with candling in both spring and summer.
What’s candling?
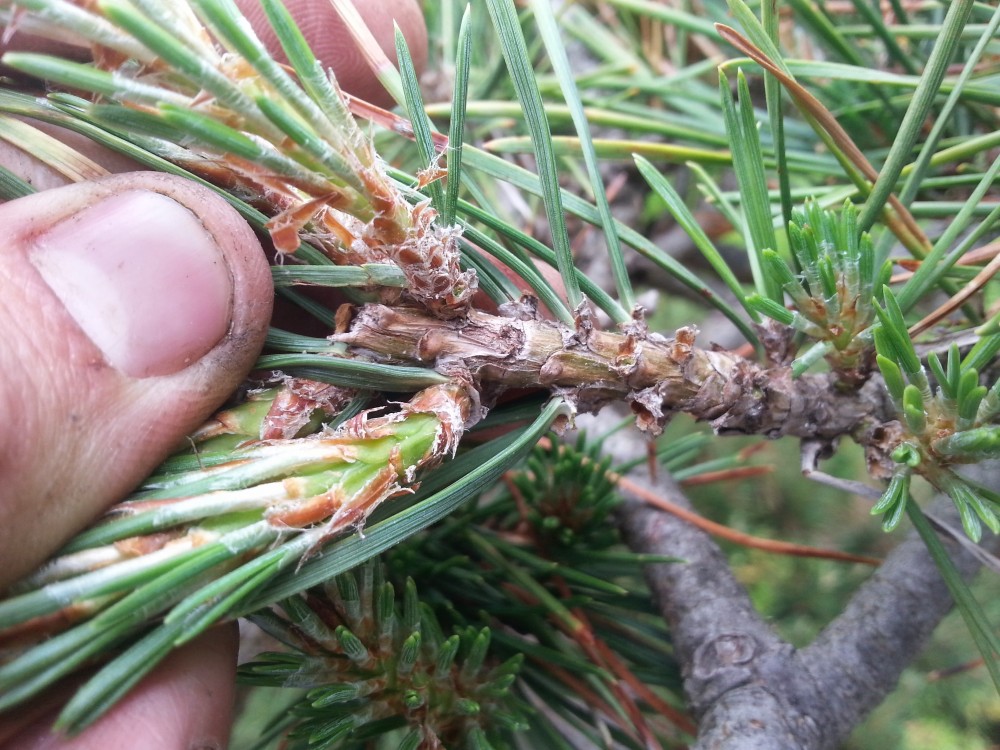
In spring, we all know things start to grow again: seeds sprout, perennials push out growth from the roots, and trees break dormancy. In pine trees, these shoots of new growth are called “candles.” When we candle, we break off part of the new growth to stimulate growth from lower nodes. (In other plants, we often refer to this as “pinching.”)
A closeup of this Pinus sylvestris shows where the candle was broken last year and where you expect the new growth to emerge.
The result of breaking these candles is that the new growth spreads more horizontally than vertically, and the density of the pads increase, which makes them appear more lush and healthy over time. We never purposely take off an entire candle, because it removes the most actively growing point and takes longer to recover.
Why candle?
The pine shoots that emerge in spring are called candles for a reason: they tend to be very tall, skinny cylinders like taper or dinner candles. If we let this growth continue, the growth from one pad would grow into the next pad within a few short years. By the time this would happen, much, if not all the original pad would be woody, old, and almost impossible to repair. So in order to maintain the appearance of these trees, we need to candle every year.
If allowed to grow, these new shoots would quickly take over.
How long does it take?
There are 180 trees in the Malott Japanese Garden trained in this style. Each tree can take anywhere from eight hours to multiple days, depending on the size and on the person who is working on it. Most of the trees at the entrance to the garden will take eight hours for some of our speedier employees. Most days, during our regular hours, you can expect to see between two to five employees in the trees.
It’s easy to find fun outdoors—with sticks, chirpy crickets, magic circles, and more.
“Hands in earth, sand, mud: building, digging, sewing, baking—these are what humans DO.”
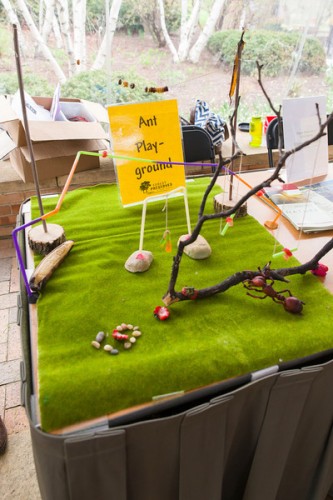
Build an ant playground out of sticks! Sue Dombro of the Forest Preserves of Cook County gave us tips for building one, adding this telling comment: “My daughter used to do this all the time, and now she’s a wildlife biologist.”
For fun, interesting, and education-based ideas, we turned to a fun, interesting, and education-based crowd: the 190 teachers, home educators, day care providers, park district staff, museum employees, librarians, and just-plain-curious caregivers who came together at the Garden for a Nature Play conference (sponsored by the Chicago Botanic Garden, Chicago Wilderness, and the Alliance for Early Childhood).
That morning, opening remarks were short, but sweet. A few thought-provoking highlights are quoted here. Then we did what any group of early childhood-oriented people would do: We all went outside to play.
At our outdoor “playground,” 19 organizations shared their fun, interesting, and education-based ideas for playing outside. You may recognize many from your own childhood.
1. Pick Up a Stick
How cool is this? In 2008, the stick was inducted into the National Toy Hall of Fame! It’s in great company: the jump rope, dominoes, the Frisbee, Tinkertoys and, yes, the Easy-Bake Oven are co-recipients of the honor. The possibilities of the stick are endless—it’s a musical instrument, a light saber, a wand, a fishing pole, a giant pencil for drawing in the dirt, a conductor’s baton, the first leg of a tepee, and anything else a child says it is.
2. Learn to Lash
If one stick is interesting, a pile of sticks has real 3-D potential. The art of lashing teaches kids to turn something small—two twigs lashed together—into something big: a ladder, a lean-to, a stool, a swing.
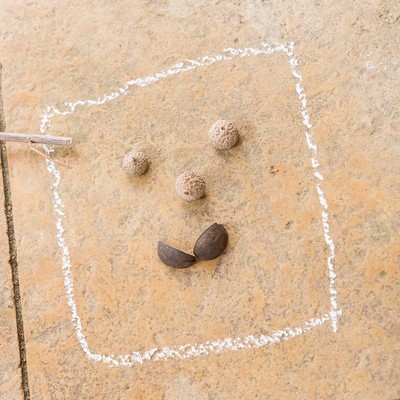
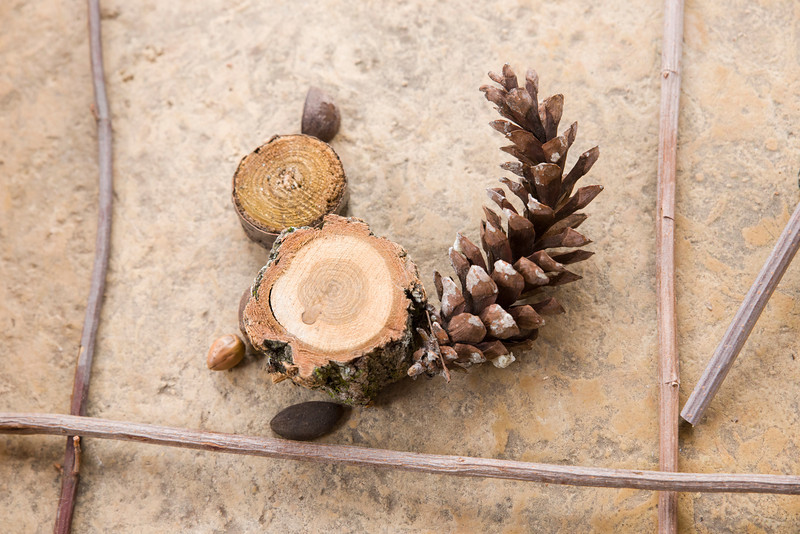
3. Find the Art in Nature
Twigs + stones + leaves + “tree cookies” + seeds = a nature “painting,” a sculpture, an imaginary animal, backyard trail markers, or utterly simple, charming drawings like the happy face made out of seeds shown with our headline.
“For children, the most powerful form of learning is with their hands.”
Imagination can run wild when kids are outside.
4. Nature as Paintbrush
Sure, you can use a standard brush to paint with, but feathers, pine needles, and arborvitae segments not only expand the creative possibilities but also feel wonderfully different in the hand.
5. Kid-Made Kites
Send the imagination soaring with a simple paper bag and a couple of kitchen skewers—in moments, it’s a kite! And then there’s the process of decorating it with ribbons and streamers…
6. Cricket Bug Box
Catch a cricket (or buy a dozen for $1 at the pet shop). Friendly and chirpy, crickets are many kids’ first experience with the insect world. Even little kids can collect the foliage, food scraps, and water-soaked cotton balls to accessorize a temporary shoe-box habitat.
“Nature is children’s real home.”
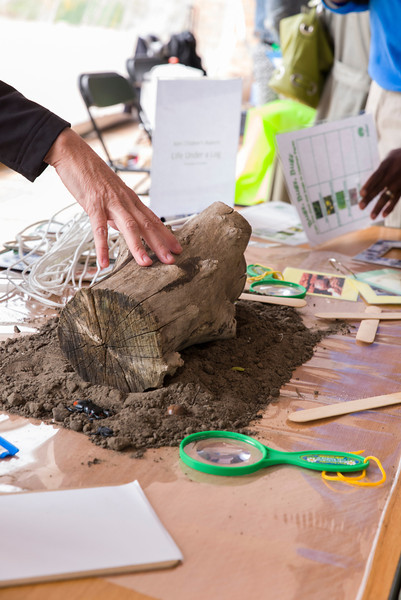
What’s under that log? Life.
7. Lift a Log
One of the simplest of all outdoor projects: lift up a log that’s been sitting on the ground and be amazed by the tiny wildlife that lives underneath it! Don’t forget to bring your magnifying glass.
8. Make a Magic Circle
Tuck a few wooden embroidery rings into a backpack. Placed on the ground in the woods, or the garden, or the sand, they become magical circles for kids to explore. What’s in yours?
9. D.I.Y. Dyeing
Rainy days need projects, too. Natural dyes made from vegetables (beets, onions), fruits (grape juice), or spices (turmeric, chili powder) transform undyed yarn or fabric into a personal style experience.
10. Paint Chip Color Hunt
One quick visit to the paint store can send kids off to hunt for hours, as they try to match nature’s colors to the humble paint chip card. (Handy to keep in the car for unexpected delays, too).
Simple but engrossing: match the colors in nature to the colors on a paint card
The arbor house in the Elizabeth Hubert Malott Japanese Garden was re-thatched recently by William Cahill, a professional thatcher, who gave us a short interview on the process, and how he learned to thatch.
A few things that thatcher William Cahill doesn’t tell you in this video:
He is one of only two thatchers in the entire United States.
He has his own forge and makes some of his own tools.
In the video, he wields a leggett and a Dutch mallet.
The water reed used for the roof is so sharp that it can cut your hand.
He has thatched with heather, bamboo, willow, water reed, and eucalyptus.
While Ireland and Japan are best known for thatched roofs, Africa thatches the most, with more than two million thatched structures.
His roofing résumé is fascinating: structures at Winterthur, Grey Gardens, and Lotusland; plus flower shops, sheep houses, potting sheds, museums, wigwams, churches, faerie houses, zoo pavilions…and William Butler Yeats’ home in Galway, Ireland. Check out Cahill’s amazing work at roofthatch.com.
We could listen to his beautiful Irish accent all day.