You Say Tomato, I Say Science Project

Here’s a science project students can do at home! Try tomato seeds.
tomato project

As I’ve stated before, we in the education department of the Chicago Botanic Garden are committed to helping parents and teachers find great projects that teach students how plants sustain and enrich life. Last year we talked about using radish seeds; this year, it’s tomato seeds. And like last year, this project can be done by an individual student, a small group or ecology club, or an entire class.

Let’s begin by thinking about tomato seeds. Cut open a tomato and try to pick out a single seed. Go ahead and try it, I’ll wait.

PHOTO: This close up of a tomato seed shows the transparent coating that surrounds the tomato seed.
These tomato seeds glisten and mock me when I attempt to pick them up with my fingertips. The little brats also resist sliding off the cutting board.

 
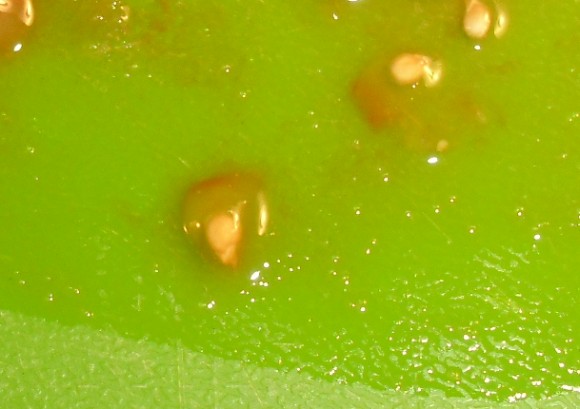
As you will discover (if you didn’t already know) the seeds are coated in a gelatinous substance that makes them slippery and difficult to handle. So the first question is, what purpose does the slimy coating serve?

This is not the kind of blog post where I give you all the answers. That would not be good science teaching. I will tell you that tomato seeds can pass through the digestive tract of an animal and still germinate. Not all seeds can do that. It is possible that in nature, the coating protects the seeds on their journey from the mother plant through the hostile environment of a hungry animal’s gut and on to wherever that animal relieves itself.

Another theory is that the coating prevents premature germination of the seeds while they are inside the warm, moist, ripening fruit. Whatever the true reason—and there may be several—seed savers find it’s better to remove that coating after the seeds are harvested, because they become easier to handle and store.

The natural way to remove the coating is to ferment the seeds in a jar or bowl. It’s a simple procedure.

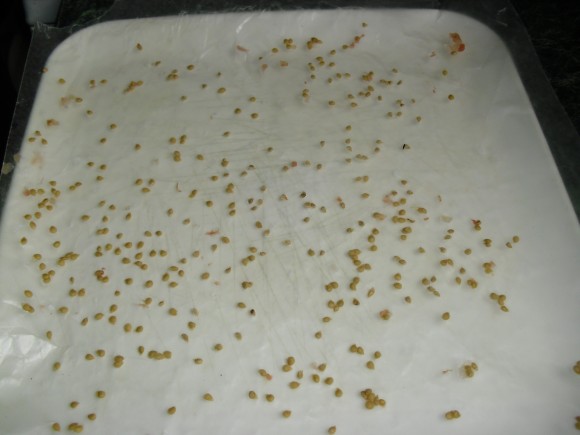
1. Scoop or squeeze the seedy pulp out of the tomatoes and put it into a bowl. (I prefer glass, but some people use plastic.) Add water equal to the volume of tomato pulp. Cover the bowl with plastic wrap and poke a few holes in the top.

PHOTO: glass bowl about a third full of tomato pulp, covered with plastic wrap, sitting on the windowsill.
Here are the seeds from three medium-sized tomatoes, sitting by the window on the back porch, waiting to ferment.

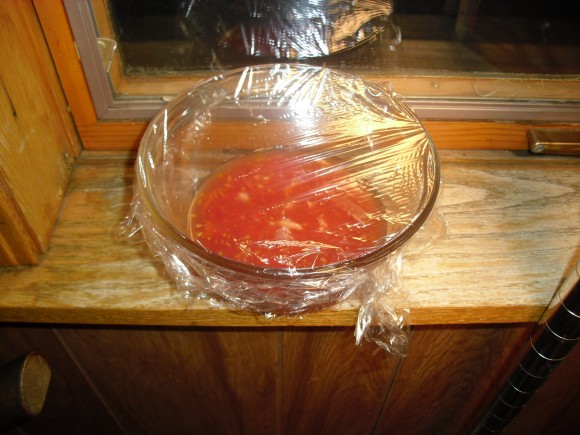
2. Place the bowl in a warm location such as a sunny window. It is going to smell bad, so don’t put it in your dining room, unless you’re trying to reduce your appetite. You will also want to avoid fermenting your seeds next to bananas and other fruit ripening in your kitchen, because it can attract fruit flies. Leave it there for three to five days, depending on the conditions. Natural “beasties” in the air (yeast) will settle on the sugary goodness of the tomato. They will gorge themselves and reproduce, resulting in a yucky mess floating on top of the mixture. This is exactly what you want.

PHOTO: the bowl of tomato seeds is covered in white stuff.
In four days, my tomato seeds were ready, with a thin layer of white scum floating on top. Be very glad odors are not transmitted over the internet.

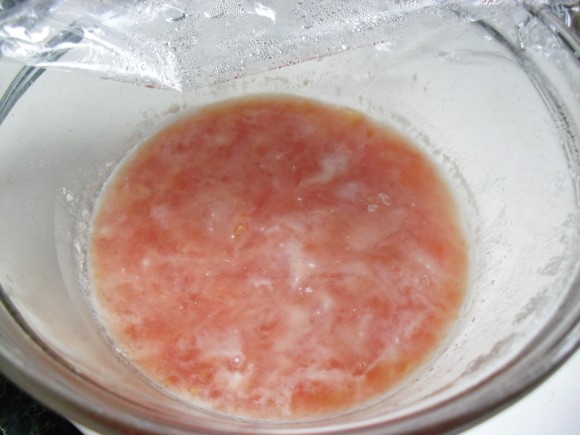
3. After you have grown a nice head of gunk on your seeds, remove that film and throw it away. (Unless you’d like to keep it for some reason.)  If you can’t skim all of it, no worries, the remaining goo will rinse off in the next step. Remove any floating seeds, too—they are not viable.

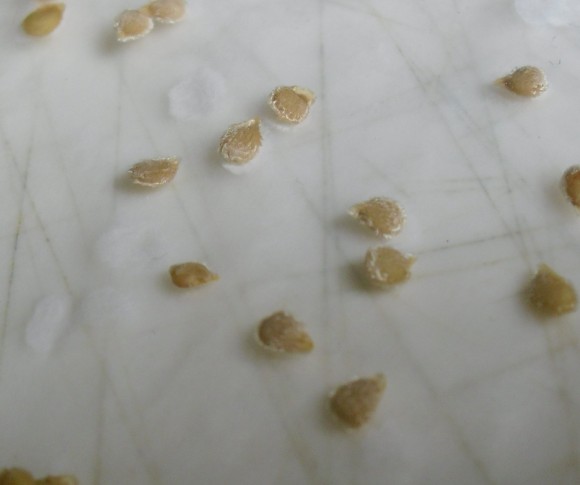
4. Pour the mixture into a sieve or wire strainer with fine mesh and rinse well, shaking the seeds gently to remove any remaining pulp and seed coatings.

PHOTO: The tomato seeds are spread out on a wax paper so they do not touch.
The most tedious part of the process is spreading out the seeds so they do not touch each other.

5. Dump the seeds onto wax paper. Poke at the seeds with a toothpick or other clean utensil to separate them. Remove any dark seeds that don’t look right. They are not viable. Let the seeds air dry on the wax paper in a protected place for about a week.

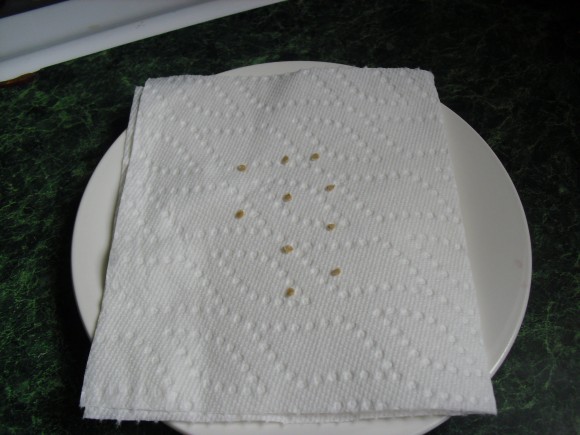
6. Store the completely dried seeds in an envelope until you are ready to use them.

PHOTO: close up of several tomato seeds - you can see the fuzzy outer layer of the seeds.
The cleaned and dried seeds are coated with tiny white hairs. These hairs were holding the gooey coating on the fresh seeds and now they will help the seeds soak up moisture when they are planted.

Now comes the science question: Do tomato seeds really need this kind of abuse to germinate?

The only way to find out is to experiment. Collect seeds from some ripe tomatoes—two or three tomatoes will do. Ferment half of the batch using the directions above. Rinse the remaining half with water in a sieve (to remove any attached tomato pulp), and then dry them on wax paper without any other treatment. When you have dried all the seeds, use the same procedure from Eleven Experiments with Radish Seeds to measure and compare germination rates.

PHOTO: Ten tomato seeds are arranged on a paper towel in three rows; the towel is on a plate.
These ten fermented and dried tomato seeds are ready for germination testing.

Since you’re curious and kind of into this now, see if you can figure out if there are other ways to remove the seed coating that result in equal or better germination success. Some seed savers skip the fermentation and instead clean their tomato seeds with a solution of Oxi Clean. You can add this treatment to your experiment by dividing your batch of tomato seeds into three parts for: untreated, fermented, and Oxi Clean treatments.

The Oxi Clean method goes like this:

  1. Put the tomato seeds in a measuring cup and add water to make 1 cup of liquid.
  2. Add 1 tablespoon Oxi Clean power to the mixture and stir to dissolve.
  3. Let the seeds soak for 30 minutes.
  4. Rinse thoroughly in a sieve and dry on wax paper, just as you would with the other treatments.

As you will see, the Oxi Clean method is faster and there is no offensive odor, but is it better for germination?

PHOTO: A 16 ounce container of Oxi Clean Versatile Stain Remover
This product contains sodium percarbonate and sodium carbonate, no bleach, and will work for your experiment.

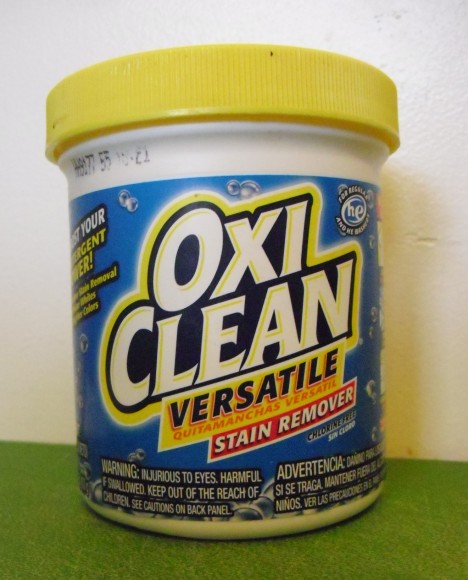
Note: if you Google information about this, you will find articles that discuss Oxiclean (one word) vs. Oxi Clean (two words). The two commercial products are made of different chemicals. The former is a liquid that contains sodium hypochlorite (chlorine bleach), the latter, promoted by Billy Mays, does not. For the purposes of this experiment, the less caustic, powdered Oxi Clean pictured in this blog post works perfectly well. Students should report the actual chemical names in the materials list, not just the product name. It’s just like using the scientific name of a plant instead of the common name—it’s more accurate and less confusing for someone who wants to replicate the experiment.

If you are ambitious, try a treatment of your own. After all, three tomatoes are going to give you a lot of seeds to test. My daughter tried soaking some of her seeds in vinegar. Perhaps regular dish soap or ordinary laundry detergent will remove the seed coating. Or you could try a cleaner that contains chlorine bleach. It’s up to you. Please remember to wear goggles and plastic or latex gloves while handling any chemicals because, like the tomato seeds, your eyes and hands may need a protective coating to escape harm.

I’d like to tell you what is going to happen, but then I would totally lose street cred and face ridicule from my science teacher peeps. One hint, though: be sure to measure the timing of germination as well as the number of seeds that germinate in each condition. If you want to know what happens, you’ll just have to cut open some tomatoes and try it yourself.


©2014 Chicago Botanic Garden and my.chicagobotanic.org

Autumn Blooms in the Bulb Garden

It’s now early fall and that means it’s time for Colchicum! Colchicum is a group of flowers also known as autumn crocuses, though they’re not related to the true crocus. Seventeen species and varieties of Colchicum grow in the Graham Bulb Garden. Flower colors range from white to magenta-violet, and include doubles and bicolors.

PHOTO: Colchicum cilicum.
Colchicum cilicum

Colchicum blooms are a great way to brighten up the early autumn landscape. They’re best grown in a groundcover or as an underplanting for taller bulbs such as lilies (Lilium sp.). The spring foliage can be rather large and hosta-like, making them sometimes difficult to pair with smaller spring-blooming bulbs such as Scilla, but it makes them perfect for hiding bare stems of tall plants in the summer while providing a jolt of color to your beds just before everything goes to sleep for the fall.

PHOTO: Colchicum 'Antares'.
Colchicum ‘Antares’

PHOTO: Colchicum x agrippinum.
Colchicum × agrippinum

In addition to the crocuses, dahlias and lilies are still bursting forth with color, like jewels in the September garden. The cooler temperatures help create richer colors in the dahlias, and longer-lasting blooms, while their large size provides a contrast with the dainty blooms more typical of fall bulbs. We’re still seeing the final blooms of Lilium speciosum ‘Uchida’ as well. This lily is notable for being the latest-blooming lily in our climate. These plants started blooming in early September and are still holding on. Due to their late blooming nature, these beauties must be planted in the spring in a well-drained but fertile area. 

PHOTO: Lilium speciosum 'Uchida'.
Lilium speciosum ‘Uchida’

PHOTO: Dahlia 'Bahama Mama'.
Dahlia ‘Bahama Mama’

PHOTO: Dahlia 'Diva' and Salvia guaranitica 'Argentina Skies'.
Dahlia ‘Diva’ and Salvia guaranitica ‘Argentina Skies’

PHOTO: Dahlia 'Jitterbug'.
Dahlia ‘Jitterbug’

While these might be the last blooms of the season in the Bulb Garden, this certainly isn’t the end of interesting things happening in the Chicago Botanic Garden. Fall foliage color will be peaking soon, and winter holds its own interest in the colors of berries, dogwood stems, and the exfoliating bark of the birches against snow’s white blanket.

©2014 Chicago Botanic Garden and my.chicagobotanic.org

Cool Crops for Fall

Now that the leaves are turning and the days are growing shorter, if you’re tempted to pack away your gardening gloves…don’t!

PHOTO: Baby brussels sprouts budding at the end of September.
Brussels sprouts (Brassica oleracea) enjoy the cooler weather of fall for producing their delicious edible buds.

At the Regenstein Fruit & Vegetable Garden, we’re as busy as ever. Our cool-weather crops include brussels sprouts, spinach, and toscano kale. Fall is a great time to grow vegetables—insects die off, weeds wither, and moisture is plentiful. If you don’t have much space, remember that you can grow vegetables in containers, window boxes, and hanging baskets.

Don’t say good-bye to your summer garden yet

  • Document the good, the bad, and the ugly. Walk around your garden making notes, drawing pictures, and taking photographs; document challenges and successes, problems, tasks, and ideas for next year. Make a list of the plants that worked and should be planted again.
  • Bring in twigs, nuts, berries, and seedheads to dry for fall decorations or winter wreath making. Gather the stems into bunches, and secure them with a rubber band. Hang the bunches for several weeks to dry in a warm spot (but out of direct sun).
  • Harvest herbs to dry, freeze, or use fresh.
  • Lift tender perennial herb plants like rosemary and lavender to replant in pots. Annual basil lasts for several additional weeks in a sunny kitchen window.
PHOTO: Dried plants and seedheads.
Now is the best time to gather plants at the end of the season for beautiful arrangements for the fall table.

Other prep work

  • Remove debris such as leaves, clippings, and bits of fruits and vegetables. Garden sanitation is important to remove the overwintering habitat for many insects. Cucumber beetle and squash bugs overwinter on leaf litter and create problems in the spring.
  • Perform bed prep and broad forking—break up densely packed soil now to avoid working heavy soils in the spring (when you do so, you further compact the soil and destroy soil structure). Fall prep ensures that the bed will be ready for early peas around St. Patrick’s Day.
  • Add organic matter to feed the soil rather than using fertilizers to feed the plant.
  • Add mulch, thumb deep, to help maintain soil temperature and moisture.
  • Everbearing raspberry bushes produce their fall crop on the top half of the canes. After harvesting, prune out the top half of the plants. The lower half of the canes will produce fruit early next summer.
  • As you harvest, remember to save seeds for next season! Got extra? Join us for our annual Seed Swap.


PHOTO: Butternut squash.
Harvest warm-season vegetables, including winter squash and pumpkins, before the first frost.

PHOTO: Tropaeolum majus 'Kaleidoscope Mix' nasturtium.
The edible flowers of nasturtium last well into fall and make a wonderful planting in the garden or containers.

Plant cool season crops

PHOTO: Spotted cucumber beetle.
Thorough fall cleanup is important to avoid pests like spotted cucumber beetle, whose larvae overwinter in leaf litter. Photo by Pollinator at en.wikipedia [GFDL, CC-BY-SA-3.0 or CC-BY-2.5], from Wikimedia Commons
  • Short-season crops and salad plants—radish, spinach, 
arugula, lettuce, mustard, mizuna, and tatsoi—should be sown 30 to 40 days before the first frost (roughly October 15 in Chicago-area suburbs and a bit later downtown).
  • Plant cool-season herbs like parsley (flat or curly), chervil, cilantro, and edible flowers such as calendula and nasturtium.
  • Get edible bulbs—such as garlic bulbs, shallot, and onion sets (small onions for planting)—into the ground by Halloween; they’ll be ready for harvest in July.
  • Harvest hardy vegetables after the first frost, when they become sweeter—kale, brussels sprouts (remove the tops of the plants in early September), cabbage, broccoli, collard greens, and cauliflower.
  • Harvest warm-season vegetables, including winter squash and pumpkins, before the first frost. Don’t let the first frost touch your peppers and tomatoes; if they’re still green, they’ll ripen a bit indoors.
  • Think about ways to extend the growing season—with row covers, garden blankets over raised beds, cold frames, etc.

For more ideas or inspiration, drop by the Fruit & Vegetable Garden (in October, come see the giant pumpkins on display). Did I mention that fall is a good time to plant fruit trees for spring blooms and fruit? Plant the trees in cooler weather, under less stress—and they’ll be ready to soar in the spring.

For more seasonal gardening tips, tune into my weekly Saturday morning audio podcast on news radio WBBM. Get past tips online at chicago.cbslocal.com/audio/gardening-tips.


©2014 Chicago Botanic Garden and my.chicagobotanic.org

September Shorties

Fall bloomers are already stealing the show and, while they are colorful, it is largely due to their size.

By the time many of these perennials bloom, they are so tall that they often need to be staked. Not to mention, some end up having unsightly “legs” from shedding lower leaves. Ironweed, monkshood, and sneezeweed are all guilty of this unsightly phenomenon. Fortunately, there is a compact substitute for each of these bulky favorites. So, if you want to give your yard more color in autumn but don’t want it confined to the back of the border, try planting these “shorties” up front.

PHOTO: Rudbeckia subtomentosa 'Little Henry'
Rudbeckia subtomentosa ‘Little Henry’

Little Henry sweet coneflower
Rudbeckia subtomentosa ‘Little Henry’

Zones: 4 to 9
Size: 3 feet tall and 24 inches wide
Conditions: Full sun to partial shade; moist, well-drained soil

Little Henry sweet coneflower (Rudbeckia subtomentosa ‘Little Henry’)  is the petite progeny of Rudbeckia subtomentosa ‘Henry Eilers’. While 3 feet isn’t necessarily short for a perennial, it is definitely an improvement over its 5- to 6-foot-tall daddy. And like Henry Eilers sweet coneflower, each petal is rolled to create a quilled appearance around an obvious chocolate cone. Flowering can begin well before September, but the unique shape and yellow hue really stand out in the fall landscape. (The leaves are said to smell of vanilla, but if you’re like me, ragweed season will make it difficult to notice.) Don’t be afraid to stick these beauties in a vase.

PHOTO: Helenium autumnale 'Short and Sassy'
Helenium autumnale ‘Short and Sassy’

Short and Sassy sneezeweed
Helenium autumnale ‘Short and Sassy’

Zones: 3 to 8
Size: 18 inches tall and 2 feet wide
Conditions: Full sun; moist to wet soil

With Short and Sassy sneezeweed (Helenium autumnale ‘Short and Sassy’), the cultivar name says it all: the plant is 2 feet tall with an assertive orange-yellow color. In the past, all sneezeweeds grew 5 feet tall and would push out flowers from the beginning of August until October. ‘Short and Sassy’, however, has a much longer bloom time. Since it doesn’t have to grow as big, this cultivar begins flowering in midsummer and doesn’t quit until it has fought its way through multiple frosts. Heleniums are plants perfect for rain gardens or any moist, sunny spot. Butterflies find them irresistible, too.

PHOTO: Aconitum fischeri
Aconitum fischeri

Fischer’s monkshood
Aconitum fischeri

Zones: 4 to 8
Size: 2 feet tall and 18 inches wide
Conditions: Full sun to partial shade; moist, rich, well-drained soil

Under favorable conditions, an autumn-flowering monkshood can reach 4 to 5 feet tall—not exactly a plant you can showcase next to a path. Nevertheless, Fischer’s monkshood (Aconitum fischeri) is a lesser-known species that is beginning to find its way into the market. The 2-foot-tall plants sport the same size flowers as the commonly seen Aconitum carmichaelii and its hybrids. The showy blue flowers are perfect for adding fall color to a woodland garden, but are just as nice in a sunny border. Monkshoods are poisonous, so hide the children!

PHOTO: Vernonia lettermanii 'Iron Butterfly'
Vernonia lettermanii ‘Iron Butterfly’

Iron Butterfly Ironweed
Vernonia lettermanii ‘Iron Butterfly’

Zones: 4 to 9
Size: 3 feet tall and 3 feet wide
Conditions: Full sun; well-drained soil

The reddish-purple color found in ironweed flowers is one of kind. The problem with these natives is that most of them get gigantic, usually around 8 feet tall. Fortunately, you can enjoy that stunning hue on a much more compact plant. Vernonia lettermanii is a 2- to 3-foot-tall species that naturally occurs in Oklahoma and Arkansas. Allan Armitage, Ph.D., selected the best form of this species from his trials and called it ‘Iron Butterfly’. The foliage and form are similar to Amsonia hubrichtii, but without the fall color. This shorty is tolerant of droughty soils or brief flooding, but it requires lots of sun. It’s also a butterfly magnet!

PHOTO: Anemone x hybrida 'Pretty Lady Susan'
Anemone × hybrida ‘Pretty Lady Susan’

Pretty Lady Susan windflower
Anemone × hybrida ‘Pretty Lady Susan’

Zones: 4 to 8
Size: 16 inches tall and 2 feet wide
Conditions: Full sun to partial shade; moist, rich, well-drained soil

While I would rather see pink in the spring, I do love the poppylike feel of windflowers. They are also known as Japanese anemones and are sometimes listed under the name Anemone hupehensis. The Pretty Lady Series features crosses that stay 16 inches tall, as opposed to unwieldy 3- to 4-foot-high plants. They also have the same 2-inch flowers you would find on other Japanese anemone hybrids. Pictured here is a dark pink variety called Pretty Lady Susan windflower (Anemone x hybrida ‘Pretty Lady Susan’, but the series also includes a double-flowered, a bicolored, and a white-blooming form. Of course, I can’t wait to get my hands on Pretty Lady Maria windflower—the non-pink one.


©2014 Chicago Botanic Garden and my.chicagobotanic.org

Chrysanthemums

You’re in a small suburban downtown in early autumn. The sun hangs low in the twilight sky. The crisp, cold air carries the rich perfume of straw, touched with pumpkin spice and apples.You pull your arms close to your body and cradle a warm drink between your hands. Polyester witches hover over pumpkin-laden lamp posts. Planters overflow with chrysanthemums in assorted colors of bronze, gold, white, and red. 

Chrysanthemums, also called “mums” or “chrysanths” have always felt to me like old American flowers. This was the kind of plant that grandmothers flocked to the nursery for, just before the leaves began to turn, as if there were some prehistoric trigger deep in the mind. As traditionally American as they may seem, the chrysanthemum is actually a Chinese immigrant.

PHOTO: A mum cultivar.
Modern varieties of mums are much improved, but some of the original Chinese versions could have had flowers like these.

Cultivated as an herb in China for more than 3,500 years, the chrysanthemum represents nobility and is considered one of the four gentlemen: the pure and defiant recluse that represents fall. For a long time, the flowers were only permitted to be grown by nobility, later becoming the badge for the old Chinese army.

Chrysanthemum seeds passed through Korea and arrived in Japan sometime around the fourth century. In 910 C.E., Japan held its first Imperial Chrysanthemum Show and soon after, this became the national flower and the imperial seal of Japan, or “mon” of the imperial family. At the Festival of Happiness and Nihonmatsu Chrysanthemum Dolls Exhibition celebrations in Japan, plants are sculpted to cascade, form trees, and even form outfits for life-sized dolls.

PHOTO: Life-size manikins dressing in traditional clothing made of chrysanthemums sit in temple.
The Nihonmatsu Chrysanthemum Dolls Exhibition is truly astonishing. By User:Harisenbon (Own work) [Public domain], via Wikimedia Commons

In 1688, chrysanthemums crept into Europe. The reception was not warm. It wasn’t until 1843 when Robert Fortune, funded by the Royal Horticultural Society, set out in search of hardy chrysanthemums from China. Within a few years, the plant experienced a popularity boom, especially in France. In contemporary Europe, countries such as France, Poland, and Spain regard certain types of chrysanthemum as a symbol of death and mourning. It is a cultural taboo in some of these areas to provide them as a gift.

Though chrysanthemums arrived in the United States more than 100 years after their arrival in Europe, their popularity exploded at about the same time. In 1900, the Chrysanthemum Society of America formed and the first exhibition appeared at the Art Institute of Chicago in November of 1902. It has since become a fall classic in America.

Classification and Breeding

The very first mums to be classified were yellow to gold in color (the name comes from the greek words “khrusos” for gold and “anthemon” for flower). Thirteen classes of chrysanthemum in nearly every color (except blue and black) make up the thousands of chrysanthemums that have been bred over the years. Chrysanthemums are classified as irregular incurve, reflex, regular incurve, decorative, intermediate incurve, pompon, single and semi-double, anemone, spoon, quill, spider, brush or thistle, and unclassified or exotic. For a full list with descriptions and pictures, visit www.mums.org/chrysanthemum-classes/.

PHOTO: Chrysanthemum 'Wisp of Pink'.
Chrysanthemum ‘Wisp of Pink’ is a stunning brush mum. Photo by Tom Weaver.

Chrysanthemums at the Chicago Botanic Garden

As gardeners know, the emergence of flower buds is an exciting event. At the Garden, we drum up the same excitement by using dark cloth to omit light and simulate short day conditions, which triggers the flowering of chrysanthemums. If the summer is typical and you time it right, you will have flowers right when you want them. With an atypically cool summer this year, they received just the encouragement they needed to flower early. That means that if you’ve been to the Garden in the past few days you’ve likely seen the more than 1,600 mums that we planted in the Crescent and the cascading mums descending from the hayracks over the visitor center bridge!

This year, our wonderful production staff grew 50 cultivars of mums, starting in February, to produce more than 12,000 mums for fall displays! Tim Pollak, outdoor floriculturist, oversees the growing, training, and care of the mums from February until they enter the gardens in September.

Did you ever wonder how we get our mums to look the way they do? Good watering practices, fertilizer, disease management, pinching and…nuts?

PHOTO: Hex nuts dangle from wires fastened to mum branches.
Hex nuts hang off chrysanthemum branches like ornaments on a Christmas tree.

PHOTO: Garden mums in bloom.
This year there are four different mums planted in The Crescent.

To train our cascading mums, we attach hex nuts that act as weights to hold down the stems as they grow and harden. This is done weekly by two staff members from February until late August, amounting to more than 400 person-hours from this activity alone! 

The mum ball containers you’ll find in the Crescent are the result of the four other techniques used to make our mums look good. Each container contains 18 to 60 plants that are pinched twice a year to obtain those enormous colorful balls!

When you visit, make sure to visit the Elizabeth Hubert Malott Japanese Garden to see the cascading mums, a tradition that has endured for more than twenty-five years!

Also, keep an eye out for mums in the Circle, Sensory, and English Walled Gardens, as well as a new fall feature in the Heritage Garden.

Grow Your Own

Fall planted mums rarely survive winter because their root systems aren’t well developed. Start with healthy, hardy mums in spring, after danger of frost has passed. Plant them somewhere that they’ll get at least three hours of sun. If you want bushier mums, pinch once in early June and later in mid-July. The later you pinch mums, the later they flower, so if you have a cool summer and want later mums, give an extra pinch in the beginning to middle of August. If you wish to fertilize, one to three times throughout the season will be enough for most mums. As for which mum to plant? Tim Pollak suggests the Igloo series.


©2014 Chicago Botanic Garden and my.chicagobotanic.org