The Power of Plants: Botanical Weightlifters

There are things I look forward to seeing every season.

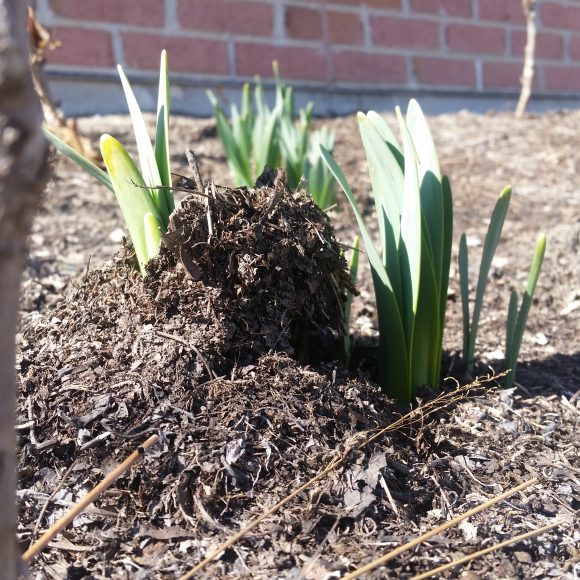
In spring, I watch for “mighty plants” that emerge from the ground with enough force to heave the soil above ground. These botanical weightlifters—the bulbs, grasses, and other emergent plants—pushing up soil that was compressed by a blanket of snow never fail to impress me. I am in awe of the strength of plants. 

PHOTO: Daffodil leaves have pushed through the mulch, lifting it off the ground.
Daffodil leaves erupted from the ground in March and lifted the mulch in the beds around the Regenstein Learning Campus.

Seeing bulbs coming up all around me inspires lots of questions. I want to understand how this is possible and I want to test their strength. So I spent a few weeks playing around with this phenomenon in the Learning Center’s Boeing Nature Laboratory. 

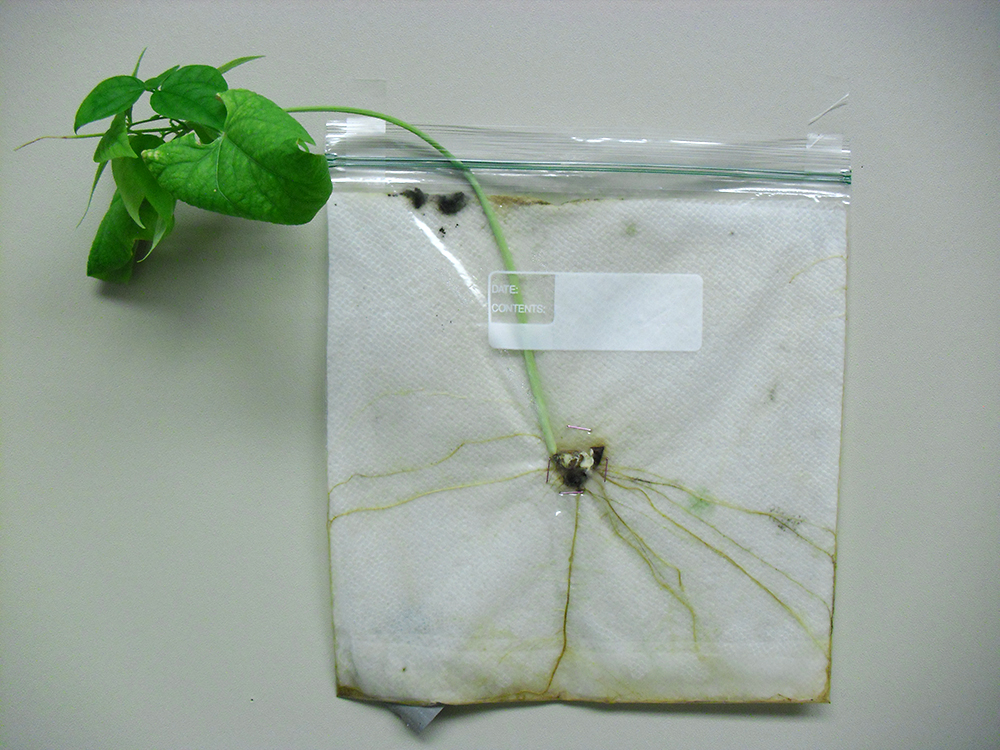
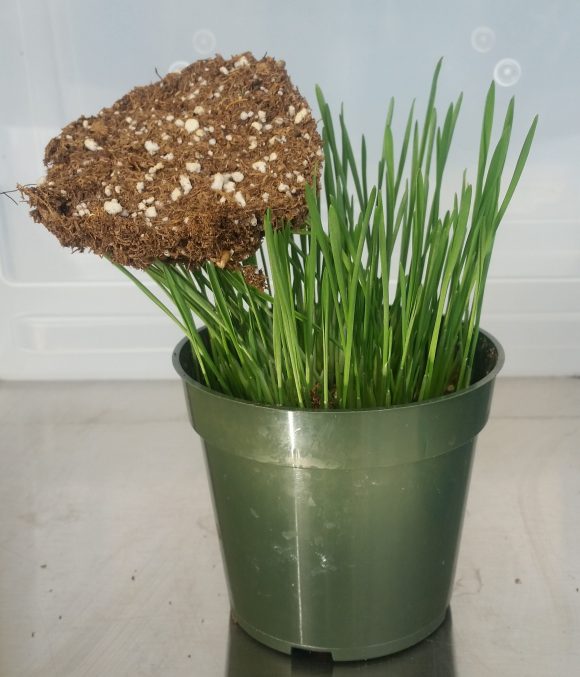
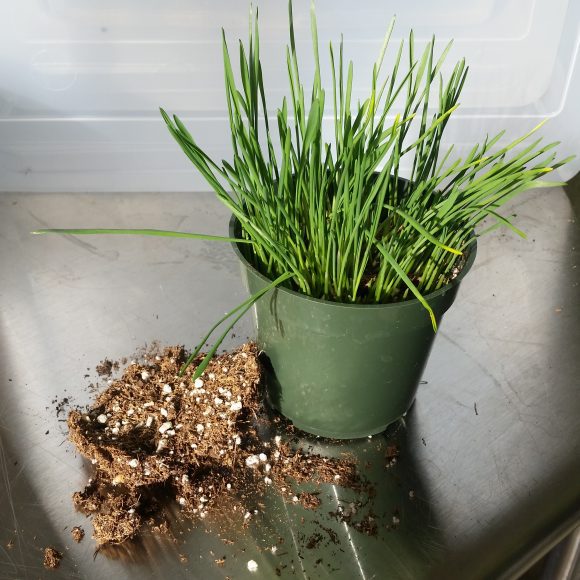
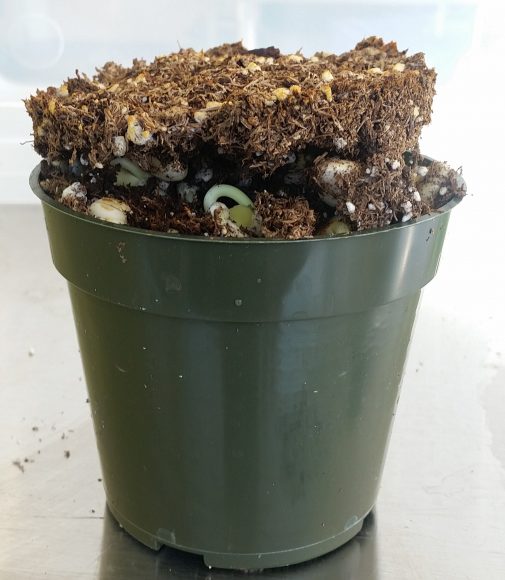
To begin, I wanted to demonstrate that seeds will lift soil in a pot. I soaked bunch of wheat seeds overnight and planted them in a pot. I covered them with a generous amount of potting soil (about a 1/2-inch layer) and I tamped the soil down gently so that it would be compressed—like the topsoil might be after a winter of snow cover. Three days later, I had results! I sprayed the soil disk to give it a little adhesion, so I could see how long it would hold together as the grass lifted it up.

PHOTO: A few days after planting the soaked wheat seeds, they are already sprouting and pushing up the soil.
Day 3 after planting the seeds: They are pushing up the compressed layer of soil.
PHOTO: The wheat leaves have grown to an inch over the pot and are holding up a disk of soil.
Day 4: The leaves have pushed the soil up a little more.
PHOTO: The wheat is 2-3 inches above the pot and still suspending the disk of soil.
Day 5: The soil is light and there are a lot of wheat plants, so they continue to lift the soil.
PHOTO: The grass is now 4-5 inches tall and the disk of soil is on top, but leaning to the side, about to fall off.
Day 6: “Get off me, Soil! – Umph!”
PHOTO: The disk of soil that was lifted by the grass has fallen to the side of the pot.
Day 7: Phew!

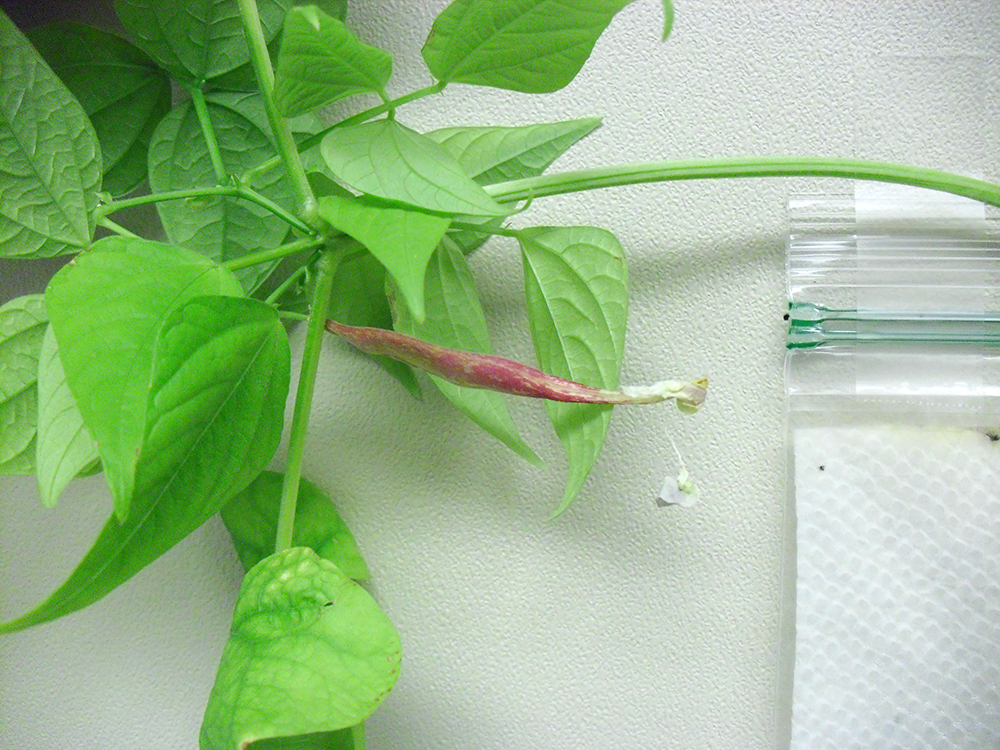
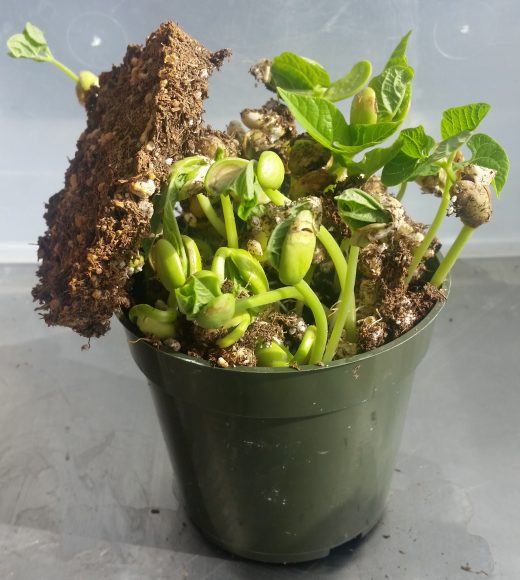
That was so much fun, I tried the same thing with a bunch of bean seeds.

PHOTO: the top of the soil is rising about a half inch out of the pot.
Bean sprouts pushing…
PHOTO: the sprouting beans can be seen pushing up the top of the soil, now 1-2 inches over the top of the pot.
…pushing…
PHOTO: a dozen bean plants are growing out of the pot and pushing the top soil disk to the side.
…and bursting from inside the pot.

This demonstration was pretty easy and impressive. It is a simple activity to illustrate how plants and other living things change their environment to suit their needs (which is a disciplinary core idea in Next Generation Science Standards for kindergarten). I recommend doing it in the classroom or at home, just for fun.

This is just the beginning. I will be sharing the results in a future blog post. But before I do, I would like to make a few points about the nature of science and how scientists work. 

  1. Science is a collection of established facts and ideas about the world, gathered over hundreds of years. It is also the process by which these facts are learned. Science is both “knowing” and “doing.”
  2. Discoveries start when you watch nature and ask questions, as I did in watching spring bulbs come up. Before beginning an experiment, scientists play. They mess around with materials and concoct crazy ideas. They are constantly asking, “I wonder what will happen if I do ___ ?” That is when discoveries actually happen.
  3. Scientists do formal experiments with purpose, hypothesis, procedures, results, and conclusions after they think they have made a discovery. They use the experiment to test their discovery and provide convincing evidence to support it. In some cases, the experiment disproves a fact or idea, which is a different kind of new understanding about the world. 

I have to agree with Boyce Tankersley, the Garden’s director of Living Plant Documentation, who recently wrote “The SciFi Rant.” Those of us who lean toward botany instead of horticulture are more interested in growing plants to yield ideas rather than meals. In my continuing investigation, I have two goals, and neither is to produce anything to eat.

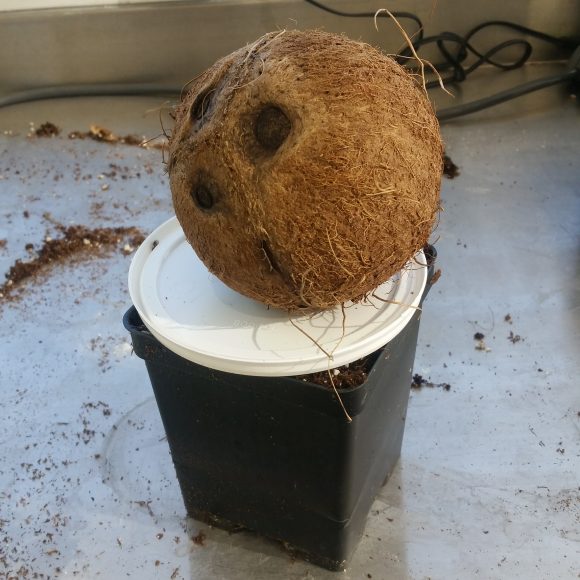
First, I want to determine the strength of sprouting seeds and see how far I can push them. For example, how many bean sprouts will it take to lift a coconut? I want to find a standard way to measure seed strength.

Second, I want to establish a reliable method for experimenting with seed strength so teachers and students can replicate the procedure, modify it as needed, and use it for their own investigations without going through the awkward phase of figuring out the best way to do this.

PHOTO: a 6 inch square pot is topped with a round plastic lid and a coconut.
Will the mighty beans sprouting under this menacing coconut have the power to lift it off the top edge of a pot? Stay tuned…

I invite you on my journey.
(To be continued.)


©2018 Chicago Botanic Garden and my.chicagobotanic.org

DIY Living Plant Wall

This year, the Living Wall in the Grunsfeld Children’s Growing Garden needed to be replanted. The metal cells that hold the plants to the wall were removed and taken to the Garden’s greenhouse nursery to grow new plants before placement outside for the summer.

This left us with four empty walls at the entrance to the Growing Garden. So we decided to get creative. We made an “alternative” living wall. 

PHOTO: sixteen cone-shaped pockets containing small plants are displayed on the brown walls.
The south-facing wall is now covered with burlap pocket planters containing alyssum, lettuce seedings, grass, and coriander.

Our carpenters covered foam boards with brown burlap and installed these panels on the living wall frame where the plant cells had been removed. Students from the Garden’s Nature Preschool planted seeds and transplanted seedlings into small pots. We placed the plants into colored burlap planters and pinned them to the foam walls, and voila! We have a vertical garden again.

You can do this at home. Making planting pockets is simple and fun.

  1. Plant seeds or transplant small plants and let them sprout. We used biodegradable Fertilpots, but you could also start seeds in egg cartons, newspaper pots, or plastic pots.

2. Cut the burlap into squares that are twice as long and wide as the pots.

PHOTO: The picture shows the size of the burlap square next to the pot that was used.
Our Fertilpots were 4″ tall, so I cut the fabric roughly into 8″-x-8″ squares. This does not need to be exact.

3. Fold the square in half diagonally and sew a seam along the side. You can use a heavy duty needle with a sewing machine or do this by hand with a darning needle. It might be possible to use a hot glue gun to make the seam, but I did not try this.

PHOTO: This shows what the burlap looks like after it is sewed in half.
I used a sewing machine because I made more than 100 of these. They could be sewn by hand.

4. Turn the triangle inside out to form the pocket. Slip the planted pot into the pocket and get ready to hang it on a wall.

PHOTO: This shows the pocket with a pot inside.
The seam side of the pocket is the back, and the pointed front top can either be folded down or cut off.

5. To hang on the wall, pinch the extra fabric so the burlap fits snugly around the pot. Fold down the point in front or cut it off—your choice. Push a long pin through the pot and the fabric and pin the pocket to the wall. (I had pins used by our horticulturists to propagate cuttings; you could use T-pins or other pins with large heads.) You could also lace a ribbon around the top of the pocket and cinch the fabric, then hang the planter by the ribbon.

PHOTO: The picture shows a hand holding the fabric to make the pocket fit around the pot.
Gathering the extra fabric will help hold the pot better, and it will look neater on the wall.

Students in our Nature Preschool enjoyed helping to grow the plants and pin them to the Living Wall. Each child wanted to place his or her planter next to a friend’s planter so they could grow close together.

wall KJ with girl

Just for fun, we experimented with some other kinds of planters, including plastic bottles and shoes.

PHOTO: a 2 liter plastic bottle turned sideways and filled with soil and oregano plants is pinned to the wall.
If you want to try growing a plant in a 2-liter bottle, cut a rectangular opening in the side of the bottle, poke six to eight holes on the opposite side for drainage, fill with soil, plant, and hang it up.

The preschoolers are fascinated by the soda bottle planter. They like to look in the round opening on the side. The toddler shoe makes everyone smile. We may add more surprising planters over the next few weeks, just to keep it interesting.

PHOTO: a toddler shoe with alyssum growing in it is laced with twine and hanging on the wall,
An old shoe can become a whimsical planter that sparks imagination.

If you decide to try something like this at home, be advised that the small pots need to be watered frequently (ours need watering daily) because they tend to dry out faster than larger containers. It’s a good project for young children because they will get to do a lot of watering without harming the plants.

Our “alternative living wall” is only temporary. Stop by the Grunsfeld Children’s Growing Garden between now and June 12 to see how it’s growing. After that, the real living wall will be installed for the rest of the year.


©2017 Chicago Botanic Garden and my.chicagobotanic.org

Meet Naranjilla

We get a lot of questions about one particular plant in the Grunsfeld Children’s Growing Garden: Naranjilla (pronounced nahr-ahn-HEE-yah). It’s easy to see why.

PHOTO: The naranjilla plant has thick green leaves that are about 10-12 inches long, 8-10 inches wide, with deeply serrated edges. Leaves have dark purple hairs on the veins and petioles.
You can find this naranjilla (Solanum quitoense) in Bed #10 in the Growing Garden.

This attractive plant has large, thick, green leaves, is about 10–12 inches long and 8–10 inches wide, with deeply serrated edges, and is completely covered in tiny, purple hairs (which are not really hairs—in the botanical world they are called “tricomes”). It is native to Ecuador and other South American countries.

There is more to notice about this intriguing plant than its gorgeous coloring, interesting texture, and striking presence. First, the naranjillas in this small garden bed, number 10, were put there for a reason. All but one of the plants in this bed are in the nightshade family, Solanaceae. This family includes tomato, eggplant, potato, and petunia. Naranjilla is cousin to these more familiar plants.

CIMG0876
Upon closer inspection, it’s easy to see how these plants are related.

When you’re in the garden, take a look at the flowers on these plants. You will see the similarities that characterize plants in the nightshade family. Notice that they all have five petals that are fused so that they look like a funnel with five lobes. You’ll easily be able to pick out the one plant that does not belong in the family.

PHOTO: close-up of a bright pink petunia.
See how this ‘Pink Dreams Fuseable’ petunia (Petunia x hybrida ‘Pink Dreams Fuseable’) has five petals fused together, so it is like one continuous petal? You’ll find the same bloom design on tomato and other nightshade flowers.

The naranjilla won’t bloom until much later in the summer, and when it does you’ll recognize the similar flower shape. Naranjilla means “little orange” in Spanish, because the fruits are small, yellow, and spherical like little oranges. Unfortunately, our growing season in Chicago is not long enough for naranjilla plants to produce the sweet fruits, which are juiced for beverages in Ecuador.

Another interesting thing about the naranjilla—a detail that separates it from other members of the family—is that the leaves look soft and fuzzy, but they can grow sharp thorns along the veins. As you might expect, the thorns discourage large animals from eating the leaves. They are not as sharp and menacing as rose thorns, but you wouldn’t want to stroke a naranjilla leaf that bears thorns.

PHOTO: this close up of a naranjillo leaf shows sharp thorns sticking up from the veins of the leaf.
This naranjilla leaf, which is growing in a container on the Learning Center deck, is covered in thorns. There are no thorns on the plants in the Growing Garden. (The white things on this leaf are stamens fallen from the nearby “bunny tail” grass.)

Stop by the Growing Garden at the Learning Campus from noon to 4 p.m. Monday through Friday, and 10 a.m. to 4 p.m. on weekends this summer to see our naranjilla plants and enjoy free family drop-in activities.

Please note: the Growing Garden is closed on weekday mornings while Camp CBG is in session.


©2013 Chicago Botanic Garden and my.chicagobotanic.org

Growing a Bean in a Bag

Garden blog followers may remember that in “How to Train Your Plant” I demonstrated a way to grow a bean seed in a plastic bag to test geotropism. I started working on that project around Thanksgiving week last year. At that time, I started a few bean bags just to see what would happen. I kept one seed growing in the bag all winter, adding water as needed.

PHOTO: A ziptop bag was used as a container to grow a bean plant. Roots, stem, leaves, and the remains of the original seed are visible.
The bean plant grew for five months, leaning toward the window in my office.

The plant produced a white flower about a month ago. I should have taken a picture. Now this week I discovered a seedpod growing where the flower had been! In the picture, you can see the wilted flower petals still hanging from the tip of the reddish colored pod. Botanically speaking, this is the fruit of the plant, even though you might not think of beans as fruit in your diet.

PHOTO: a red bean pod, about 2 and a half inches long is attached to the stem of the plant.
The red fruit was hidden under the leaves.

So if you try this activity, and you stick with it for six months, you, too, may be rewarded with a little treasure!


©2013 Chicago Botanic Garden and my.chicagobotanic.org

Toad Serenade at the Cove

Have you heard the sounds coming from nearby lakes, ponds, and puddles this month? The American toads are singing!

PHOTO: female toad looking directly at the camera
This female American toad may be listening for the enchanting song from a handsome male toad.

Every spring, the toads emerge from hibernation in wooded areas and hop to the nearest standing water to breed. The sound you hear comes from the males, who are singing to attract a mate. You’ll hear the sound of hundreds of toads at the Kleinman Family Cove for the next week or so, maybe longer.

The toads will pair up and lay a string of eggs in shallow water where it is warmest and rich in food for their offspring. After laying eggs, the adults will return to the woods or shady gardens to look for food, leaving their babies to fend for themselves.

PHOTO: the toad pair are together in the water with a string of black eggs she has laid around the algae.
The black lines of dots in the water are strings of eggs that were laid by the toad on the right.

The black embryo inside each egg will grow into tiny tadpoles and hatch in about a week. They will grow and develop into half-inch toadlets over the next few weeks. Then they will leave the water and join their parents in the shady gardens and woods. With any luck, some of them will survive the next two years, developing to full maturity, and return to the Cove to breed.

This is the only time of year to hear the toads singing, so visit the Cove this month. If you visit over the next four weeks, maybe you’ll see some little black tadpoles swimming in the water.

Please resist the urge to collect them to take home. You won’t be able to provide enough of the right kind of food for a growing tadpole or toadlet, and they will die. Watch them grow up successfully in their natural habitat at the Cove throughout the month of May and early June instead!


©2013 Chicago Botanic Garden and my.chicagobotanic.org